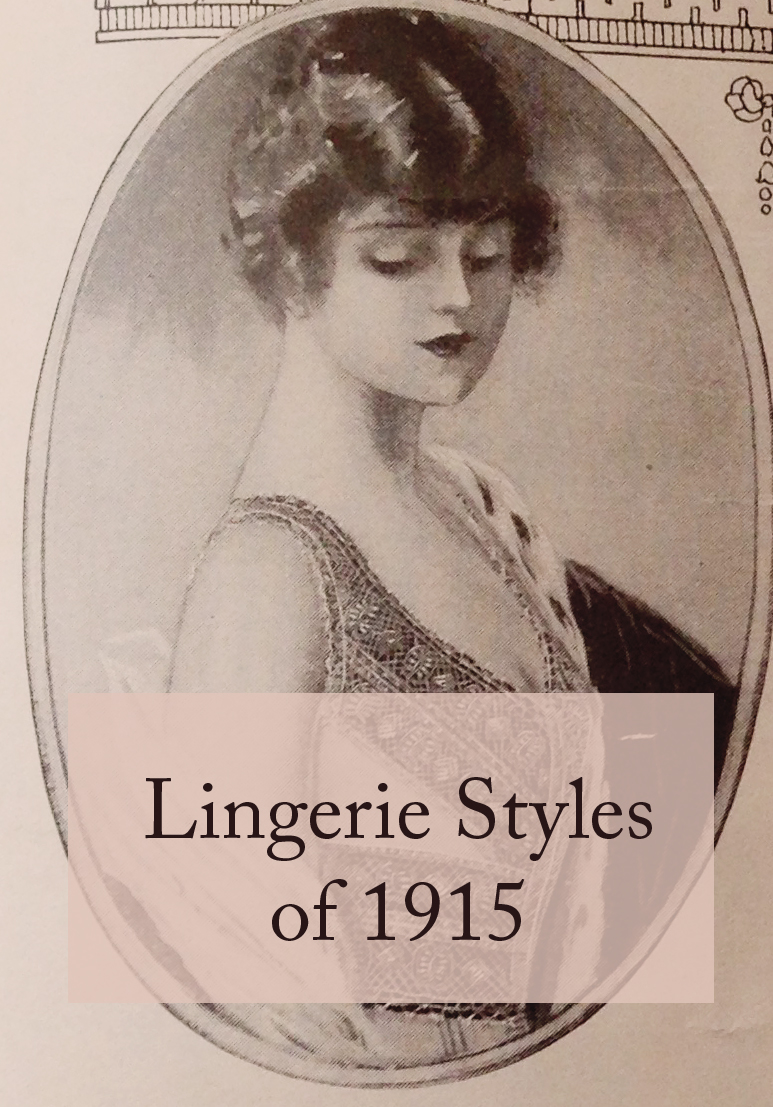
Lingerie is always one of my favorite parts of pattern catalogs. The Butterick 1915 pattern catalog I recently let go from my collection had some great examples of the lingerie styles of the era, which included chemises, corset covers, brassieres, drawers, slips, and combinations.
The Brassiere of 1915
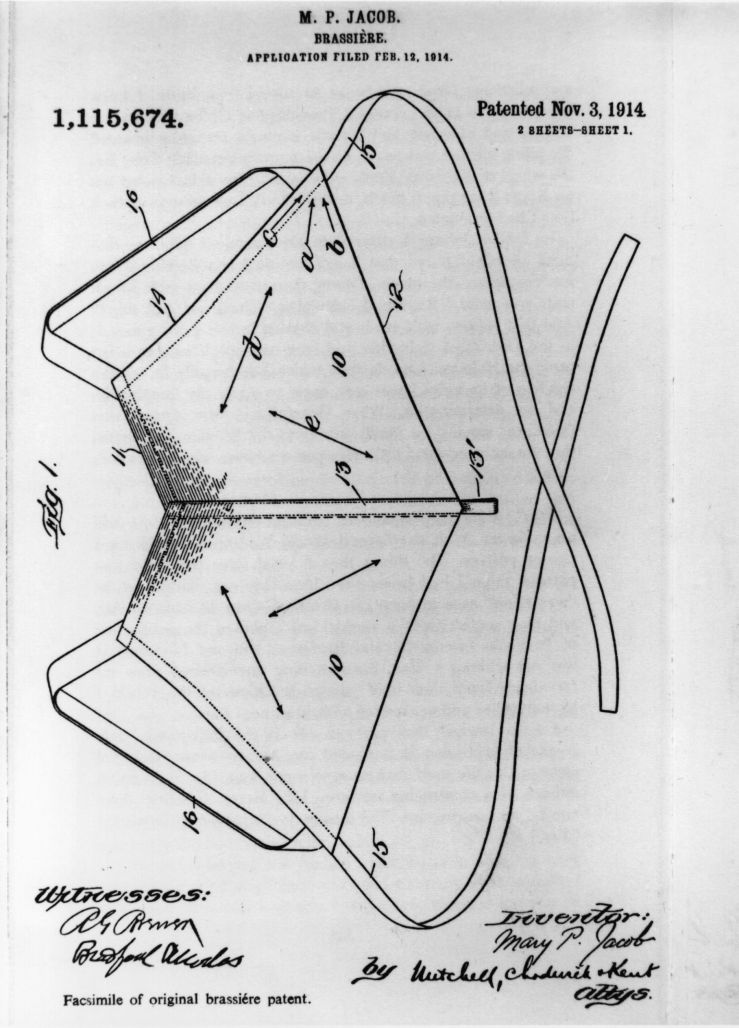
This catalog was of particular interest, though, for the brassieres. Every now and then there seems to be a mainstream cultural piece gushing about the 1914 invention of the “brassiere” and the supposed liberation from the oppression of corsets it provided, etc. This narrative defines brassiere in an extremely narrow way, ignoring breast bands that go back to Greece and are depicted in 4th century mosaics, medieval finds from Lengburg Castle dating to the 15th century that resemble modern lingerie design, and the many kinds of bust support patented during the 19th century. The Mary Phelps Jacob patent of 1914 is more of a backless bralette, which is a unique design, but far from the first bra available. (To me, it’s another example of the way that we view our historical predecessors as dramatically different from us or somehow more ignorant, confined by uncomfortable corsetry because propriety demanded it, conveniently ignoring our own modern excesses such as plastic surgery.) As long as women have had fabric, I suspect there have been ways we’ve used it to provide breast support while working or engaging in sports.
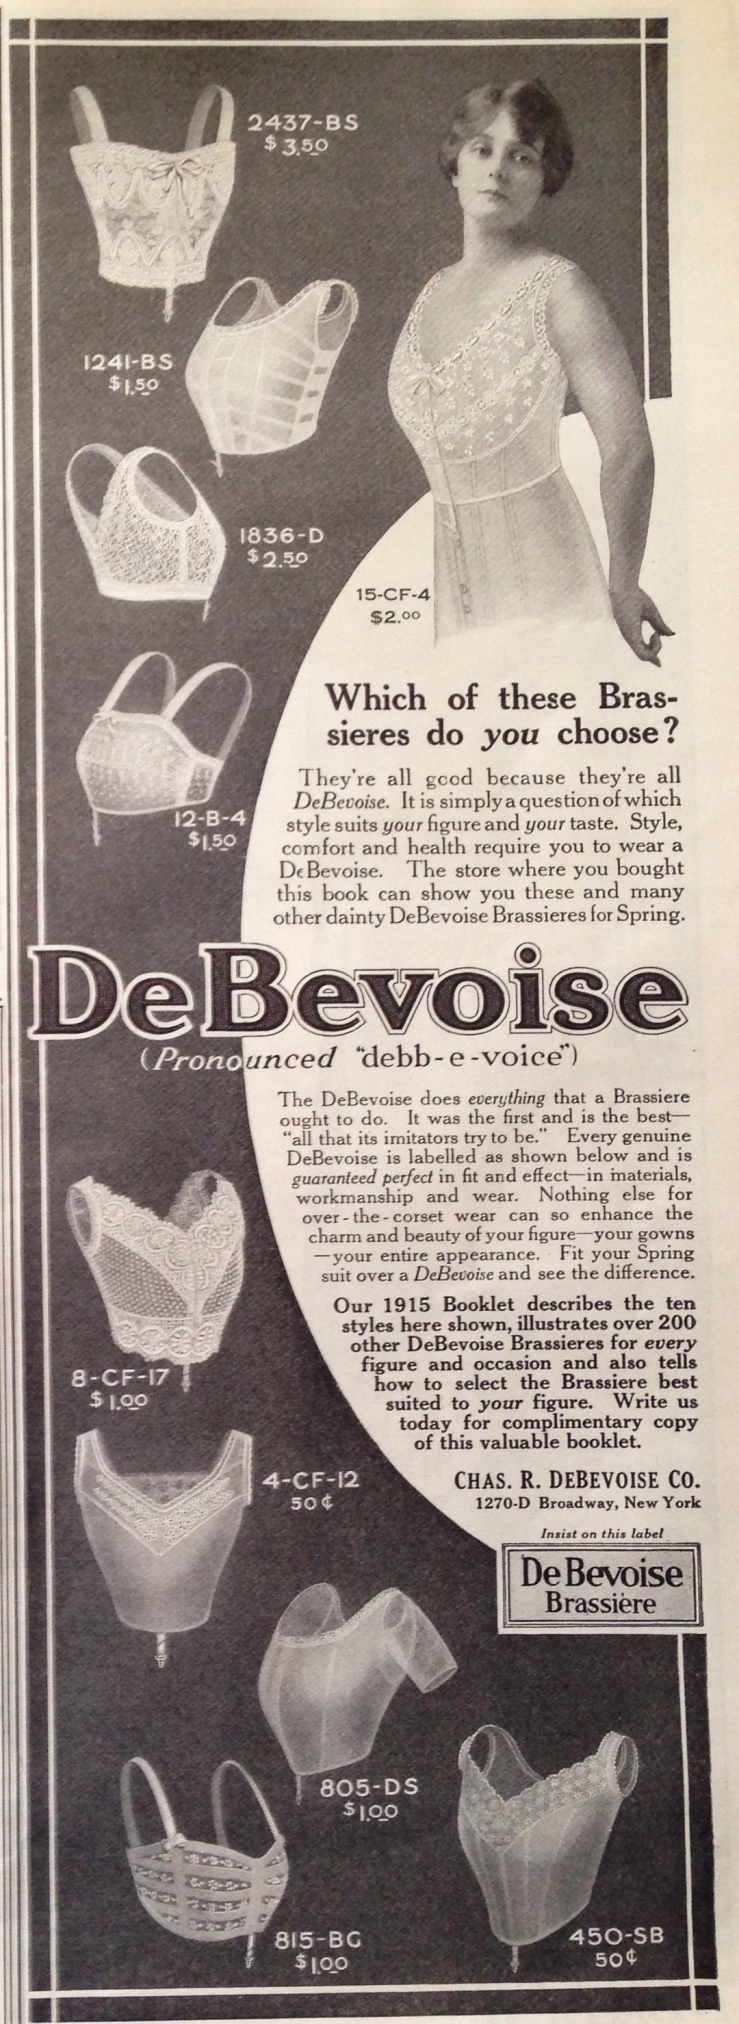
In the 1915 Butterick catalog, there are many examples of brassieres and bust support in the form of fitted corset covers. (This contradicts the “the brassiere was invented in 1914” narrative as well, since if it had just been invented a few months before, DeBevoise probably wouldn’t have been mass producing the “brassiere” in the spring of 1915.) There is an ad for DeBevoise brassieres that have the monobosom shape of the 1915 silhouette. These would have been made of mostly nonstretch fabric, and patterns for them have always seemed very plain and utilitarian to me, but I think I may have underestimated the possibilities there. Some of the lace and sheer versions are very pretty, and I’m curious enough about what kind of support they could provide that I might have to give making one of these a try.
There were patterns available from Butterick for similar styles:
The 1915 Corset Silhouette
The brassiere seemed to be gaining momentum as the corset shifted lower to give the straight, thin hipped look that was fashionable then. The brassiere or fitted corset cover would support the bust while the corset gave shaping to the lower torso. There’s a great ad for corsets in the catalog that illustrates the corset style in 1915:
I’ve seen discussions of corsetry that describe this garment as oppressive and claiming that this kind of corset made sitting difficult, but it’s clear from surviving garments from the period and patterns for this type of corset that the boning didn’t extend all the way to the bottom of this type of corset. The boning in most examples I’ve seen stops at the high hip, as a typical higher corset’s bones would. This kind of corset often included elastic panels at the hip, too. I doubt moving or sitting in it would be much different than trying to move or sit in a contemporary girdle or Spanx type control garment.
The Corset Covers, Slips and Chemises of 1915
The corset cover is a type of delicate undershirt that if made to fit closely would have provided bust support, but looser styles could be worn with other foundation pieces like corsets or boned brassieres to smooth the silhouette, too. Corset covers typically ended at the waistline or high hip while chemises usually were full body length.
There are several styles for these kinds of garments in the Butterick catalog:
Drawers of 1915
Panties or knickers as we currently know them don’t seem to have really been a thing yet as of 1915. The lower body styles featured in this pattern catalog are drawers, and they are for *open* drawers, so they were definitely still being worn in this era. For the most part they seem to still be being worn down to the knee as well.
Combination Undergarments
Judging from the amount of patterns offered for combination undergarments, they seem to have been extremely popular in this era. There are also several envelope chemises, which is the closest thing to the closed crotch kind of undergarment we’re used to today:
The combination combined the corset cover or chemise with open drawers:
This simple garment could be somewhat fitted or looser fit, simple and utilitarian or embellished with embroidery and lace, gathered at the neckline or suspended from shoulder straps, gathered and trimmed at the leg or loose.
I think I need to give these a try, too. In a suitable fabric and with a close fit, these would be basically the same thing as a summery jumpsuit, and they’d have a bit of vintage elegance to them. Maybe when I’m not sleep deprived I’ll give them a go. 🙂
I’ll end this screed with just some advertising gorgeousness for its own sake from another brassiere ad. The illustrations of the time are so beautiful.
Happy Sunday! Have you ever worn or sewn undergarments in the style of this era? I’d love to hear your opinions / experiences / general thoughts on vintage styles being done with contemporary styling.
I’m excited to say I finally had my baby girl, a little more than three weeks ago now. Requisite retelling of the birth (feel free to skip): I spent a lot of time worried about preeclampsia and platelet counts, but that ended up being for nothing as that wasn’t a problem, though labor ended up being awful for other reasons (infection after my water broke, low blood pressure, fever, crappy anatomy) and I ended up having a c-section after 24 hours of labor because my poor baby wasn’t tolerating it and after five hours of pushing and a room full of nurses cheerleading at your junk, well, a c-section starts sounding pretty good. Poor kiddo had some scary complications after the stressful birth and ended up in the NICU for about five days, and I couldn’t even touch her for about two days, so that was an emotional nightmare, but I’m happy to say everything resolved and we’re all home now and healthy and happy(ish – let’s be real, I have some emotional wobbliness while pregnant / after birth that check a lot of antenatal/postpartum depression boxes, but luckily I am able to caretake and enjoy the moments with my kids despite it). Sleep deprived, of course, but content. The whole experience was identity-jarring, which has left me with an even more intense minimalism/decluttering urge for convoluted psychological reasons better left explored over coffee with a sister or bff, but eh. Despite my aspirations and birth plans and idealism and well-intentioned attempt at unmedicated labor (HAAAAAHHAHAHA. NOPE), birth is intense and sometimes horrible and sort of existentially traumatizing, at least for me, but I seem to have bad luck in that department. She’s wonderful, and worth it all, and her brother, too, who has been amazing adapting to everything, too. I’m so blessed in that.
Funny, though, that most of the women I know told me that you’ll know labor is imminent when you get a burst of energy and want to clean the house. That sensation is utterly unknown to me. I did get zoned in on working on a pattern for about 12 hours straight, though, which I’m still grading and testing, but hope to release very soon. The world is full of good bra patterns, especially in the boom of interest over the last 3 or so years, but it makes me feel better to work on something I enjoy and I feel much less isolated when I engage with the world via a craft I care immensely about. It’s helping me to really systematize my understanding of stretch reductions, cup sizing, grading different bra parts, and using Illustrator, so that feels like an accomplishment. Once I’m satisfied with the nuts and bolts of this one, I have quite a few ideas for less common, more vintage inspired pattern styles in the future. It’s a simple demi style bralette with slightly angled seam lines and an angled center front band, which works well with the lines of rectangular torsos like mine to imply a little curvaceousness, worked well with the belly I had when pregnant, and allows for a front of bra lace longline detail:
Ease amounts in commercial patterns are one of the eternally frustrating problems of contemporary sewing. The amount of ease included in designs seems to vary wildly from pattern to pattern, even from the same company, so that the home sewer finds her or himself needing to sew a muslin/toile for each pattern. It adds yet another layer of complication to the puzzle that is pattern size selection. But where does the confusion come from, exactly? I’m thinking there are a few main culprits: patterns drafted with ease amounts that don’t fit the actual garment type, inaccurate pattern photographs, and lack of finished garment measurements to give an objective way to analyze final fit. (For simplicity’s sake, I’m only going to consider patterns for woven fabrics at the moment.)
What exactly is ease?
It’s the amount of extra space added to a pattern in excess of actual body measurements to allow for movement and style. Wearing or fitting ease refers to a necessary small amount of space included in slopers and almost every pattern type (with the exception of corsets, some foundation garments, and stretch fabric patterns) that allow the wearer to breathe, sit, bend, and reach in the garment. This is usually around 2″ of additional space at the bust, 1″ at the waist, and 1.5″ at the hip, no matter what the pattern size.
Design ease is a more variable amount of space added to patterns to create different style types, create silhouettes, and to give movement to the garment. Design ease amounts are proportional and depend to some extent on the size of the garment, though there are general industry standards for different fits that are the approximately the same from pattern company to pattern company.
Ease Standards for Different Garment Types
Ease amounts and garment fit shown to scale as a fashion flat..
There are about five different categories of fit that pattern companies generally use to describe their patterns. Though there is a lot of variation from garment style to garment style, and the top of the pattern may have one fit and the bottom have another, this can be helpful in understanding how much ease to expect the garment to have. The McCall website here offers a chart of ease amounts for various fits. This chart doesn’t differentiate between design and wearing ease, so my assumption is that this is the total amount added to the body measurement.
Close Fitting (includes 0-2 7/8 inches of design ease at the bust)
Fitted (includes 3-4 inches of design ease at the bust)
Semi Fitted (includes 4 1/8-5 inches of design ease at the bust)
Loose Fitting (includes 5 1/8-8 inches of design ease at the bust)
Very Loose (over 8 inches of design ease at the bust)
Slightly more design ease is added for garments that are layered on top of other garments, such as jackets and coats. The design ease included at the waist and hip varies depending on whether the garment has a waistband or where the garment hangs from the body.
There’s a great piece that goes more in depth on the subject (here), though I’m unsure about the exact design ease amounts it lists. (That chart matches the McCall chart, which I think includes wearing ease and design ease in its amounts, so the amounts of *design* ease added to body measurements are probably smaller than it describes.) It has some very helpful visual guides to what different fit styles look like on the body.
Wearing and design ease standards seem formulaic enough that it’s odd there’s so much inconsistency. So many people on sewing forums and doing pattern reviews describe problems with way too much ease for their size. So where does the confusion come in? Do pattern companies not stick to their described standards? Does grading add excessive ease for certain sizes? I examined a set of patterns to see how this works out for a few different garment fit types from different eras (because I have strange ideas about what constitutes a good time) and found a few issues I’ll examine in detail.
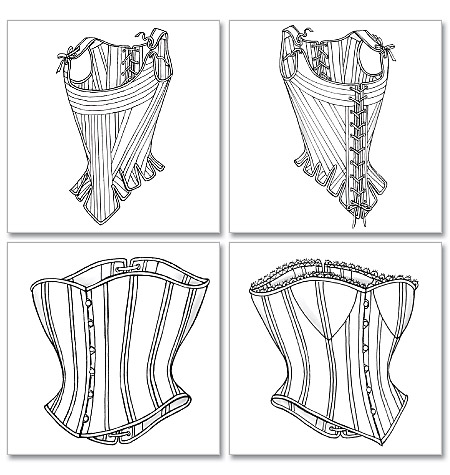
Grading Inconsistency and Wrong Ease Amounts for the Garment Type: Corset Patterns
Some of the problem may come from using the wrong pattern block or wrong design ease for the garment type, though this seems likely only for certain kinds of close-fitting garments like corsets and strapless bodices that require a very close fit to stay in place.
Butterick 4254 corset and stays pattern.
I looked at Butterick 4254 View C, sizes 12, 14, and 16, which is a historically based late 19th century style corset with a front busk and a laced up back. At the bustline, the finished garment measurements printed on the pattern match the body exactly at the bust. At the waist, for size 12, the pattern matches the body exactly. For sizes 14 and 16, the pattern is 1/2 inch smaller than the waist. So for this particular pattern, there are two fit problems. First, the ease seems to vary irregularly by size at the waist, which is problematic for predicting fit. Second, the lacing gap for most corsets is usually about 2″, so if we add that, the final corset is not going to fit as a sewist would expect it to fit. If the sewist is wanting a garment that fits something like a Victorian corset, they’re going to be disappointed, because there’s no way a period garment included 2″ of ease, and a corset would have nipped in at least an inch or two at the waist as well. Sewists using this pattern on various boards usually recommend sizing down about two sizes, sometimes more, in order to get the fit that one would want in a corset.
Butterick 5797 corset pattern.
I also looked at Butterick 5797, View A, sizes 12, 14, and 16. It’s described as a corset, close fitting, and labeled with “Making History” (though, alas, there’s no info on the specifics of that history included). This one closes with a zipper in front and has no lacing. I found that based on the final garment sizes given, at the bust there is a consistent 2″ of ease for all sizes. At the waist, for size 12 and 14, there is 2 1/2″ of ease, and for size 16, there is 3″ of ease. At the high hip, there was approximately 1 1/2″ for all sizes. For this pattern as with the other corset pattern, it isn’t going to fit like an actual corset at all, so a sewist expecting that is going to be disappointed, though they might suspect that from the zipper. (Without lacing to allow movement with breathing, the zero ease typical of a corset isn’t really desirable or comfortable). An argument could be made for having more design ease at the waist for larger sizes since design ease is proportional, but if that were the case, the ease amount should increase between size 12 and 14 by some increment as well, but a corset is usually expected to nip in at the waistline.
What’s frustrating is that two “historical” corset patterns from the same company seem to vary in the amount of ease they use for similar garments in a way that is not transparent. Even if you give them the benefit of the doubt on 4254 and pretend that 2″ that should be indicated for the lacing gap are part of the pattern ease, when you compare the two patterns, the ease amount doesn’t change in the same way between sizes, so how can you predict the fit accurately? If you know the best size for you in one pattern, that same size may not work in the other pattern. Looking at the pattern envelope raises another issue as well.
Is Pattern Envelope Photography Realistic?
The photo on the envelope of Butterick 5797 seems to fit the model as a contemporary corset might, if worn without the intention to nip the waist. But if the model were wearing the size indicated for her on the size chart, it’s very unlikely it would fit this way. If a strapless boned bodice had 2″ of ease at the bust, it probably wouldn’t stay in place. If the model’s garment had 2 1/2″-3″ of ease at the waist, it probably wouldn’t appear this form flattering on her.
My suspicion is that models on pattern envelopes almost never wear the sizes of the garment they would be told to select on the pattern envelope, and during the photo shoot, clothing is probably pinned with clips to flatter body curves and hang just right. The photos of this particular pattern look lovely, but what’s the point of great product photos that don’t accurately depict the fit of the product? It creates an expectation that’s going to be disappointed.
Ease Amounts in Commercial Patterns over Various Eras
1930s
I was curious about ease amounts and silhouettes in other commercial patterns and over different eras, so I looked at several more examples of different garment styles for the sake of comparison.
The oldest pattern I looked at was a dress from 1934 from Mabs Weekly, one of the fashion magazines of the era that often included a free pattern. This one would have been a fitted bodice style. I don’t have the original illustration of the garment, but the pattern is for a 36” bust. The final garment measurements weren’t listed on the pattern, so I measured the pieces themselves and subtracted the seam allowances to find the finished measurements. The finished measurement of the garment at the bustline is 39.5″, for 3.5″ total ease.
1940s Lingerie Pattern Ease
Advance 3067 slip pattern.
I looked at another pattern, Advance 3067, for a slip from what I’d guess is the 40s from the envelope design and the lines. The slip doesn’t have a placket or closure and isn’t cut on the bias, so it’s close fitting but probably not as close to the body as some lingerie. (This image is borrowed from an Etsy listing here). I found that for a size listed as 32″ breast, the finished measurement (which I had to take from the pieces themselves) was 36″ after seam allowances were removed. At the waist, the garment had approximately 6.75″ of ease when darts and seam allowances were removed, which makes sense for a pullover style garment.
1950s Lingerie Pattern Ease
Simplicity 1426 bra pattern.
For this example, I examined a contemporary reissue of a 50’s era Simplicity bra pattern (Simplicity 4333). The contemporary version of the pattern is numbered 1426, and I looked at view C. *Represses rant about ugly contemporary pattern envelope design with all her might* But seriously, the 1980s wood stain exterior paint green of the Simplicity logo and the weird way the elements are balanced is just…no. NO.
There is some confusion with using the finished garment measurements in some reviews, as it’s unclear if the size represents the full bust. (My guess is probably yes, since that’s where the Simplicity site suggests measuring to select your pattern size. Personally, I think the high bust is the better starting point for accurate pattern selection, since it measures your frame rather than your breast fullness.) According to the size chart, the finished measurement matches the body measurement exactly at the bust.
Out of curiosity, I measured the pattern pieces for my likely size as well. For the size 12 pattern, the finished measurement is listed as 34″. But there is a button placket at the center back, and it’s unclear if those finished garment measurements include the amount that the band overlaps at the placket or not. I measured to the center line of that placket, essentially measuring the circumference of the garment when closed for wearing, and found that when seam allowances were removed, that size would actually be 33″, an inch smaller than the body, which isn’t going to be workable for a garment with no stretch. (Counting the overlap in the finished measurement would have given me a measurement of approximately 34 and 1/4″ full circumference.)
While there’s definitely some room for error on the part of my measuring, a lack of any ease for breathing and the lack of clarity in what the finished garment measurements actually mean are a problem. While the contemporary formulation of band size/cup size wasn’t being used in the ’50s, it seems odd to me that one of the Big 4 pattern companies couldn’t examine the pattern measurements and explain their sizing in a way that takes band size/cup size into account to better serve the needs of their current customers for the reissued version. If I could find the original pattern, I’d love to compare the ease standards and grading used in the original to the ones used in the reissue. I’m also curious how accurate the finished garment measurements printed on patterns usually are.
Contemporary Lingerie Pattern Ease
Vogue 8888 lingerie pattern.
I looked at Vogue 8888 to get an idea of how much ease is used in contemporary lingerie pattern making as well. View A is a loose-fitting surplice robe. View C is a close fitting, bias cut pull over camisole. View F is a semi fitted pair of bias cut shorts.
What I found was that for the robe (View A), the bust included 6.5″ ease and the hip had 7.5″ of ease for all sizes. For the camisole, there was 3″ of ease at the bust for all sizes I checked, which might be just slightly above what the Big 4 ease charts describe as “close” fit by about 5/8″, but which makes sense given the lack of a closure and need to be able to pull it over the shoulders. For the shorts (View F), the hip had 3.5″ of ease. (I checked the actual pattern pieces for this view and found this measure to be accurate, too.) The waist had 8″ of ease, which, along with the stretch of the bias cut, would allow for them to be pulled over the hip without a placket or opening. These ease amounts aligned pretty accurately with the stated total ease amounts for the major pattern companies for different fits, and the ease amounts were the same for all sizes I looked at.
Contemporary Pattern Ease in Loose Fitting Garments
McCall 6649 loose fitting shirt pattern.
McCall 6465 loose fitting dress pattern.
I looked at McCall 6649, a loose-fitting button up menswear style shirt in a B cup size, and found that the bust had 5 1/2″ of total ease, the waist had 6″ of total ease, and the hip had 6″ of total ease for all sizes I looked at (16, 18, and 20 for this pattern). So ease amounts were consistent, and matched the given ease chart amounts for a loose fit. I was curious, though, if the final garment actually fit as it’s depicted on the envelope or if it might be looser, especially at the waist. The model may be wearing a smaller size than the envelope would recommend for her body measurements, or it might be styled to be flattering, or maybe it’s just me.
I looked at one more “loose-fitting” pattern, the McCall 6465 loose tunic dress. For sizes 16, 18, and 20, ease amounts were consistent. It had 5.5″ of ease at the bust, 13.5″ of ease at the waist, and 8.5″ of ease at the hip. The ease amount at the waist seems large, but if the dress is pulled over either the shoulder or the hip, it would make sense for the narrowest part of the body to require more ease here. This one was a looser fit than the other pattern, so if a person was expecting “loose fit” to mean the same thing on both without pulling the patterns out to check the finished measurements, there might be some frustration with the results.
Conclusions
The patterns I looked at seemed mostly consistent with ease amounts described as “industry standard.” I can’t find much information on ease standards in ready to wear, so I’m curious how those industry standards are applied outside of patternmaking for home sewing.
If ease amounts in patterns are relatively standard, then where does the confusion and frustration come in? I’m thinking some of it is the stylized photography of pattern envelope photos. When we see a photo of a finished garment, there is a certain automatic assumption that the photo is more realistic than the highly stylized, exaggerated silhouettes of vintage pattern envelope fashion illustration. But the photos aren’t as realistic as they seem if the samples are potentially being selected to flatter the model and the garment rather than depicting the actual fit of the pattern if it were sewn to the model’s body size. This is compounded by the possibility that clothes are pinned in place or pinned closer to the body and that photo editing might be creating the illusion of closer waistlines or trimmer leg silhouettes than the garment really gives.
So what’s a sewist to do to avoid pulling her/his hair out? The best indicator of final fit is the finished garment measurements. You can check the total ease amount by subtracting actual body measurements on the measurement chart from the finished garment measurements printed on the tissue, if they’re present. If not, it’s worthwhile to measure the pieces at least at the bustline to get an idea of whether the fit the pattern is said to be is the fit you’re expecting, and the waist and hip measurements are helpful as well. If you have a sloper that you work with for pattern fitting, you can rotate the darts to the approximate position of the sewing pattern you’re comparing it to to see how much the additional space the sewing pattern has, and whether this works for you for the fit you’re seeking.
Finally, it’s a good idea to know what kind of ease you prefer in your garments, and a great way to do this is to measure ready to wear clothing you already have that fits the way you’re wanting your sewn garment to fit. For example, if you have a skirt that is just long enough and has the amount of ease you want in a close fit, measure its actual dimensions and compare with your body measurements to get an idea of what desirable fit is for you. I’m incredibly picky about how pants fit, so as soon as my pregnancy belly resumes a more semi-permanent, somewhat back to normal state, I will be measuring a few of my favorite pairs of jeans for exact inseam length, favorite boot cut flare amount, and crotch depth that is tight enough to give some curvy definition to my back end without being pinchy or uncomfortable. In my own patternmaking future, I hope to help with the ease confusion issue by listing final garment measurements clearly and offering consistent descriptions of fit or an explanation of the amount of ease so that, hopefully, the sewist can know what they are getting into without having to sew muslins of every pattern.
If you have frustrations with pattern fitting because of excess ease, I hope that this was helpful. Do you have any tips or strategies that help you to get consistent fitting results from commercial patterns? I’d love to hear them!
For part two of my exploration of the bra, an in depth look at the bra band, its relationship to cup size, and its role in complicating everything about finding a bra that fits.
The bra band is really the base of the bra. It’s where the vast majority of the support comes from, and the support it provides is cantilevered horizontally from the close fitted band and the cups holding the weight of the bust up, rather than support by suspending weight from the shoulders, which hurts and doesn’t work very well.
Oh, yes, Jimmy, it is a veritable marvel of modern engineering.
The bra band also establishes circumference of the torso at the underbust (for simplicity, I’m disregarding for a moment the way that the old plus four inches issue muddies the waters for certain sizing systems). Bra band size is the starting point for how we describe bra sizes. Cup sizes are relative, and the letters actually have no meaning without a bra band to give them context. Even though we talk about double Ds or B cups as if they describe an objective size, they actually don’t mean anything, because they are relative to the band size that defines them. Here’s a better visual explanation of how cup size relates to torso/band size:
The way that we write bra sizes as a numerical value and a letter is kind of like a little math equation where the bra band is the base circumference of the body at the underbust, and each letter increase adds an inch to this to end up with enough room for the circumference of the bust at the fullest point:
AA = .5 inch
A = 1 inch
B = 2 inch
C = 3 inch
D = 4 inch
DD or E = 5 inch
And upward, though the specific letters used sometimes vary from manufacturer to manufacturer or European system versus American sizing system, etc. If you wrote it as a math problem, it would be something like this:
Numerical band size/underbust circumference + letter to specify extra cup inches = full bust circumference
So for a 36B, it’s basically an equation that says: 36″ rib cage + 2″ total added in the cups = 38″ full bust measurement. This is why sister sizing works, where you can go down a band size but a cup letter, or up a band size and down a cup letter, to approximate a fit like your exact size (more on this another day).
This sounds simple enough, but then everything gets complicated, because A) different fabrics are reduced by different amounts depending on stretch and recovery properties, so a band designed for a 36″ rib cage probably will measure smaller than that, B) all bodies are not the same and the broad backed and non-standard torso-ed among us (*raises both hands*) are statistical outliers who can’t find an appropriate size this way, and C) the plus 4 phenomenon.
The plus four thing is an often repeated piece of advice bra fitting – take your actual rib cage measurement, if it’s even, add four inches, and if it’s odd, add five inches to get your band size. To me, this seems illogical and stupidly complicated, and it seems more intuitive to just use your actual rib cage measurement. There are interesting historical reasons that this developed that I’m reading up on and will write about, but it seems to have been a vanity sizing tick that happened around the ‘50s or ‘60s when bra sizing as we now know it began to emerge as an industry standard. Things get really, really complicated these days, because sizing standards vary by market (American, UK, EU, Japanese, Australian, to name a few), and because in the US market, some companies no longer add these inches into the band sizes, and some companies do. This means a 36 band brand A might not be drafted for the same rib circumference as brand B, so your 36B is not the same size across brands. For those of us who don’t want to try on 37 bras at the mall to find one with a good fit, this is exasperating.
This isn’t exactly the bra manufacturer’s fault, since it is very hard to accommodate the wide range of bust shapes, sizes, and body proportions that exist in the real world into a single approximation. It’s a complicated supply/demand and consumer knowledge problem. Even if there were more variations available, most of us (my pre-lingerie-addiction self included) would not know where to begin to understand our particular shape and support needs. That being said, some kind of standardization on band measurement seems to me like it would make it much easier for all of us. (In my own drafting and bra sizing, I use an exact rib cage measurement as a starting point, since the plus four model assumes a certain standard tapered rib cage typical of more of an hourglass shape than the vast majority of women have. Statistically most of us are much more rectangular.)
I’ll be rambling about bust position next in my sprawling Ted talk on the mechanics of the bra. 🙂 I’d love to hear any thoughts, and if anyone knows more about the weird history of bra size standards, I’d love to hear more on this.
I’m working on an in depth guide to bra sizes, bra types, some common fit issues, and in particular, how to use all of this information to have a better idea of what to look for in a bra shop or when specifying sizing and style needs in a bespoke bra. Prior to making lingerie, this was all a mystery to me, so I thought it might be helpful to share it as I write it out. This will be the first part in a multi-part series on the intricacies of the bra. 🙂
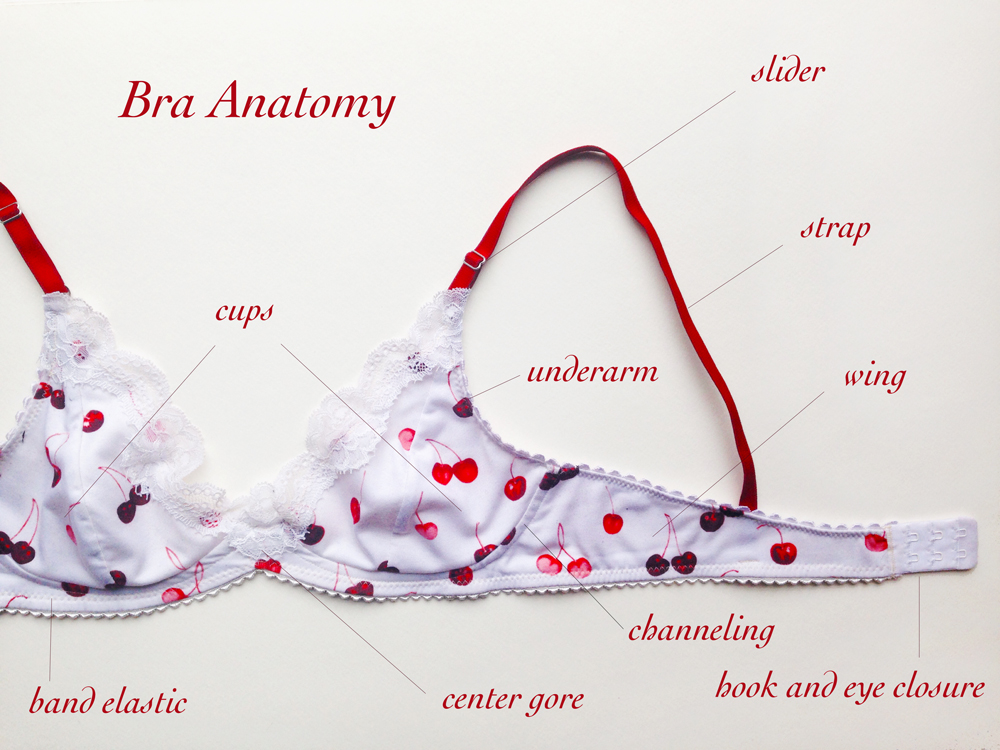
The Anatomy of a Bra.
How to Tell if a Bra Fits
Start with the band, which is the part that encircles the torso, made of the center gore, the front cradle that holds the cups, and the back wings. It should fit snugly on the loosest hook when the bra is new. (The elastic will stretch over time, so the other hooks allow you to adjust for this. ) It should be close fitting but comfortable, and ideally, two fingers should be able to fit between the band and your body, but not more. It should be level all the way around the body, and not ride up in the back.
In an underwired bra, the center gore of the bra should lie flat against the sternum, unless you have very full breasts that touch at the base of the breast. If the gore is held away from the sternum, the cups are probably too small.
The cups should fully encase the breast tissue from the breast root without flattening breast tissue or having tissue spill out from the cup. If the underwires or center gore are held away from the chest wall, the cups don’t have enough depth. If tissue is spilling over the top of the cup or under it at the sides or underarm, the cup size probably isn’t correct. Cup size is complicated by a few factors that I’ll explore in depth in a few days, particularly breast shape and breast position on the torso. If the cup puckers or gapes, sometimes this means the cup is too small, but this isn’t always the case. With certain breast shapes, some brands and cup styles can gape even if the size is correct. This is an issue close to my heart and is a big part of why I started making lingerie, so I’ll explore this further in the near future as well.
When trying on bras, to ensure that all the breast tissue is in the cup, the stoop and swoop technique can really help. It can have a dramatic impact on comfort, fit, appearance, and overall functionality of the cup. To do this, when putting the bra on, bend forward at the waist and use gravity to help gather all your breast tissue toward the front and position it inside the cup. Often breast tissue that isn’t gathered up into the cup can be smashed down by underwires or out the sides of the bra. If the tissue isn’t entirely in the cup, it isn’t being well supported, and this can be uncomfortable and less flattering than a well fitting cup. This can be really helpful for the well-endowed trying to find a truly supportive bra size. It helps with smaller busts, too, though, and can make a surprising difference in cup size and the fullness of tissue within the cup. Curvy Kate has a great video here:
The cups and the frame should work together to position the breasts high on the body, and they should provide most of the support. The straps should only provide about 10% of the support and should function mostly to keep the upper cup positioned correctly. If straps are digging into your shoulders or leaving marks, the band should be adjusted to provide better support.
I hope this is helpful, and I’d love to hear any other tips and tricks to getting a great bra fit. 🙂 Check back soon for the next part, which will explore the bra band and its role in sizing inconsistency.
Pregnancy is rapidly rendering my once favorite bras uncomfortable, so now that the second trimester is upon me and I’m actually able to make it through my day without three naps and seven meals, I’ve had more waking hours and energy with which to put them to use.
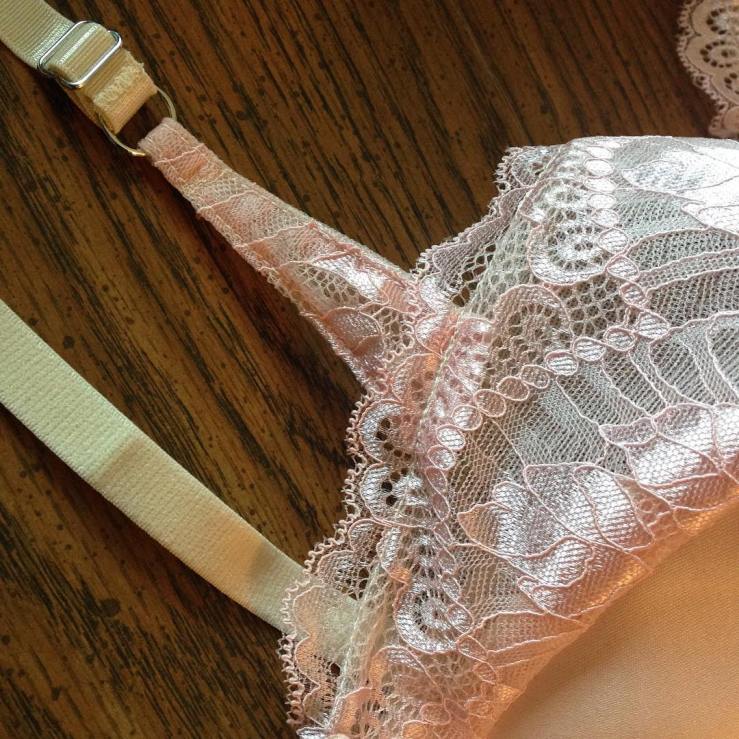
So this weekend I dug out my tried and true bra band and adapted it for a demi wire and a three piece, very round cup shape. I chose to make the cups out of a gorgeous beige stretch lace I’ve got in my stash and lined it with stretch mesh in a blushy skin tone, so that the cup could conform to variations in my shape depending upon planetary alignment, tidal schedules, water retention, engorgement, etc, lol. I used a slightly lighter, stretchier power net for the back band that I usually do to build in some extra give in the band, too. Thank goodness for spandex.
Now that I have a pretty solid understanding of materials and construction methods in bra making, I like to challenge myself on the finishing details, so I went all out on the interior on this one.
I used a gothic arch on the elastic, since I’ve found that especially as my tummy expands, the elastic on the bridge rolls in a weird, uncomfortable, and unflattering way and it seems like that can cause it to look worn out over time in some of my older bras. The gothic arch is trickier to construct than an unbroken piece of elastic but I think it sits much better against the body, especially over the life of the bra. I enclosed all the seams using the mesh lining, which I think gives a great feel against the skin and a good look, too. The strap elastic is enclosed where it joins with the bra as well.
I’ll be adding this to my Etsy shop after a few more iterations and a few more tweaks on a bra size / style guide I’ve been working on, along with a few other full cradle and partial band bras. More soon. 🙂
I’m excited (and a bit jittery) to say that my Etsy lingerie shop is finally open. I’ve been setting it up for a few weeks and still have *so many things* I want to add to it, but it’s a start that I feel proud of. Also excited to say I’m testing sizing and writing up directions for a sewing pattern I hope to release soon. The crafter life goals of sewing for others and pattern drafting do work well together.
So far, no full cradle bras because I’m writing up my 95 theses of how to fit a bra. Not really 95, but a few pages for sure. I’ve been reading a lot on sizing standards and the history of different measurement practices and vanity sizing, and now I see why most of us are totally confused by manufacturer sizing. More on this later when I get my fitting guide all hammered out, but the issue of adding four or five inches to your underbust measurement really throws a wrench in everything. What’s even more frustrating is that just using your raw underbust measure seems like it would clear up everything, but then you have to grapple with figuring out which manufacturers add inches to the underbust measure for their bands and which don’t, and with how individual brands approach sizing, because a 36B in one brand might be another brand’s 32DD. (I intend to use the raw underbust measure, myself, though I’ve found the high bust to be a better place to measure – right under the armpits, over the bonier part of the upper chest, since the underbust measure can vary so dramatically with breathing, sitting vs. standing, bloating, etc. It tends to be slightly larger than the underbust measure by an inch or two, which works out perfectly for me with my broad back and unusual proportions, but may not for everyone.)
For now, I’ve focused on lacy bralettes, underwear and garter belts in the shop, and I’m still learning the ins and outs of SEO and writing copy and it’s been actually kind of amazing in researching all of that to realize how much snake oil marketing stuff floating around out there is promising starry-eyed budding entrepreneurial dreamer types like myself that a fortune is there for the taking if we just fork out 2k for whatever guru’s online course! Ugh, gross. (They tell me that if I don’t set up a mailing list, the howling abyss demon of failure and loneliness and bad skin will come for me, so if you’d like to join the mailing list, it’s (here), and I did set up a 10% off code that will be sent to your email, and I promise I won’t spam you. Especially not with false scarcity marketing or canned enthusiasm adspeak crap, because the world has more than enough of that.)
Learning photography is infinitely more fun, though I think I lost at least a week to cussing my camera controls and my cat for jumping in the shot when I finally got all the elastics to lie flat for two seconds. You can really see the eternal conflict between my antique feminine, Marie Antoinette delicate aesthetic and my Morticia Addams for life/what would Cersei wear sensibilities:
Under My Thumb bralette.
Tangled Up in Blue bralette.
Rapture bralette and ruched back underwear.
Heart of Glass bralette and underwear.
Just Like Honey bralette, garter belt, and underwear.
Nothing But Flowers bralette and underwear.
Going to California bralette and ruched back underwear.
And now I’m off to bed to listen to the rain. Mmm, gothic novel spring weather.
2017 was … intense, macrocosmically and microcosmically. But it’s been ever upward and onward, and rounding up the things I created over the last year really makes me feel pretty great about how far my lingerie making and sewing skills have progressed. I also feel a sense of accomplishment about trying fabric design!
So here’s a sampling of my sewn work over the last year, all self-drafted:
It’s somehow cheering to see it all in one place. It’s easy to think of all I’d hoped to accomplish and did not; it’s harder to realize how far I’ve actually come.
My biggest goal for 2018 are to finally open up an etsy shop for handmade lingerie, and I’m moving toward being able to do that probably within the next week or two. Lots of samples sewn and processes mastered and materials hoarded toward that end. Still to do: photos to take, copy to write, listings to create. I’d like to offer patterns and design more fabrics to use in my collections as well. It may seem unrelated, but for me this is inextricably connected to my more personal urge to declutter and simplify and work towards realizing the more minimalist approach to living I’ve always wanted. To me, clearing the physical clutter is tied to clearing the psychological hesitation to focus on what I really want to be doing with my time. I went around my house taking pictures to have a “before” state to see what progress I can make and have a nice list of TED talks to work through for inspiration. But mostly I hope to be able to declutter enough to actually sew in my sewing room instead of just piling it full of sewing-related junk.
Happy almost 4th of July. We’re making a stay-cation of it, which means lots of sewing time. Lots of makes I’m proud of lately–larger bras sewn for my grandma, since being a 40E doesn’t afford her the luxury of choosing from all the lacey whispy nothings we 36b-ish-es have to peruse. I’m trying to stretch my abilities so that I can sew well for a wider range of sizes than just my own.
satin covered foam cup, lace and tulle upper cup. lace + tulle cradle.strap detail.It looks a bit lumpy on my 36b dressform, and I had to stuff it to fill it out. this picture doesn’t quite do it justice, alas, but it gives an idea.
I’ve also been somewhat doggedly trying to work on my finishing methods like attaching fold over elastic. So convenient and shiny and pretty, and yet, such an enormous pain in the butt. The first few sets of underwear I made were a huge disappointment, since the waving of the elastic distorted the lines of the fabric and made my makes scream homemade. But I sewed about twelve pairs in a week and I think I’ve got it now. The tricks seem to be actually measuring elastic into quadrants and evenly distributing the reduction (I mark quadrants on the garment and FOE with pins, then match the pins as I go, so that the stretch is distributed evenly over the FOE) and sewing along the open edge of the FOE as accurately as possible. And also steaming/pressing when it’s all done to help pull the elastic back into shape and make it lie flat on curves (thanks to tailormadeblog.com/Ying of Tailor Made Shoppe for that tip!).
early FOE + mesh struggles.and here is where it all started to really come together for me, in my brain and in the muscles of my hands. 🙂
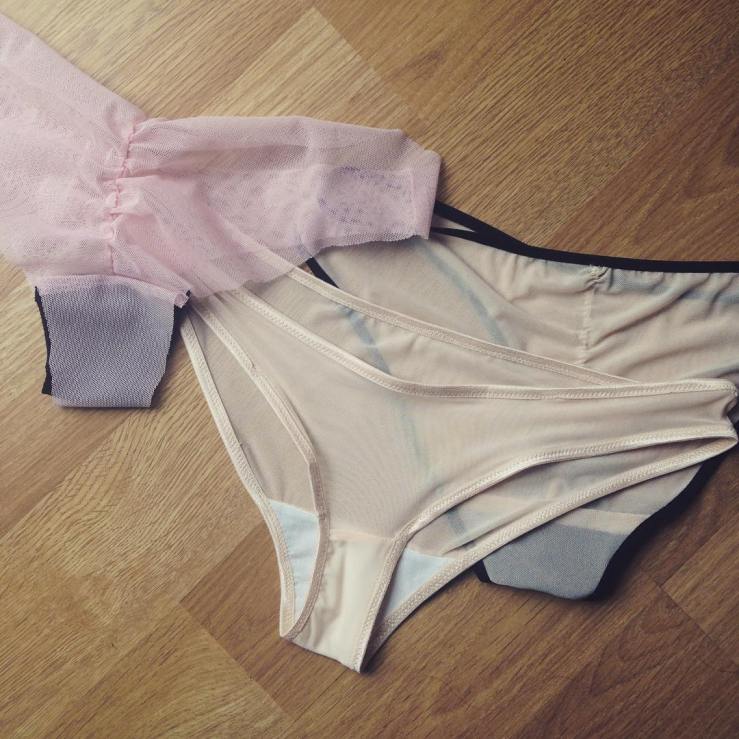
I made these to match the bra above. The pink lace is one of my absolute favorites.
And then finally there’s this, a bralette pattern I’m working on. It’s not a terribily original design; it’s a pretty commonly seen basic bralette style with a lot of coverage. Stylistically it’s not very different from Cloth Habit’s Watson pattern, and the cups have a very similar seaming arrangement. But there are definite differences in the cradle/wings; hers brings things to a definite V point in the center and that’s a challenge I don’t want to deal with if I can help it. I’m not sure but I think the underarm side might be higher on this because I am anti side boob escape-age, and for wider set breasts, the struggle is real. Most bralettes without a higher side band leave me feeling exposed and at the mercy of the elements/gravity/sudden movements. So far I’m pretty happy with it!
I even dyed this fabric and strap elastic! stretch lace over mesh.first attempt at enclosing the band seams with the lining. it was tricky and slow going but maybe practice will help.outer view of the finished bra. I made this one in scuba, a thicker double knit (I think), which works great for balancing stretch with structure. Seems a perfect fabric for bra cups.
I’m making up some samples of lots of these pieces in a range of sizes to test the fit and refine my details these days. Slowly lurching ever closer to actually offering custom made lingerie… 🙂
I’ve been working this week on refining my bra making process. I like to experiment with the steps in garment making and trying to arrange them for efficiency and speed. #nerdlife So this week I cut out four bras at once:
I’ve been experimenting with foam cups and how to finish and join them:
So far, I’ve finished one 40E sized bra using the Maya pattern, available for free here, which has as great round shape. It doesn’t work so well for me personally (shallow broad shape), and for the person I’m making the large bras for, it required some adjustments to the upper cup, but the resulting shape works really well.
And here’s the first one I’ve finished of this round. I’m really happy with the way it turned out, and the person I sewed it for was really happy. It’s kind of amazing how many women haven’t had the experience of wearing a bra that actually fits, and it makes me happy to be able to help with that. It’s a small thing, but I know how that having a bra that fits right and flatters makes me feel a little bit happier with my body and a little bit more confident, and I love that I’m getting almost to the point that I can do that in some small way for other people. It’s also fun to sew these for the older women I know who are more endowed and haven’t ever had a really lacy lavish bra because they are so hard to find in larger sizes. 🙂
The full on view shows some issues I had with getting the elastic aligned with the bottom of the cup; in the future, I’ll probably widen the cradle so that when I use wide elastic for larger sizes, it doesn’t come so close to the channeling line. Something to add to my bra making lab notebook 🙂