Working with Ease Amounts in Commercial Patterns

The amount of ease in commercial sewing patterns can be a source of sizing confusion and fitting frustration. In this blog entry, I look at types of ease, industry standard amounts for different garment types, and actual ease amounts in a selection of corset, lingerie, and loose fitting commercial patterns from a range of eras. Click through to read more.

Ease amounts in commercial patterns are one of the eternally frustrating problems of contemporary sewing. The amount of ease included in designs seems to vary wildly from pattern to pattern, even from the same company, so that the home sewer finds her or himself needing to sew a muslin/toile for each pattern. It adds yet another layer of complication to the puzzle that is pattern size selection. But where does the confusion come from, exactly? I’m thinking there are a few main culprits: patterns drafted with ease amounts that don’t fit the actual garment type, inaccurate pattern photographs, and lack of finished garment measurements to give an objective way to analyze final fit. (For simplicity’s sake, I’m only going to consider patterns for woven fabrics at the moment.)

What exactly is ease?

It’s the amount of extra space added to a pattern in excess of actual body measurements to allow for movement and style. Wearing or fitting ease refers to a necessary small amount of space included in slopers and almost every pattern type (with the exception of corsets, some foundation garments, and stretch fabric patterns) that allow the wearer to breathe, sit, bend, and reach in the garment. This is usually around 2″ of additional space at the bust, 1″ at the waist, and 1.5″ at the hip, no matter what the pattern size.

Design ease is a more variable amount of space added to patterns to create different style types, create silhouettes, and to give movement to the garment. Design ease amounts are proportional and depend to some extent on the size of the garment, though there are general industry standards for different fits that are the approximately the same from pattern company to pattern company.

Ease Standards for Different Garment Types

Ease amounts and garment fit drawn to scale as a fashion flat.. Ease amounts in commercial patterns are a consistent source of fitting confusion and sewing frustration. For tips on understanding industry standard ease amounts and what is meant by different fits, click through for the full blog entry.
Ease amounts and garment fit shown to scale as a fashion flat..

There are about five different categories of fit that pattern companies generally use to describe their patterns. Though there is a lot of variation from garment style to garment style, and the top of the pattern may have one fit and the bottom have another, this can be helpful in understanding how much ease to expect the garment to have. The McCall website here offers a chart of ease amounts for various fits. This chart doesn’t differentiate between design and wearing ease, so my assumption is that this is the total amount added to the body measurement.

Close Fitting (includes 0-2 7/8 inches of design ease at the bust)
Fitted (includes 3-4 inches of design ease at the bust)
Semi Fitted (includes 4 1/8-5 inches of design ease at the bust)
Loose Fitting (includes 5 1/8-8 inches of design ease at the bust)
Very Loose (over 8 inches of design ease at the bust)

Slightly more design ease is added for garments that are layered on top of other garments, such as jackets and coats. The design ease included at the waist and hip varies depending on whether the garment has a waistband or where the garment hangs from the body.

There’s a great piece that goes more in depth on the subject (here), though I’m unsure about the exact design ease amounts it lists. (That chart matches the McCall chart, which I think includes wearing ease and design ease in its amounts, so the amounts of *design* ease added to body measurements are probably smaller than it describes.) It has some very helpful visual guides to what different fit styles look like on the body.

Wearing and design ease standards seem formulaic enough that it’s odd there’s so much inconsistency. So many people on sewing forums and doing pattern reviews describe problems with way too much ease for their size. So where does the confusion come in? Do pattern companies not stick to their described standards? Does grading add excessive ease for certain sizes? I examined a set of patterns to see how this works out for a few different garment fit types from different eras (because I have strange ideas about what constitutes a good time) and found a few issues I’ll examine in detail.

Grading Inconsistency and Wrong Ease Amounts for the Garment Type: Corset Patterns

Some of the problem may come from using the wrong pattern block or wrong design ease for the garment type, though this seems likely only for certain kinds of close-fitting garments like corsets and strapless bodices that require a very close fit to stay in place.

Butterick 4254 corset and stays pattern. Click through for a blog entry on garment ease and amounts in commercial patterns, including two contemporary corset patterns and issues with sizing and ease amount discrepancies.
Butterick 4254 corset and stays pattern.

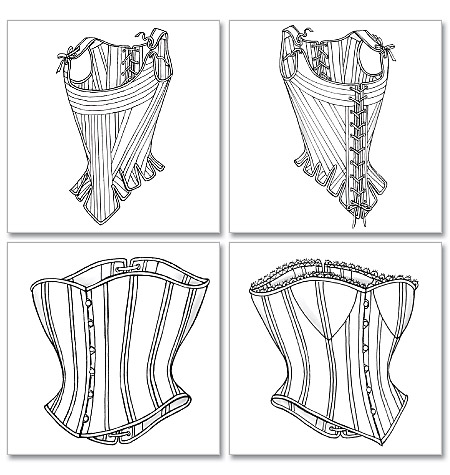
I looked at Butterick 4254 View C, sizes 12, 14, and 16, which is a historically based late 19th century style corset with a front busk and a laced up back. At the bustline, the finished garment measurements printed on the pattern match the body exactly at the bust. At the waist, for size 12, the pattern matches the body exactly. For sizes 14 and 16, the pattern is 1/2 inch smaller than the waist. So for this particular pattern, there are two fit problems. First, the ease seems to vary irregularly by size at the waist, which is problematic for predicting fit. Second, the lacing gap for most corsets is usually about 2″, so if we add that, the final corset is not going to fit as a sewist would expect it to fit. If the sewist is wanting a garment that fits something like a Victorian corset, they’re going to be disappointed, because there’s no way a period garment included 2″ of ease, and a corset would have nipped in at least an inch or two at the waist as well. Sewists using this pattern on various boards usually recommend sizing down about two sizes, sometimes more, in order to get the fit that one would want in a corset.

I also looked at Butterick 5797, View A, sizes 12, 14, and 16. It’s described as a corset, close fitting, and labeled with “Making History” (though, alas, there’s no info on the specifics of that history included). This one closes with a zipper in front and has no lacing. I found that based on the final garment sizes given, at the bust there is a consistent 2″ of ease for all sizes. At the waist, for size 12 and 14, there is 2 1/2″ of ease, and for size 16, there is 3″ of ease. At the high hip, there was approximately 1 1/2″ for all sizes. For this pattern as with the other corset pattern, it isn’t going to fit like an actual corset at all, so a sewist expecting that is going to be disappointed, though they might suspect that from the zipper. (Without lacing to allow movement with breathing, the zero ease typical of a corset isn’t really desirable or comfortable). An argument could be made for having more design ease at the waist for larger sizes since design ease is proportional, but if that were the case, the ease amount should increase between size 12 and 14 by some increment as well, but a corset is usually expected to nip in at the waistline.

What’s frustrating is that two “historical” corset patterns from the same company seem to vary in the amount of ease they use for similar garments in a way that is not transparent. Even if you give them the benefit of the doubt on 4254 and pretend that 2″ that should be indicated for the lacing gap are part of the pattern ease, when you compare the two patterns, the ease amount doesn’t change in the same way between sizes, so how can you predict the fit accurately? If you know the best size for you in one pattern, that same size may not work in the other pattern. Looking at the pattern envelope raises another issue as well.

Is Pattern Envelope Photography Realistic?

The photo on the envelope of Butterick 5797 seems to fit the model as a contemporary corset might, if worn without the intention to nip the waist. But if the model were wearing the size indicated for her on the size chart, it’s very unlikely it would fit this way. If a strapless boned bodice had 2″ of ease at the bust, it probably wouldn’t stay in place. If the model’s garment had 2 1/2″-3″ of ease at the waist, it probably wouldn’t appear this form flattering on her.

My suspicion is that models on pattern envelopes almost never wear the sizes of the garment they would be told to select on the pattern envelope, and during the photo shoot, clothing is probably pinned with clips to flatter body curves and hang just right. The photos of this particular pattern look lovely, but what’s the point of great product photos that don’t accurately depict the fit of the product? It creates an expectation that’s going to be disappointed.

Ease Amounts in Commercial Patterns over Various Eras

1930s

I was curious about ease amounts and silhouettes in other commercial patterns and over different eras, so I looked at several more examples of different garment styles for the sake of comparison.

The oldest pattern I looked at was a dress from 1934 from Mabs Weekly, one of the fashion magazines of the era that often included a free pattern. This one would have been a fitted bodice style. I don’t have the original illustration of the garment, but the pattern is for a 36” bust. The final garment measurements weren’t listed on the pattern, so I measured the pieces themselves and subtracted the seam allowances to find the finished measurements. The finished measurement of the garment at the bustline is 39.5″, for 3.5″ total ease.

1940s Lingerie Pattern Ease

Advance 3067 slip pattern. Click through for a blog entry on garment ease and amounts in commercial patterns, including vintage and contemporary lingerie patterns and ease amount discrepancies.
Advance 3067 slip pattern.

I looked at another pattern, Advance 3067, for a slip from what I’d guess is the 40s from the envelope design and the lines. The slip doesn’t have a placket or closure and isn’t cut on the bias, so it’s close fitting but probably not as close to the body as some lingerie. (This image is borrowed from an Etsy listing here). I found that for a size listed as 32″ breast, the finished measurement (which I had to take from the pieces themselves) was 36″ after seam allowances were removed. At the waist, the garment had approximately 6.75″ of ease when darts and seam allowances were removed, which makes sense for a pullover style garment.

1950s Lingerie Pattern Ease

For this example, I examined a contemporary reissue of a 50’s era Simplicity bra pattern (Simplicity 4333). The contemporary version of the pattern is numbered 1426, and I looked at view C. *Represses rant about ugly contemporary pattern envelope design with all her might* But seriously, the 1980s wood stain exterior paint green of the Simplicity logo and the weird way the elements are balanced is just…no. NO.

There is some confusion with using the finished garment measurements in some reviews, as it’s unclear if the size represents the full bust. (My guess is probably yes, since that’s where the Simplicity site suggests measuring to select your pattern size. Personally, I think the high bust is the better starting point for accurate pattern selection, since it measures your frame rather than your breast fullness.) According to the size chart, the finished measurement matches the body measurement exactly at the bust.

Out of curiosity, I measured the pattern pieces for my likely size as well. For the size 12 pattern, the finished measurement is listed as 34″. But there is a button placket at the center back, and it’s unclear if those finished garment measurements include the amount that the band overlaps at the placket or not. I measured to the center line of that placket, essentially measuring the circumference of the garment when closed for wearing, and found that when seam allowances were removed, that size would actually be 33″, an inch smaller than the body, which isn’t going to be workable for a garment with no stretch. (Counting the overlap in the finished measurement would have given me a measurement of approximately 34 and 1/4″ full circumference.)

While there’s definitely some room for error on the part of my measuring, a lack of any ease for breathing and the lack of clarity in what the finished garment measurements actually mean are a problem. While the contemporary formulation of band size/cup size wasn’t being used in the ’50s, it seems odd to me that one of the Big 4 pattern companies couldn’t examine the pattern measurements and explain their sizing in a way that takes band size/cup size into account to better serve the needs of their current customers for the reissued version. If I could find the original pattern, I’d love to compare the ease standards and grading used in the original to the ones used in the reissue. I’m also curious how accurate the finished garment measurements printed on patterns usually are.

Contemporary Lingerie Pattern Ease

I looked at Vogue 8888 to get an idea of how much ease is used in contemporary lingerie pattern making as well. View A is a loose-fitting surplice robe. View C is a close fitting, bias cut pull over camisole. View F is a semi fitted pair of bias cut shorts.

What I found was that for the robe (View A), the bust included 6.5″ ease and the hip had 7.5″ of ease for all sizes. For the camisole, there was 3″ of ease at the bust for all sizes I checked, which might be just slightly above what the Big 4 ease charts describe as “close” fit by about 5/8″, but which makes sense given the lack of a closure and need to be able to pull it over the shoulders. For the shorts (View F), the hip had 3.5″ of ease. (I checked the actual pattern pieces for this view and found this measure to be accurate, too.) The waist had 8″ of ease, which, along with the stretch of the bias cut, would allow for them to be pulled over the hip without a placket or opening. These ease amounts aligned pretty accurately with the stated total ease amounts for the major pattern companies for different fits, and the ease amounts were the same for all sizes I looked at.

Contemporary Pattern Ease in Loose Fitting Garments

I looked at McCall 6649, a loose-fitting button up menswear style shirt in a B cup size, and found that the bust had 5 1/2″ of total ease, the waist had 6″ of total ease, and the hip had 6″ of total ease for all sizes I looked at (16, 18, and 20 for this pattern). So ease amounts were consistent, and matched the given ease chart amounts for a loose fit. I was curious, though, if the final garment actually fit as it’s depicted on the envelope or if it might be looser, especially at the waist. The model may be wearing a smaller size than the envelope would recommend for her body measurements, or it might be styled to be flattering, or maybe it’s just me.

I looked at one more “loose-fitting” pattern, the McCall 6465 loose tunic dress. For sizes 16, 18, and 20, ease amounts were consistent. It had 5.5″ of ease at the bust, 13.5″ of ease at the waist, and 8.5″ of ease at the hip. The ease amount at the waist seems large, but if the dress is pulled over either the shoulder or the hip, it would make sense for the narrowest part of the body to require more ease here. This one was a looser fit than the other pattern, so if a person was expecting “loose fit” to mean the same thing on both without pulling the patterns out to check the finished measurements, there might be some frustration with the results.

Conclusions

The patterns I looked at seemed mostly consistent with ease amounts described as “industry standard.” I can’t find much information on ease standards in ready to wear, so I’m curious how those industry standards are applied outside of patternmaking for home sewing.

If ease amounts in patterns are relatively standard, then where does the confusion and frustration come in? I’m thinking some of it is the stylized photography of pattern envelope photos. When we see a photo of a finished garment, there is a certain automatic assumption that the photo is more realistic than the highly stylized, exaggerated silhouettes of vintage pattern envelope fashion illustration. But the photos aren’t as realistic as they seem if the samples are potentially being selected to flatter the model and the garment rather than depicting the actual fit of the pattern if it were sewn to the model’s body size. This is compounded by the possibility that clothes are pinned in place or pinned closer to the body and that photo editing might be creating the illusion of closer waistlines or trimmer leg silhouettes than the garment really gives.

So what’s a sewist to do to avoid pulling her/his hair out? The best indicator of final fit is the finished garment measurements. You can check the total ease amount by subtracting actual body measurements on the measurement chart from the finished garment measurements printed on the tissue, if they’re present. If not, it’s worthwhile to measure the pieces at least at the bustline to get an idea of whether the fit the pattern is said to be is the fit you’re expecting, and the waist and hip measurements are helpful as well. If you have a sloper that you work with for pattern fitting, you can rotate the darts to the approximate position of the sewing pattern you’re comparing it to to see how much the additional space the sewing pattern has, and whether this works for you for the fit you’re seeking.

Finally, it’s a good idea to know what kind of ease you prefer in your garments, and a great way to do this is to measure ready to wear clothing you already have that fits the way you’re wanting your sewn garment to fit. For example, if you have a skirt that is just long enough and has the amount of ease you want in a close fit, measure its actual dimensions and compare with your body measurements to get an idea of what desirable fit is for you. I’m incredibly picky about how pants fit, so as soon as my pregnancy belly resumes a more semi-permanent, somewhat back to normal state, I will be measuring a few of my favorite pairs of jeans for exact inseam length, favorite boot cut flare amount, and crotch depth that is tight enough to give some curvy definition to my back end without being pinchy or uncomfortable. In my own patternmaking future, I hope to help with the ease confusion issue by listing final garment measurements clearly and offering consistent descriptions of fit or an explanation of the amount of ease so that, hopefully, the sewist can know what they are getting into without having to sew muslins of every pattern.

If you have frustrations with pattern fitting because of excess ease, I hope that this was helpful. Do you have any tips or strategies that help you to get consistent fitting results from commercial patterns? I’d love to hear them!

Adapting a Sloper to Your Measurements – The Maternity Sloper

I thought it might be useful to share the process of adapting a sloper pattern to actual body measurements, and what more extreme sport version of this could I do than showing how I adjusted my usual sloper size to fit the ever shifting, radical transformations of the pregnant bod? Things have shifted, swollen, and rapidly expanded in ways that I have never drafted for before. These changes are specific to certain body parts, so simply sizing up till something fits wouldn’t give me anything that fits my actual skeletal structure. I have to bust out the scissors, tape, scrap paper, and all the best swear words I learned from my time in the restaurant industry for this transformation.

I’m starting with my high bust measurement, which pre-pregnancy was 36″. (With swelling and rib cage expansion as everything gets displaced upward, my current measurement is *slightly* larger, but I’m choosing to disregard the slight discrepancy since the bones of my neck, shoulders, and upper chest are still basically the same. These bony structures are the place that most garments will hang from, so I’m choosing to prioritize this over the softer fleshy areas that have slightly swollen (or vastly expanded) where adjustments are easier to make because fewer planes of the body are intersecting.

After printing and assembling the sloper, I’m using my Body Measurements for Sloper Comparison worksheet to record the sloper measurements and my own body measurements.

front-and-back-waist-length-measurement
First, I check the vertical positioning of my front waist length, back waist length, and bust position. For my size, the front waist length of the sloper (taken from the high point of the shoulder to the waistline) is approximately 16.25.” My body measurement from high point shoulder to the area previously known as my waistline is approximately 15″. Since this is imprecise at best given my current shape, and because I know I’ll need additional length in the bodice front to cover my baby bump, I’m choosing not to adjust the waist position.

For the back waist length, the sloper measurement is approximately 16.75″ and my body measurement is 17″, so I’m not going to make any adjustments here.

bust-position-sloper-measurementFor the bust position, I measure the pattern from the high point shoulder to the bust point/apex/nipple, and the measurement is 9.5″. My actual body measurement is 10.5″, so for this area, I’m cutting the entire dart area out and shifting it 1″ lower and redrawing the side seam, and comparing to make sure the length still matches the back side seam length.
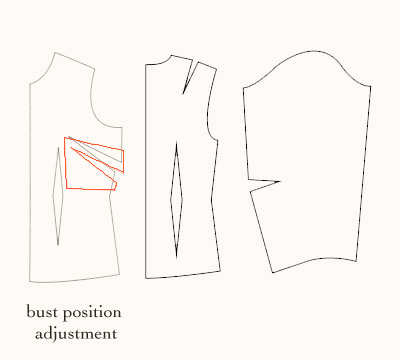
bust-position-sloper-adjustment

bust-position-sloper-adjustment-redrawn

vertical-adjustments-completed

Then I move on to the horizontal girth measurements, where things get really intense. The total waist circumference of my sloper is approximately 30.5″. My body measurement is about 41.5″ right now. The sloper measurement includes .5″ total ease at the waist for this size, so my total desired waist circumference in my adjusted sloper should include .5″ over my body measurement as well, so the total width of my personal sloper after adjustment should be 42″ total. The majority of that difference is in the front of my body, so when adjusting the sloper, most of the adjusting will be taking place in the front. From previous pattern work, though, I do know that my waist is proportionately larger than most patterns’ standard sizing, so for the sake of balanced distribution, I will add a bit to the back waist width as well.

The front waist measurement of the sloper is 16″, .25″ of which is ease, and my body measurement is 23.75″, which is 7.75″ of difference. If I add .25″ of ease, the total front adjustment I need is 8″. (I want to maintain at least about a half inch of wearing ease in my pattern, I want to be sure to add about a half inch over my total body measurement at the waist.)

24″ actual body and ease – 16″ sloper measurement = 8″ adjustment needed to full front bodice at the waist.

So I’ll be adding 8″ of extra width to the front waist, total. Since I’m working with the pattern piece that covers a quarter of the body, I’ll only be adding 4″ to the actual pattern piece. (All of these changes will be doubled in the actual fabric since this piece is cut out twice.)

For the pregnancy shape, the front waist darts are definitely not needed, (unless you’re going for something super fitted at the underbust, in which case you could shorten the dart to the length needed and end it higher, well above the waist). For my current purposes, I don’t need the dart at all. It’s 1″ wide at the waistline, so eliminating this dart adds 2″ of total width to the front bodice, or 1″ of the needed 4″ width in the quarter body pattern piece.

I still need to add 3″ to the quarter body front bodice piece, or 6″ to the full front bodice, at the waist. To determine where and how to add this extra width, I’m going to consider what amount I need for the back as well. The sloper measurement is 14.5″ in back, which is .25″ ease. My body measurement at the back waist is 17.75″. If I add .25″ to that body measurement for ease, the width I want the back waist to be is 18″. So for the back, the total adjustment I need is going to be:

18″ actual body and ease – 14.5″ sloper measurement = 3.5″ adjustment needed to full back bodice at the waist.

This means I’ll need 1.75″ added to the quarter body back pattern piece. The back dart is 1.25″ wide at the waist line, so one possibility would be to eliminate it, but I don’t want to do that and entirely lose the shaping it provides. Though my waist is wider than typical proportions, my back definitely does have curvature there that a dart allows the fabric to follow. I may narrow it slightly to add some width, but I’ll wait to see how much. Another possibility would be to slash and spread the pattern along something like a princess line hinged at the underarm area, but this is probably more complicated than what I need, and would involve changing the hip, too.

For the sake of simplicity and trying to add girth to the pattern in a way similar to the rectangular body shape I actually have, I’m going to reduce the waistline at the side seam by straightening it, making the same adjustment to the front bodice side seam, because those pieces must match in length and their alignment is crucial to the balance of the final pattern. This adjustment adds 1.25″ width to my quarter body pattern pieces in back and front. The remaining amount I need to add at the waist is .5″ to the quarter body back piece and 1.75″ to the quarter body front piece.

side-seam-adjustment

To finish the waist adjustment to the back, I’m going to narrow my back dart width by .5″, leaving me with a .75″ back dart for shaping. To finish the waist adjustment to the front, I’m going to add to the center front by essentially slashing and spreading along the line where the dart was to add space for the additional body volume here.
I want to slash and spread enough to make the waistline 1.75″ larger. (Interestingly, in historical patterns, the center front seam often was curved along this line. To me, this seems like a potentially more accurate two dimensional depiction of the actual body shape in the front of the torso, which is rarely flat, unless you’re very athletic and far more disciplined about food than I.) Another benefit to this pattern adjustment is that in the future, when/if/to whatever extent my body does return to normal, having a center front bodice seam will allow for easy repeat alterations, so my maternity wear isn’t necessarily going to be relegated to the back of the closet for the rest of time, but can shrink back down with me as needed.

all-waistline-adjustments

Next, I want to look at the high hip. The industry standard for this measurement is approximately 4″ below the waistline, with the full hip approximately 8″ below the waist, though of course this varies from person to person and between different figure types. I want to compare the high hip of the sloper (36″, .5″ of which is ease) to my high hip body measurement (39″), remembering to add .5″ of ease to my body measurement. I know from previous pattern work and from my belly bump that the entirety of this discrepancy is in the front of the pattern.

39.5″ actual body and ease – 36″ sloper measurement = 3.5″ adjustment needed to full front bodice at the high hip.

This will be 1.75″ needed in the quarter body front pattern piece. If I weren’t pregnant, I would probably slash and spread outward at the side seam to add the needed amount, but since the protrusion of my figure is along the center line, I’m going to add it to the center instead. Since I already slashed and spread at the waist to angle the sloper pattern outward and didn’t yet adjust the hip area, I can just measure this amount and alter the center front curvature to add or reduce as needed here. The amount that was already added at the hip by my previous waist adjustments works just fine here.

high-hip-adjusted

Then I want to look at the low hip measurement, which is approximately 8″ below the waist, give or take based on height and figure type. In my case, and in the case of any full abdomen to some extent, since the belly bump expands both vertically and horizontally, it will be a bit lower than this, especially in the center front. I’ll be adding extra length to the bottom center front to cover everything. The sloper measures 39.5″ here, with .5″ of that being ease. My body measurement is 41″ here. So I’ll add ease to the body measurement and then calculate to find my needed adjustment:

41.5″ actual body and ease – 39.5″ sloper measurement = 2″ adjustment needed to full front bodice.

So I only need to add 1″ horizontally to the quarter body front pattern piece at the low hip. My previous waist slash and spread adjustment angled the low hip line outward more than this, so I’m going to curve that line back in towards the original center front line a bit. I’m also going to add length here, too. My sloper measures vertically about 9.75″ from waistline to low hip, but my current body measurement is 12.75″ here. I’m going to add about 3″ vertically to cover this.

low-hip-and-full-abdomen-adjustment

And that’s it for the major adjustments for the pregnancy belly. I’ll have to add more to the center front as I continue to expand, but the principle is the same. This is by no means the definitive way or the only way to do this in the flat pattern. Most patterns I’ve seen for maternity tend to add extra room/ease at the side seams, which works too, but in a much more drapey way that feels a bit too much like a shower curtain to me. The shape here hugs the curve, much like the cup of a bra pattern curves to encase the shape, rather than just draping over it. The downside of a center front curve like this, though, is that if the curve is bigger than the actual body shape, there will be sagging and wrinkling like a sagging bra cup. But that center seam allows a lot of adjusting as needed to happen during fitting, and changes made there are more independent of the rest of the garment than altering at the side seam might be.

Tutorial on flat pattern adjustments for maternity by Blue Hours Atelier. Click through for more on how to adjust a bodice sloper for maternity.

I hope this was helpful, and I hope that my hormone addled brain didn’t make any blatantly obvious, embarrassing simple math errors. 🙂 There are some other adjustments I do to my own sloper for a forward shoulder and broad back that I’ll probably cover in a different post soon. Happy Friday!

Free Downloadable Sloper Patterns and a Website for Free Resources (!!!)

woven-bodice-sloper-cup-size-variations

I’m super excited to say that I have FINALLY designed and fleshed out a website that I feel good about. And on this website, you will find the *free downloadable sloper patterns* that I have been working on for approximately a year and a half. Why so long? Let’s just say that there are a lot of opportunities for screwing up some seemingly minor thing in the process of choosing sizing, developing grade rules, drafting, applying said grade rules, and modifying for cup sizes, not realizing it for a very long time, and then having to go back and start completely over because one thing affects 37 other things! 🙂 Which is not to say that I can guarantee these are perfect, but I’ve learned so much in the process of creating them that it has been time well spent, and I hope they can be useful.

These are the starting point for my pattern line, and I’m making them available as a potential fitting aid for my future patterns for anyone that chooses to use them, but mostly as my way of trying to contribute something that I hope can be useful to the online sewing community. The online crafting/sewing crowd is so inspiring and generous with encouragement and help and tips and tricks that it’s been a huge part of making this craft what it has become for me. So thank you, friends!

I’ve put every single size in my range up on my website as separate pdf files, and there are B, C, and D cup size variations for each one. They can be used for determining sizes and fit for my (upcoming) patterns, or they can be used as a sort of two dimensional dress form for working out exactly the fit you need for any pattern, or they can be used as a base for your own pattern drafting. I have some resources like a finished measurement sheet, a body measurement worksheet printable, and a tutorial on measuring yourself and adapting the sloper to your measurements on my website here. Feel free to share them with anyone that might find them helpful!

A nested version of the pattern that includes all sizes is available on my Etsy shop here, if you’d prefer it for grading between sizes or your own drafting purposes.
WHAT IS A SLOPER?
A sloper is the basic starting point for pattern design. Also known as a fitting shell, it is a baseline with enough wearing ease to allow for movement and breathing, but no design ease and no details. (It isn’t quite the same as a moulage, which fits even tighter, like a second skin, and it isn’t the same thing as a block, which is a basic pattern for a specified style, with design ease included, that can then be elaborated with details.) Slopers don’t include seam allowances.

WHAT IS A SLOPER USED FOR?
Patterns almost never fit right out of the envelope. This isn’t a failure of the pattern. All patterns (except bespoke ones) are drafted to an average set of measurements that falls somewhere in the middle of the vast spectrum of human shapes and sizes and body types. Unless your body dimensions happen to be very close to that average set of measurements used in drafting, your pattern will need adjusting to better fit your body. A sloper or fitting shell can help you to work out and keep a physical record of those adjustments.

A sloper is like a two dimensional dress form. You can use a sloper as a basis for designing your own patterns, or you can use it as a fitting aid to adjust patterns to your body measurements and preferred fit. In adapting a sloper to your own measurements, you establish a known minimum requirement for garments to fit, and you can establish the fit adjustments that you know you need to apply to every garment, instead of figuring them out anew for each pattern. The sloper provides a baseline for fit, where the pattern uses additional design ease, design lines, and detailing to give style, structure and movement to garments.

I wanted to draft my own set of slopers as a starting point for a few reasons. First, I wanted to start from a more realistic shape than the body model commercial companies usually assume. The industry standard body model is usually hourglass shaped, though statistically, most women do not have this shape. I wanted to use as a starting point a somewhat fuller waist and hip measurement than the Big 4 for a more rectangular body type, which statistically is more common, at least in certain European population samples. In developing grade rules, I tried to incorporate statistical measures of actual bodies rather than dress form increments or standard grades for tricky areas like shoulder length. My hope is that this will yield a better, more realistic fit, but the downside is that finding the right one for you will probably require taking your measurements and may not translate directly from what you’re used to using in a pattern from one of the Big 4 companies.

I also wanted to draft my own slopers to start with a very fitted baseline, and going forward, I want to offer patterns that are very clear about the amount of ease they include. Mostly this is because one of my recurring struggles in sewing from commercial patterns, especially trying to sew a historical range from late 19th century to 30s and 50s patterns to contemporary ones, is that the amounts of ease change so much over time and between manufacturers that it’s hard to know how something will fit without making a muslin of everything. And making muslins isn’t the best use of fabric and to me is the. most. boring. thing. ever. Personally, I prefer patterns that don’t include a ton of ease, and patterns from the Big 4 almost always have too much for my liking. So in my future drafts, I expect to use ease standards closer to the lower end of the industry standard range, and I intend to be super clear about that ease so that sewers know what to expect without having to try it and see quite so much.

demeter-nursing-bralette-burgundy-lace-gothic-lingerie

In other news, I added my first underwired and nursing bras to my etsy shop, because holy manic nesting impulses channeled into my creative pursuits instead of my godforsaken hoarder house, Batman! Pregnancy makes me feel like a crazy woman, but throwing myself into work is extremely therapeutic right now.

Coming soon to the blog: how to adapt a sloper for maternity, in which yours truly shall snarkily narrate an exploration of the changes pregnancy has wrought upon this physical form and how I deal with them in the flat pattern format. It will also serve as an extreme example of how to adapt a sloper to your body measurements. 🙂

Have you used slopers in your sewing? Have very strong opinions on the amount of ease one way or the other included in commercial patterns? I’d love to hear your experiences! 🙂

Finished Object: Champagne and Black Demi Bra

champagne and black lace underwire bra blue hours atelier

Pregnancy is rapidly rendering my once favorite bras uncomfortable, so now that the second trimester is upon me and I’m actually able to make it through my day without three naps and seven meals, I’ve had more waking hours and energy with which to put them to use.

So this weekend I dug out my tried and true bra band and adapted it for a demi wire and a three piece, very round cup shape. I chose to make the cups out of a gorgeous beige stretch lace I’ve got in my stash and lined it with stretch mesh in a blushy skin tone, so that the cup could conform to variations in my shape depending upon planetary alignment, tidal schedules, water retention, engorgement, etc, lol. I used a slightly lighter, stretchier power net for the back band that I usually do to build in some extra give in the band, too. Thank goodness for spandex.

Now that I have a pretty solid understanding of materials and construction methods in bra making, I like to challenge myself on the finishing details, so I went all out on the interior on this one.

champagne and black lace underwire bra back blue hours atelier

I used a gothic arch on the elastic, since I’ve found that especially as my tummy expands, the elastic on the bridge rolls in a weird, uncomfortable, and unflattering way and it seems like that can cause it to look worn out over time in some of my older bras. The gothic arch is trickier to construct than an unbroken piece of elastic but I think it sits much better against the body, especially over the life of the bra. I enclosed all the seams using the mesh lining, which I think gives a great feel against the skin and a good look, too. The strap elastic is enclosed where it joins with the bra as well.

I’ll be adding this to my Etsy shop after a few more iterations and a few more tweaks on a bra size / style guide I’ve been working on, along with a few other full cradle and partial band bras. More soon. 🙂


Vintage Sewing Library: 1930s-40s Draping

I’m not sure if I have shared this link before or not, but I returned to it recently and thought I should share. These books were linked to on The Vintage Pattern Files blog, which is itself an incredibly generous resource for knitting and vintage fashion too. But the books themselves are great resources on draping, and one of them happens to be a Woman’s Institute booklet produced in the mid 30s. Evie of La Couturiere Dimanche scanned it and made it available on her blog (here). I love all things Woman’s Institute, and their materials from the 30s are especially hard to find. Yay for the internet!

designingbydraping1936

There’s another by Mary Evans from 1935–Draping and Dress Design.

drapinganddressdesign1935

It goes into some depth on draping sleeves and shoulders and necklines, which are my current problem areas to get the fit just right. Also interesting historically, since there seems to be an erroneous contemporary idea that toiles or muslins weren’t really used, despite Mary Brooks Picken advocating them in notes in Fashion Service in the 20s and these draping guides. My suspicion is that wartime shortages made fabric more expensive during the 40s, or maybe people had less disposable income for muslin, or the make do and mend mentality changed sewing practices during that time, and maybe that stuck until our contemporary era. If anyone knows more about that, I’d love to hear it!

As far as my own projects go, I have two wearable muslins in progress at the moment–one is a blazer jacket that actually allows some movement and incorporates tailoring techniques (thank you Craftsy courses!) and another is my first decent self drafted corset.  Both started as flat pattern attempts, went wrong multiple times, and gradually morphed via draping and chalking and cutting and cussing into something more like a workable pattern. I think draping is more my style than flat patterning, despite all my attempts to do it the hard way. Sigh.

Wardrobe Curation Inspiration, Tools, and Deep Seated Existential Angst.

This is a process I’ve tried and failed to execute multiple times. Here’s hoping the New Years DO ALL THE THINGS momentum will help me renew this project with a vengeance.

Here’s my shortlist of inspiration and refinement tools:

Into Mind on wardrobe refinement. (http://into-mind.com/)  This site is full of checklists and exercises and even a workbook to help refine one’s personal style into a steamlined, satisfying source of inspiration and pleasure. The author writes from a minimalist perspective, which I love, and even her blog page layouts are enjoyable examples of her aesthetic.

(Coletterie’s Wardrobe Architect.) Yes, yes, a thousand times, yes. How to define your style, your colors, etc, and actually plan your sewing in such a way that you create a wardrobe based on those principles. I cannot heap enough praise upon this series. I’m working through it right now to choose my sewing patterns/projects after way too many meh projects that aren’t exactly everyday wear anyway.

This might be weird, but, The Well Dressed Home by Annette Tatum. (It’s on Google books here.) While it’s intended to help you develop a style for your home decor based on your personal style, I find it very inspiring in a broader way. I like the way it establishes general styles and then shows creative ways to combine those styles. There is so much visual interest here that it’s impossible for me not to be inspired when I read this.

Style Statement, a book by Carrie McCarthy and Danielle LaPointe (see it on Google books here) which has a weird cult-ish following online and which is maybe 20% useful/80% too hippy fluffy for me, is nevertheless a useful tool for clarifying one’s own aesthetic. (They also love the Pareto principle.) The Manifesto of Style is fun food for thought. I very much enjoyed the book and the gorgeous visual design, but wasn’t struck by the lightning bolt of clarity when I “discovered” my two-word self descriptor. (Creative nostalgic. Pardon my French, but no shit. I could have identified that without doing all of the touchy feely self explore-y pages.) Mostly I find it interesting as a book full of beautiful things and interesting studies in specific personal styles. There’s also something intellectually important about exposing yourself to other worldviews; sometimes I find happy-hippy-self-fulfillment-actualizey speechifying to be a nice change of pace from my internal McConaulogues.

nothing-is-ever-over

biological-puppet

lets-go-to-work

I also have a hard time with the concept of identity as anything fixed or as anything so simplistic; I identify more with David Bowie figures who transform themselves repeatedly throughout their lives in accordance with whatever speaks to them best at a given time. So, in a nutshell, I’m thinking my sewing and wardrobe curation for winter/spring can be boiled down to: What would catwoman wear? Vintage style lines and silhouettes in a very simple, monochromatic palette (blacks, creams, a splash of oxblood here and there). Elegant and understated. Form fitting but allowing for movement and not revealing. Subdued feminine. My next move is to select about five patterns to stick with until I get them just right.

Sewing Projects: The Caftan Experiment.

I bought a few yards of black chiffon recently, and wanted to try something relatively simple and low stakes to get a feel for sewing with it. I’m also on the prowl for some kind of fancy-handmade-yet-generic-enough-to-make-en-masse gift for the adult women-folk of the family. A see through caftan might be a bit risque, but it sure beats a generic vanilla bath set. Let’s call it a beachy cover-up, if we must be so prudish.

So this weekend was the trial run.

To sew a caftan, theoretically, you really only need a few measurements: the width (measurement from end of arm to end of opposite arm where you want the garment to end), the length (where you want the garment to end), the desired size of your neck opening, where to put the side seams, and where you want to gather or belt in the garment. My highly sophisticated blueprint:

image

When I did this I sewed it in one piece of fabric folded into quarters and a head hole cut from the center, which was, I think, a mistake, because it’s so tricky to hem in this way, and I didn’t want to add a facing to chiffon. Next time I’ll do it in two pieces to make the neckline finish neater, and easier to manage if I try a v-neck. I measured it to end just above the knee but forgot to account for the mathematics of boobies and so it hit a few inches higher on the thigh than I had intended.

Sewing it up was simple enough. I started with hems on the bottom of both sides, sort of out of necessity, because chiffon is a messy beast. It’s also incredibly slidey and I found it tricky to maneuver without seam lines getting all drunk like. Not a big deal on the hems and the neckline but a huge issue when I topstitched down the sides. My moment of genius solution to this was to use tissue paper to draw a stitching pattern and then to pin it to the top of the fabric as a guide and a stabilizer. Then when it’s finished, you just tear it away. Magic!

What I wanted to end up with:

laurelCanyon-020113-bc-005_t650(image credit)

 What I really felt like:

Petrie_original_colors(image credit)

I think the long sleeves and excess fabric below them made it feel more flappy than I wanted. More experimentation to come!

Why Sewing Machine Addiction?

Sewing machine addiction is a helluva drug. So far in my life, I’ve been prone to obsessive interests that come and go and almost always involve hoarding and organizing materials as part of the pleasure of the obsession. Sewing machines are no exception. In fact, they’re one of the strongest experience I’ve had with any hobby since my childhood dinosaur phase and young adult survivalist kick that had me, among other things, living in a tent in the yard for a month. Lolz.

I’ve lost count of the actual number, which is blurry anyway because some of my sewing machine projects involve a machine or two that’s pretty much bound to be just a parts machine. I have a few vintage Husqvarnas that don’t run that might end up Frankenstein/Steampunked into some new creature eventually.

young frankensteinBut I really need to stop hoarding, and also to maybe Etsy off some of my least favorite machines to clear out some room. There are *at least* 15 sewing machines crammed in my litle 12″x12″ office (whose closet bottom is the angled ceiling of the staircase, so no storage space there, either) along with two cabinets, a table and chair, coffee table, and two workbenches. Tight and womblike and disheveled is usually what I go for in a workspace, but it’s too much.

And yet I can’t seem to keep from drooling over other machines I’d love to have. Because it isn’t just about the utility. Each machine represents so many things to me: a mechanical puzzlebox to put into working order, a beautiful tool to learn to use, an antique with its own unique history, and a piece of design that speaks volumes about the aesthetic of its time.

If someone dropped a top of the line contemporary Pfaff on my doorstep, I don’t think I’d use it. I don’t find it inspiring. It’s a tool that has all these features and computerized functions, but it’s not a piece of industrial art. It hasn’t got the history and the charm of wear. It doesn’t make me dream about the previous owners and previous designs it might have created toward the enrichment of the lives of its owners. It’s plastic, without a personality. Give me a pin-rashed, silvered decal-ed old Singer handcrank any day so I can marvel at the simple elegance of the mechanics and turn the well-worn wood of the handle and more deeply enjoy the tactile nature of the experience. Give me the spaceship knobs and funktastic designs of the late 50s and early 60s and let me consider the way the space race changed everything, even sewing, as I stitch away. And I also kind of feel like it builds character to learn to sew a proper buttonhole without the one push button function, but I’m a Luddite like that.

That being said, it’s a pretty shitty would-be-minimalist who is scouring ebay daily for old 50s Kenmores. It has to stop somewhere. So I think I need to start collecting images instead, see if I can put together a design timeline for machines, enjoy pondering the visuals rather than possessing the actual machine. I also need to keep focused on how I really want to spend my time: making, crafting things, not just owning them. All of these machines work better with regular oiling and use, so I need to pick my favorites and rotate them, instead of having machines that sit unused.

Because if I collect many more, my family is going to commit me.

Style Inspiration: Catwoman of The Dark Knight Rises

Full disclosure: I had a major goth girl phases in my misguided early twenties. My aesthetic has changed immensely over the years–no more black pleather with chainey things, no more piercings jutting out of my face, no more Black No. 1 hairdye. But I still adore wearing black; it makes me feel self-possessed, crisp, and it has the potential for unrivaled elegant minimalism.

Cut to my in my PJs, working and zoning on some fluff tv in the background. The Christopher Nolan Batman trilogy as “fluff” reveals much about my dark broody nature but I digress. The trilogy is okay, I don’t feel particularly strongly about it, except for Selina Kyle’s character. The first watch, her semi-snarkiness seemed a bit over the top for me; the second watch, I was in love with her I’m-a-hardass-but-really-not vibe, her complicated morality, her color scheme choices. Something about the dark elegant costume pieces with retro inspired lines and feminine but not overtly sexual styling just mesmerized me. Which is to say: there shall be costume design emulation in my future.

catwoman style lines

The catsuit is functional and gorgeous as superhero costumes go. I love the curves of the waist and the almost corseted look of the curves there, as well as the raglan sleeve and the almost Mandarin stand collar. There is a curve hugging dress she wears in another scene which appears to have kimono sleeves and a 50s era waistline, but the styling is so perfect it doesn’t look like a period piece. In her airport scene, the suitjacket and skirt ensemble are pure 50s glamour. I haven’t been able to find much about the inspiration for the wardrobe, since most costume discussion of the film focuses mostly on the action hero suits and more obvious costume choices. But if I had to wager money on it, I’m betting there’s something interesting happening with femininity and contemporary womanhood driving those concepts.

And during my obsessive internet scouring for future sewing and styling inspiration, I found a few images from shooting of scenes that apparently never made it in the film. Imagine, Gentle Reader, my squeals of girlish glee and the jazz hands that ensued.

catwoman not in filmA capelet AND a coat dress. Maybe a little too glaringly vintage for the film, but really cool to see given a Hollywood treatment. Definitely trying to sew the capelet soon. There’s something about the aesthetic of the whole world that I deeply enjoy. Contemporary but with these nostalgic overtones in everything from the design elements and architecture to the story itself.

Advance 7833: Vintage Raglan Blouse with Collar and Sleeve Variations

image
This, friends, is my weekend sewing project. Having wonky shoulders (broadish, forward) and an utter hatred of garments restrictive of my arm movements, here’s hoping the raglan sleeve will prove to be my friend. So much to love in this design–simple but fitted, with the optional elegant touches of the French cuffs and scarf collar, versatile in terms of wardrobe. I’m hopeful.
For any pattern drafters on the hunt for inspiration, a look at the actual pieces:
image(1)I’ve also been wanting to make a pair of pants. I think this blouse, in a light blue broadcloth to start, and maybe in some ivory satin should it go well enough to dip into the higher end of the fabric stash, would look amazing with some high waisted Katherine Hepburn style pants or closer fitted cigarette pants. My pants making has been dreadfully limited, though, and I’m highly perturbed by the problem of the prominent camel toe I see sometimes on sewing blogs. Being an extremely self conscious type mocked for odd things in grade school I simply cannot deal with the camel toe. Not at all. So I fell down a rabbit hole tonight reading all about adjustment possibilities to avoid the dreaded thing. More on that when I get some practice in. Also, discovered the possibility that I might have a swayfront issue (like a swayback, I suppose, but a pelvic tilt in the opposite direction that might make an excess of fabric in the front). It seems to be an elusive adjustment to track down a tutorial for, so one of my goals for the weekend is to dig around some of my vintage pattern drafting books for more information.