Working with Slopers: How to Use a Sloper to Grade A Skirt Pattern

Pattern grading can be done in a variety of ways–slashing and spreading a pattern, shifting points as x,y coordinates on a grid, radially, and I’m sure there are more. If you have a sloper that fits you well, you can use your sloper as a guide when grading patterns to your desired size. Using a sloper to grade is essentially using the slash and spread grading method, but the approach is a little bit more hands on and intuitive than it is mathematically precise.

Someone asked me for advice on how to use a sloper to grade patterns, so I wanted to write out the process as I would approach it. This is only one way among many, but I hope that it might be helpful and maybe help clarify working with slopers to adapt sewing patterns to specific measurements as well.

What is a sloper versus a regular pattern?

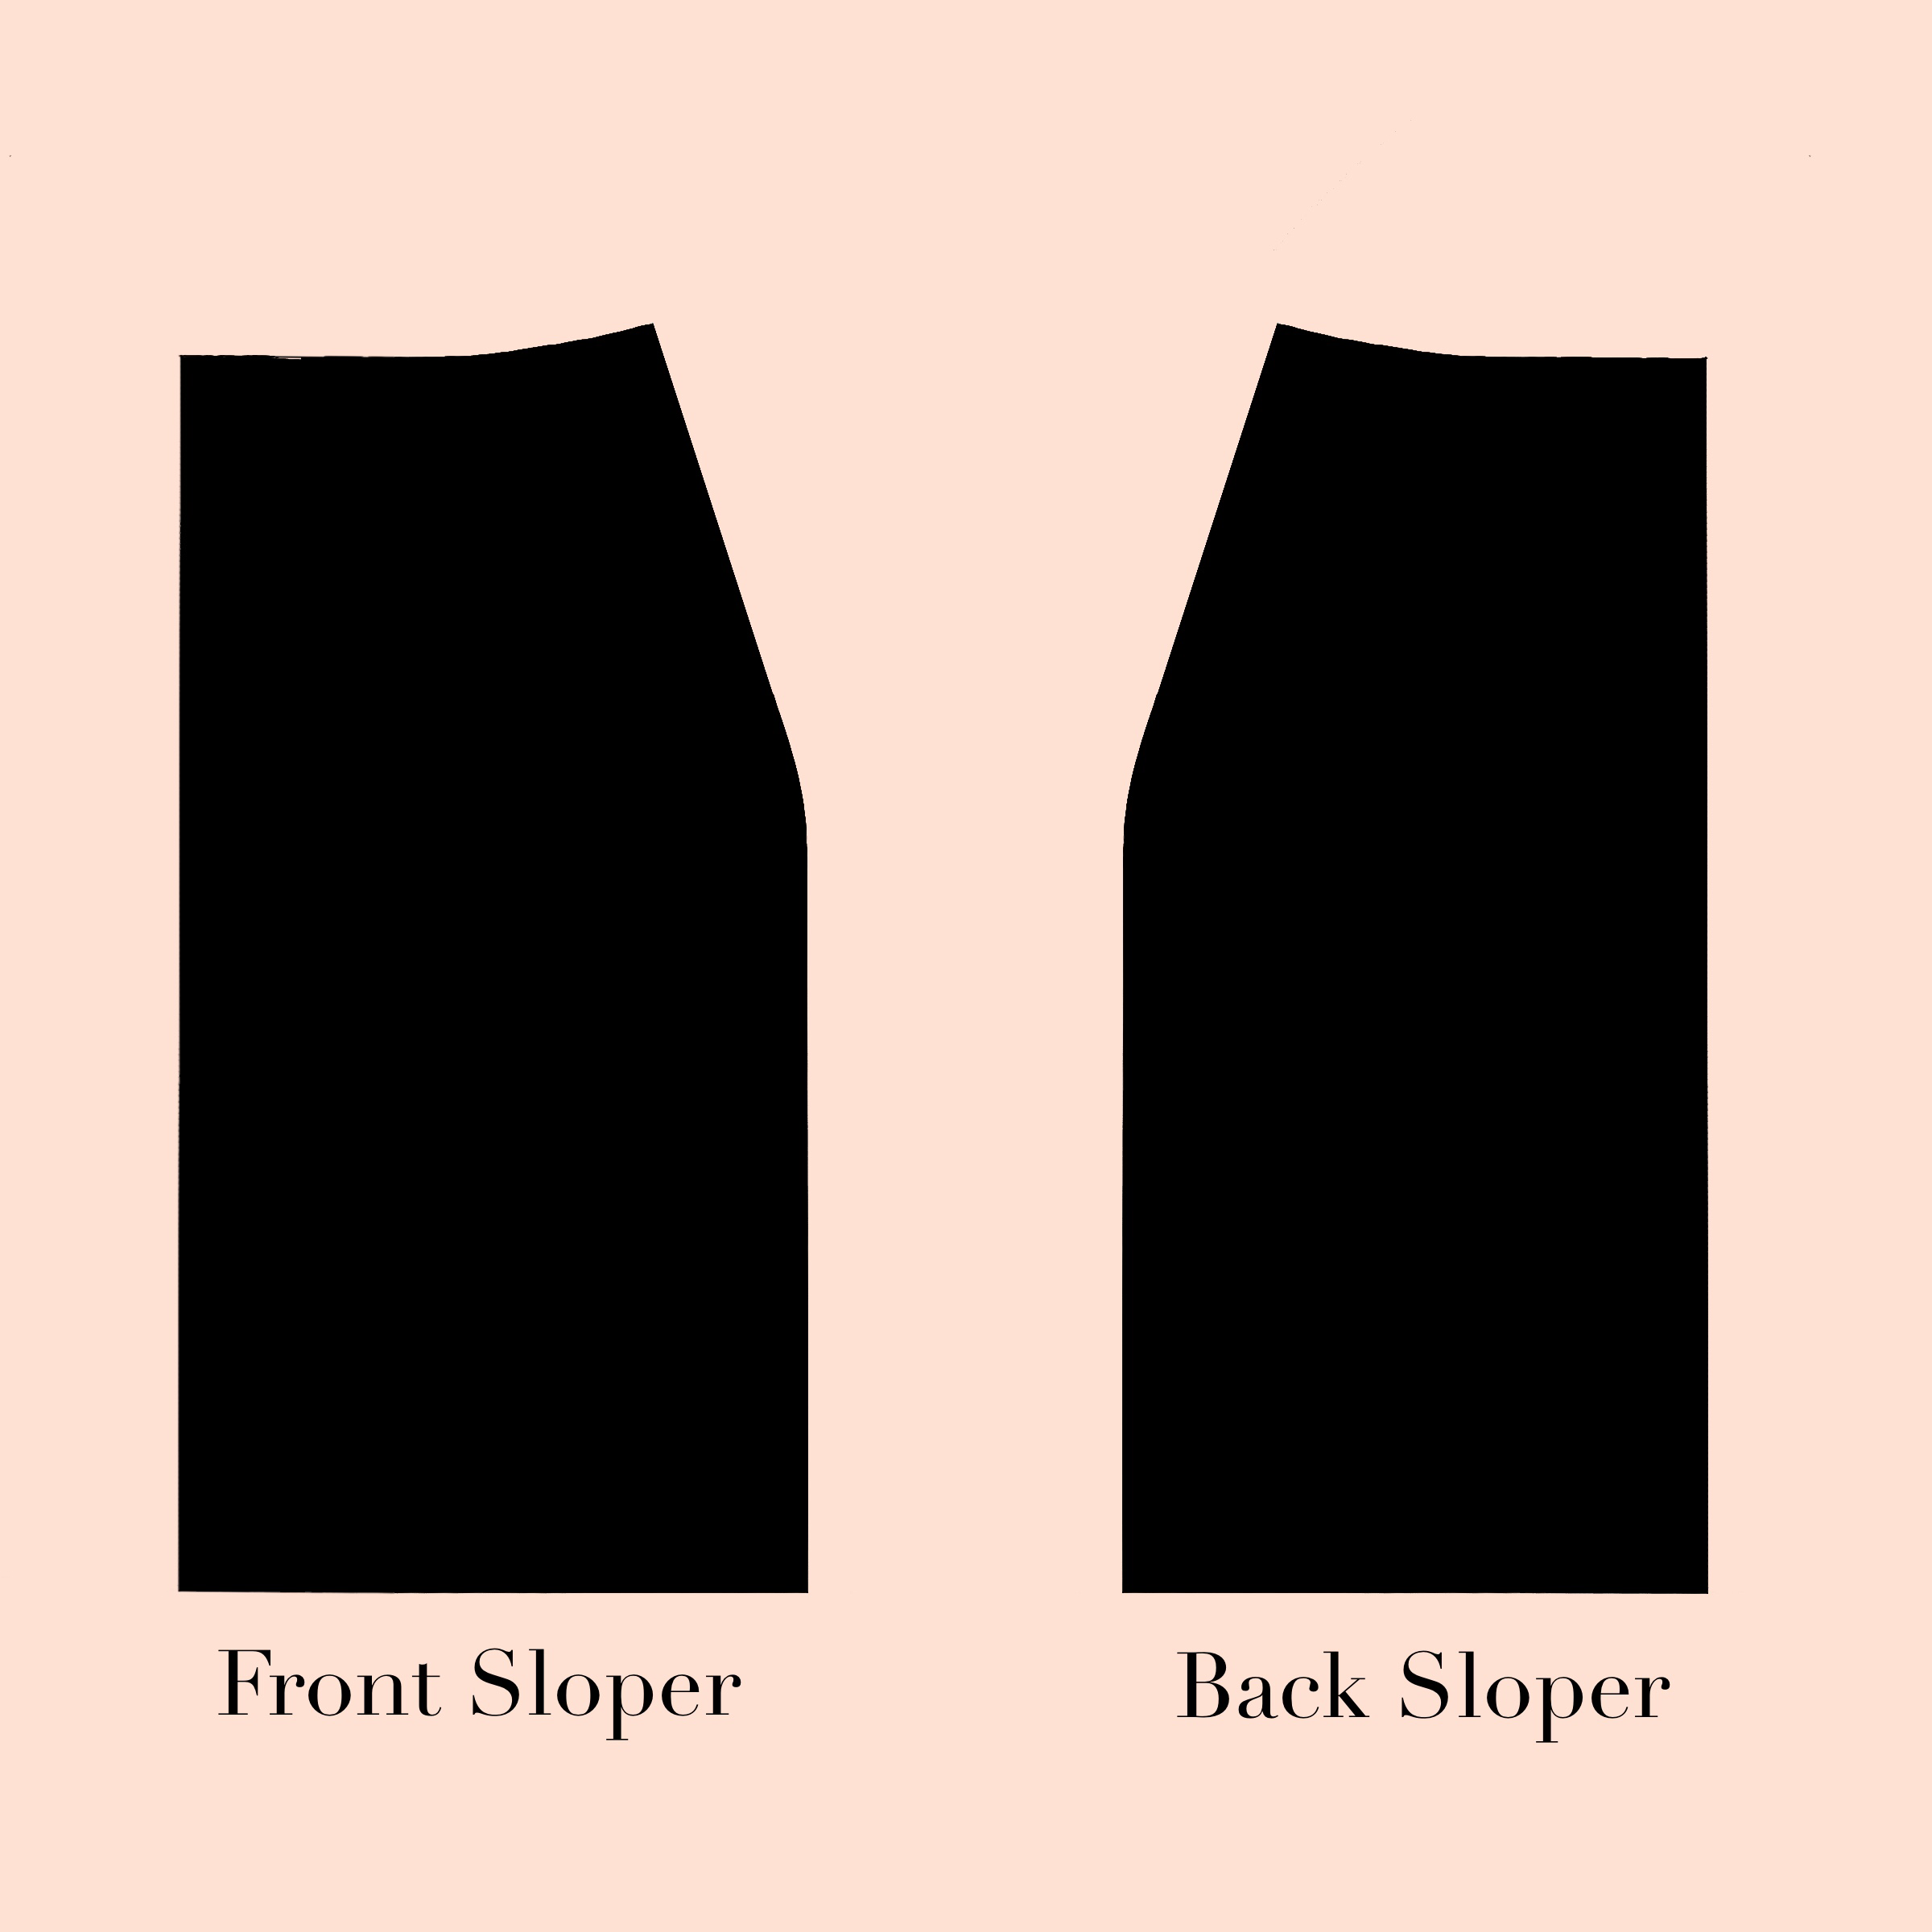
A sloper is a basic fitting shell, or a pattern that has been adjusted to fit your body shape very closely, with only the minimum required ease to allow for movement (wearing ease). A sloper represents the minimum amount of fabric required to fit your body. A sloper pattern that has been adjusted to your body is like a two dimensional dress form, a map of mass distribution and fitting adjustments to accommodate them. A fitting shell or sloper pattern that has not been fitted to a specific body is a pattern that fits a generalized ideal body as closely as possible while still allowing for movement.

A pattern is different from a sloper in that it doesn’t follow the body exactly. It almost always adds fullness or additional ease in a variety of ways to the garment in order to create shape. There are places where the garment must anchor to the body or be held in place by clinging close to the body, and in those places, the sloper and the pattern will be almost identical. But in other areas, the pattern will add extra fabric to create volume.

How can a sloper be used to work with patterns?

A sloper provides you with a map of the minimum amount of fabric necessary to fit your body. You can overlay and compare this to the pattern to be sure that the pattern is large enough to encase your body effectively. If there are places in the pattern that are smaller than your sloper, you know that you need to deal with those and add room in some way before you ever cut into your fabric.

A sloper can also help you to make your standard necessary adjustments to the pattern before you test, and can save a lot of repeated steps and fitting processes if you sew a lot of your own garments. If you know that you always need to increase waist circumference to get a good fit, you can incorporate this adjustment into your sloper and know where to add to every pattern you make before you begin.

A sloper can be used to grade a pattern up or down to your desired size as well, though this method may be less precise than grading by more mathematical methods. Essentially, using a sloper to grade is just one way to do a slash and spread grade, and the sloper becomes a guide for moving pattern pieces. It offers a quick and painless way to adjust patterns visually, and it can save some time by incorporating your fitting adjustments and resizing your pattern in a single step.

What is slash and spread grading?

Pattern grading is the process of enlarging or reducing pattern dimensions to create different pattern sizes from an existing pattern. This can get very complicated, because the way the body varies from size to size is a complicated subject that garment makers and manufacturers continue to struggle with. But the idea is simple enough.

Overall grade = the difference between the current pattern measurement and the desired pattern measurement (body measurement plus desired ease).

Distributed grade = the overall grade amount divided by 4, which tells you how much to add or subtract to each quarter panel of the pattern. Pattern pieces generally represent one quarter of the body, unless they’re asymmetrical, so 1/4 of the overall grade amount is distributed to each piece.

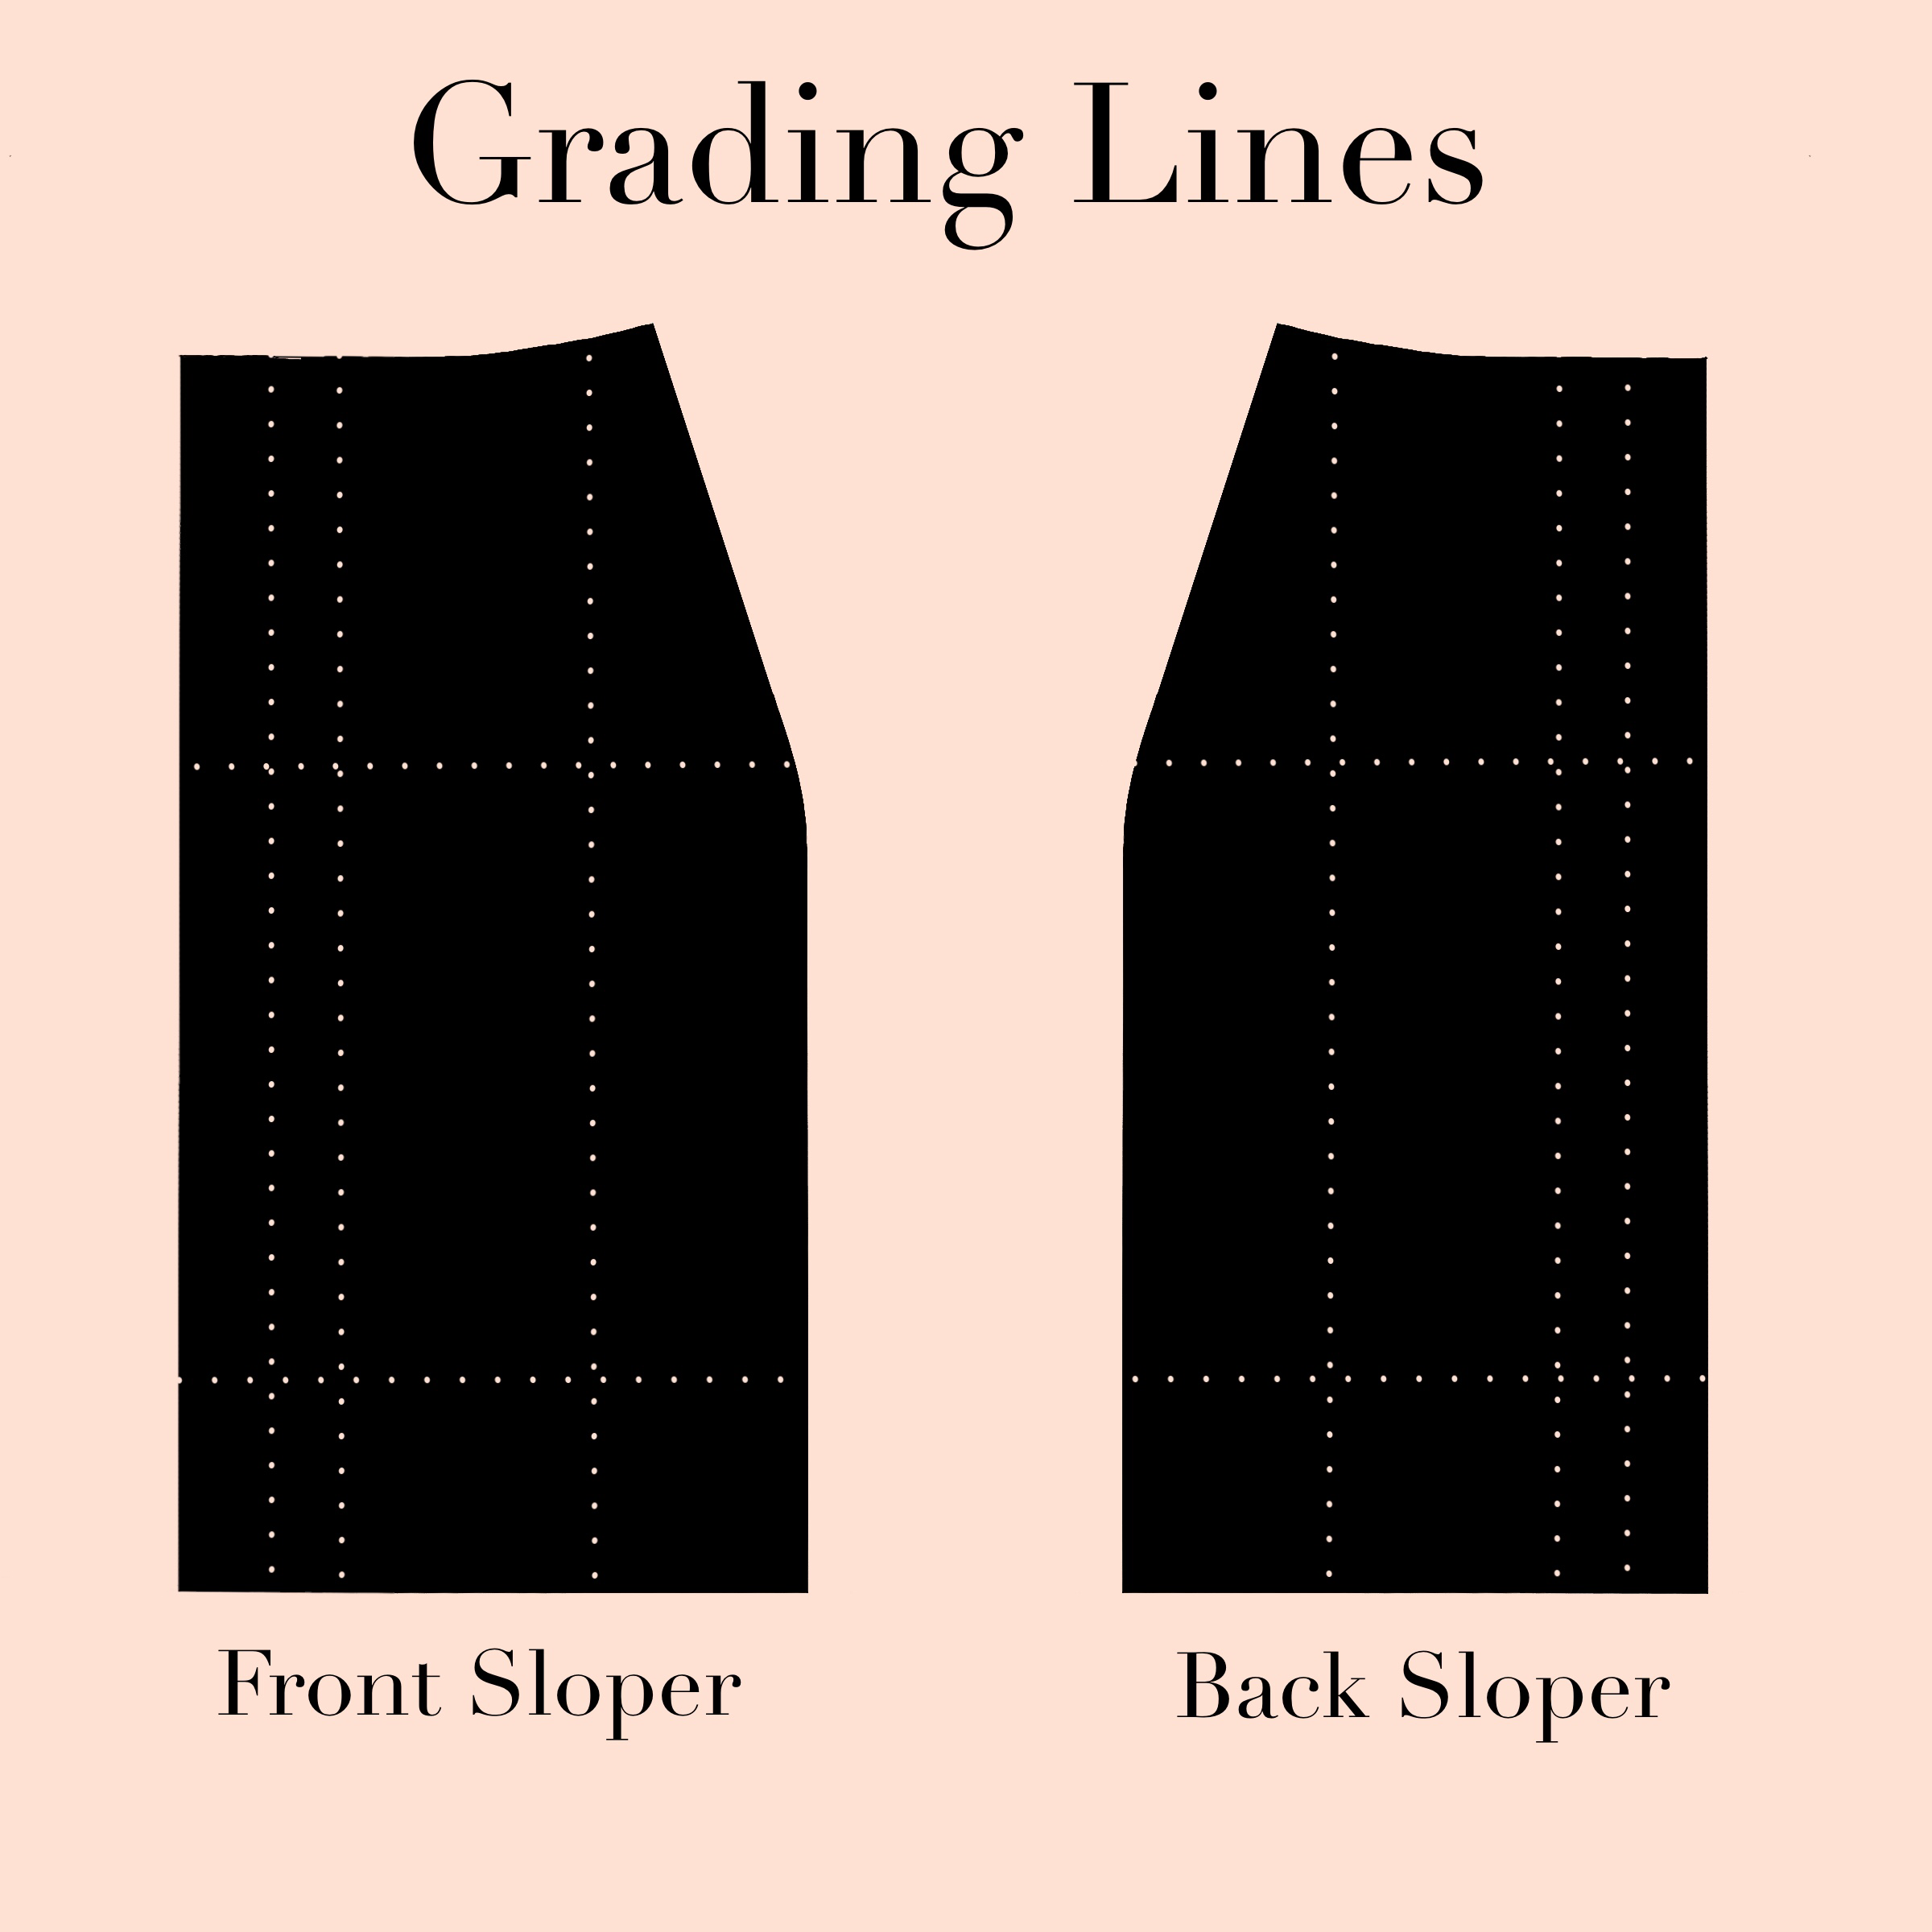
This additional space is added to the pattern in specific places to allow for the different amounts the body grows or shrinks from size to size and different places in the body. (For example, when increasing a size, you may add two inches at the waist, but the neckline circumference will increase by much less.) There is a standard set of grid lines representing where to slash and spread or overlap a pattern.

If you’re grading without a sloper, these slash line placements are very precise so that you can grow the pattern a very specific amount exactly where it needs to expand. That’s why there are double lines at center front and back. There’s a really good Threads article that explains this in detail here:

www.threadsmagazine.com/2008/11/01/quick-reference-for-cut-and-spread-pa…

So how do you determine where exactly to slash a pattern for resizing? It depends on your purposes. If you’re grading a pattern to an abstract standard, a generalized pattern to be used by multiple people and body types, you can use the standard grid lines shown above. These do seem to be agreed upon somewhat universally in all the patternmaking sources I’ve seen that use a slash and spread method.

But if you’re grading for your own body measurements or a specific person in mind with specified proportions that may or may not align with sizing standards, then the slash lines positions are more flexible and are determined by the needs of those body dimensions.

The exact slash line placement can vary based on pattern complexity as well. In patterns that aren’t very complicated like a skirt, the cut lines to slash on can be positioned with less precision than a more complicated pattern with crotch curves and scyes to deal with. The multiple slash lines are really just to allow the pattern to be spread or overlapped smaller amounts in more places so that the change in volume is spread out. In a pattern like a skirt with very simple lines, changing it incrementally by adding or subtracting smaller amounts in more places would yield the same results as fewer slashes that add or subtract a greater amount in fewer places.

Sloper Versus Pattern for Grading Purposes

If you’re using a sloper to grade rather than precise mathematically determined slash and spread amounts, this changes your approach in a couple of ways.

In terms of slash line position, if you’re grading with a sloper, especially one that has been adjusted to fit your body specifically, you usually only need to slash and spread where your body needs the space or where the pattern needs to lengthen. For example, if you’re making vertical adjustments and you have a waist to hip length that is shorter than standard, then your sloper hip and waist position are what you should use to determine whether or not you need to adjust the pattern. If the pattern has too little or too much length from waist to hip, then you would slash between the waist and full hip and move the pattern to line up with your sloper. The exact placement of the slash line doesn’t matter as much as the correct positioning of body landmarks.

It’s also slightly different than straightforward slash and spread grading because wearing ease and body measurement increases are already incorporated into the sloper pattern itself. The design ease is what will need to be added to the sloper. The final pattern and the sloper should not match exactly, because the sloper represents minimum fit and the pattern represents style created using volume and seaming. The goal is to preserve the proportions of the pattern while using the sloper to adjust sizing.

It is important to note that while wearing ease (included in the sloper and in patterns already) is somewhat universal, design ease, which is the widely varying amount of extra room added to create volume in garments, is proportional. For a style to have the same overall appearance whether a size 4 or size 16, that amount of additional volume must increase proportionately relative to the body. For example, having 2″ inches gathered in at the waist will appear differently on a waistline that is 24″ than a waistline that is 40″ in circumference. Two inches represents about 8% of the waist circumference in the original pattern. For the style to be graded well, the proportions must be considered where there is fullness added to the pattern. For it to appear proportionately similar, the amount gathered for a 40″ waist would need to be about 8% of the waist circumference, approximately 3.3″.

If you are grading up or down a size or two, especially if the garment design is simple, you may not need to worry about the proportions changing too much and you can probably disregard it without your end result being disproportionate. If the pattern is only going up or down in size by a couple of inches, the additional percentage of design ease to factor in is small enough to be negligible. But for greater size increases or decreases, it’s advisable to consider the proportions of body measurement compared to the pattern measurement and keep that proportional relationship consistent in your graded pattern.

How the Garment Hangs from the Body

When using a sloper to grade a pattern, consider where the pattern aligns most closely to the shape of the body, and where it hangs from or anchors to. For skirts and pants, the place the pattern anchors on the body is usually the waist and hips. The design relies on closeness to and tension against the body to keep it in place. In these places, the pattern should be most similar to the sloper. If the garment has pleats or gathers at the waist, there will be additional volume there, but aside from design elements, the pattern will take the shape of the body there, for the most part, because it anchors there.

Similarly, ignoring the cut away shapes of the neckline and the embellishment of the collar, the area where shoulders, neck, and back intersect at the top of a pattern is usually almost identical to a sloper. This is the part of the body that the garment hangs from, so a smooth, close fit to the body can be expected here (with the exception of shaped collars or funnel necklines, etc).

For the simple flared skirt I will be using as an example, the garment anchors at the waistline, and uses tension against the body here and the size difference between waist and hips to remain in position. So my sloper and my graded skirt pattern will have the same shape here, because there are no design features and no design ease. If there were design features like pleats or gathers, I would figure out the proportions they represent relative to the body, and figure out the amount to add or subtract to the graded pattern in proportion to the desired body measurements.

The Grading Process

To grade a pattern up or down with a sloper, you’ll need a sloper in the desired size, and a pattern that you want to grade, as well some large paper to trace on, sharp or mechanical pencils, a ruler or square, scissors, and probably some scrap paper and tape. It’s best for these purposes if your sloper extends the full desired length of the finished pattern. For my example, I’m grading a skirt pattern, so my skirt sloper should extend to the desired length of my final pattern. If needed, extend the vertical length at the center front, center back, and side seam lines.

Begin by tracing a copy of the pattern you want to grade. For simplicity’s sake, leave off seam allowances. They can be added back later and it’s much less confusing to remove them for now. Markings and grainlines aren’t necessary either, just the pattern shapes and structural features like darts and gathers or pleats. Facings are unnecessary as well, and can be redrafted from the final graded pattern.

Slash and Spread Along Grading Lines

Typically for the slash and spread method of pattern grading, a standard set of gridded lines is used to determine where to slash the pattern and by what percentage of the desired grade the pattern is to be expanded or reduced. With a sloper, the precise distance to move pattern pieces can be determined by just aligning the pieces visually, though for patterns with a lot of additional volume, this just establishes the basic shape.

It’s important to remember that additional volume may be needed where there is a lot of design ease added to the pattern so that you can preserve the proportions. But sliding the pattern to align with the sloper provides a starting point, and for small size changes, the proportions are similar enough that they can sometimes be ignored. For my simple flared skirt example, the flare at the bottom is the only place where the design ease proportions are a consideration. If my original pattern has a bottom hem that is 12″ larger than my sloper hem of 36″, then the design ease is 12 divided by the sloper measure (or body measure plus wearing ease of 36, for a result of 33%. So whether I’m grading up or down, the final pattern should be 33% larger than the body at the bottom edge.

So start with the grid lines. If your pattern has seam lines that divide each quarter into pieces, these grid lines can be moved slightly to position them within pieces. This is more of an eyeballed art than a science. There is less flexibility in locations like the neckline or scye, though. If it helps, patterns can be butted up to one another at the seams, temporarily taped and separated later.

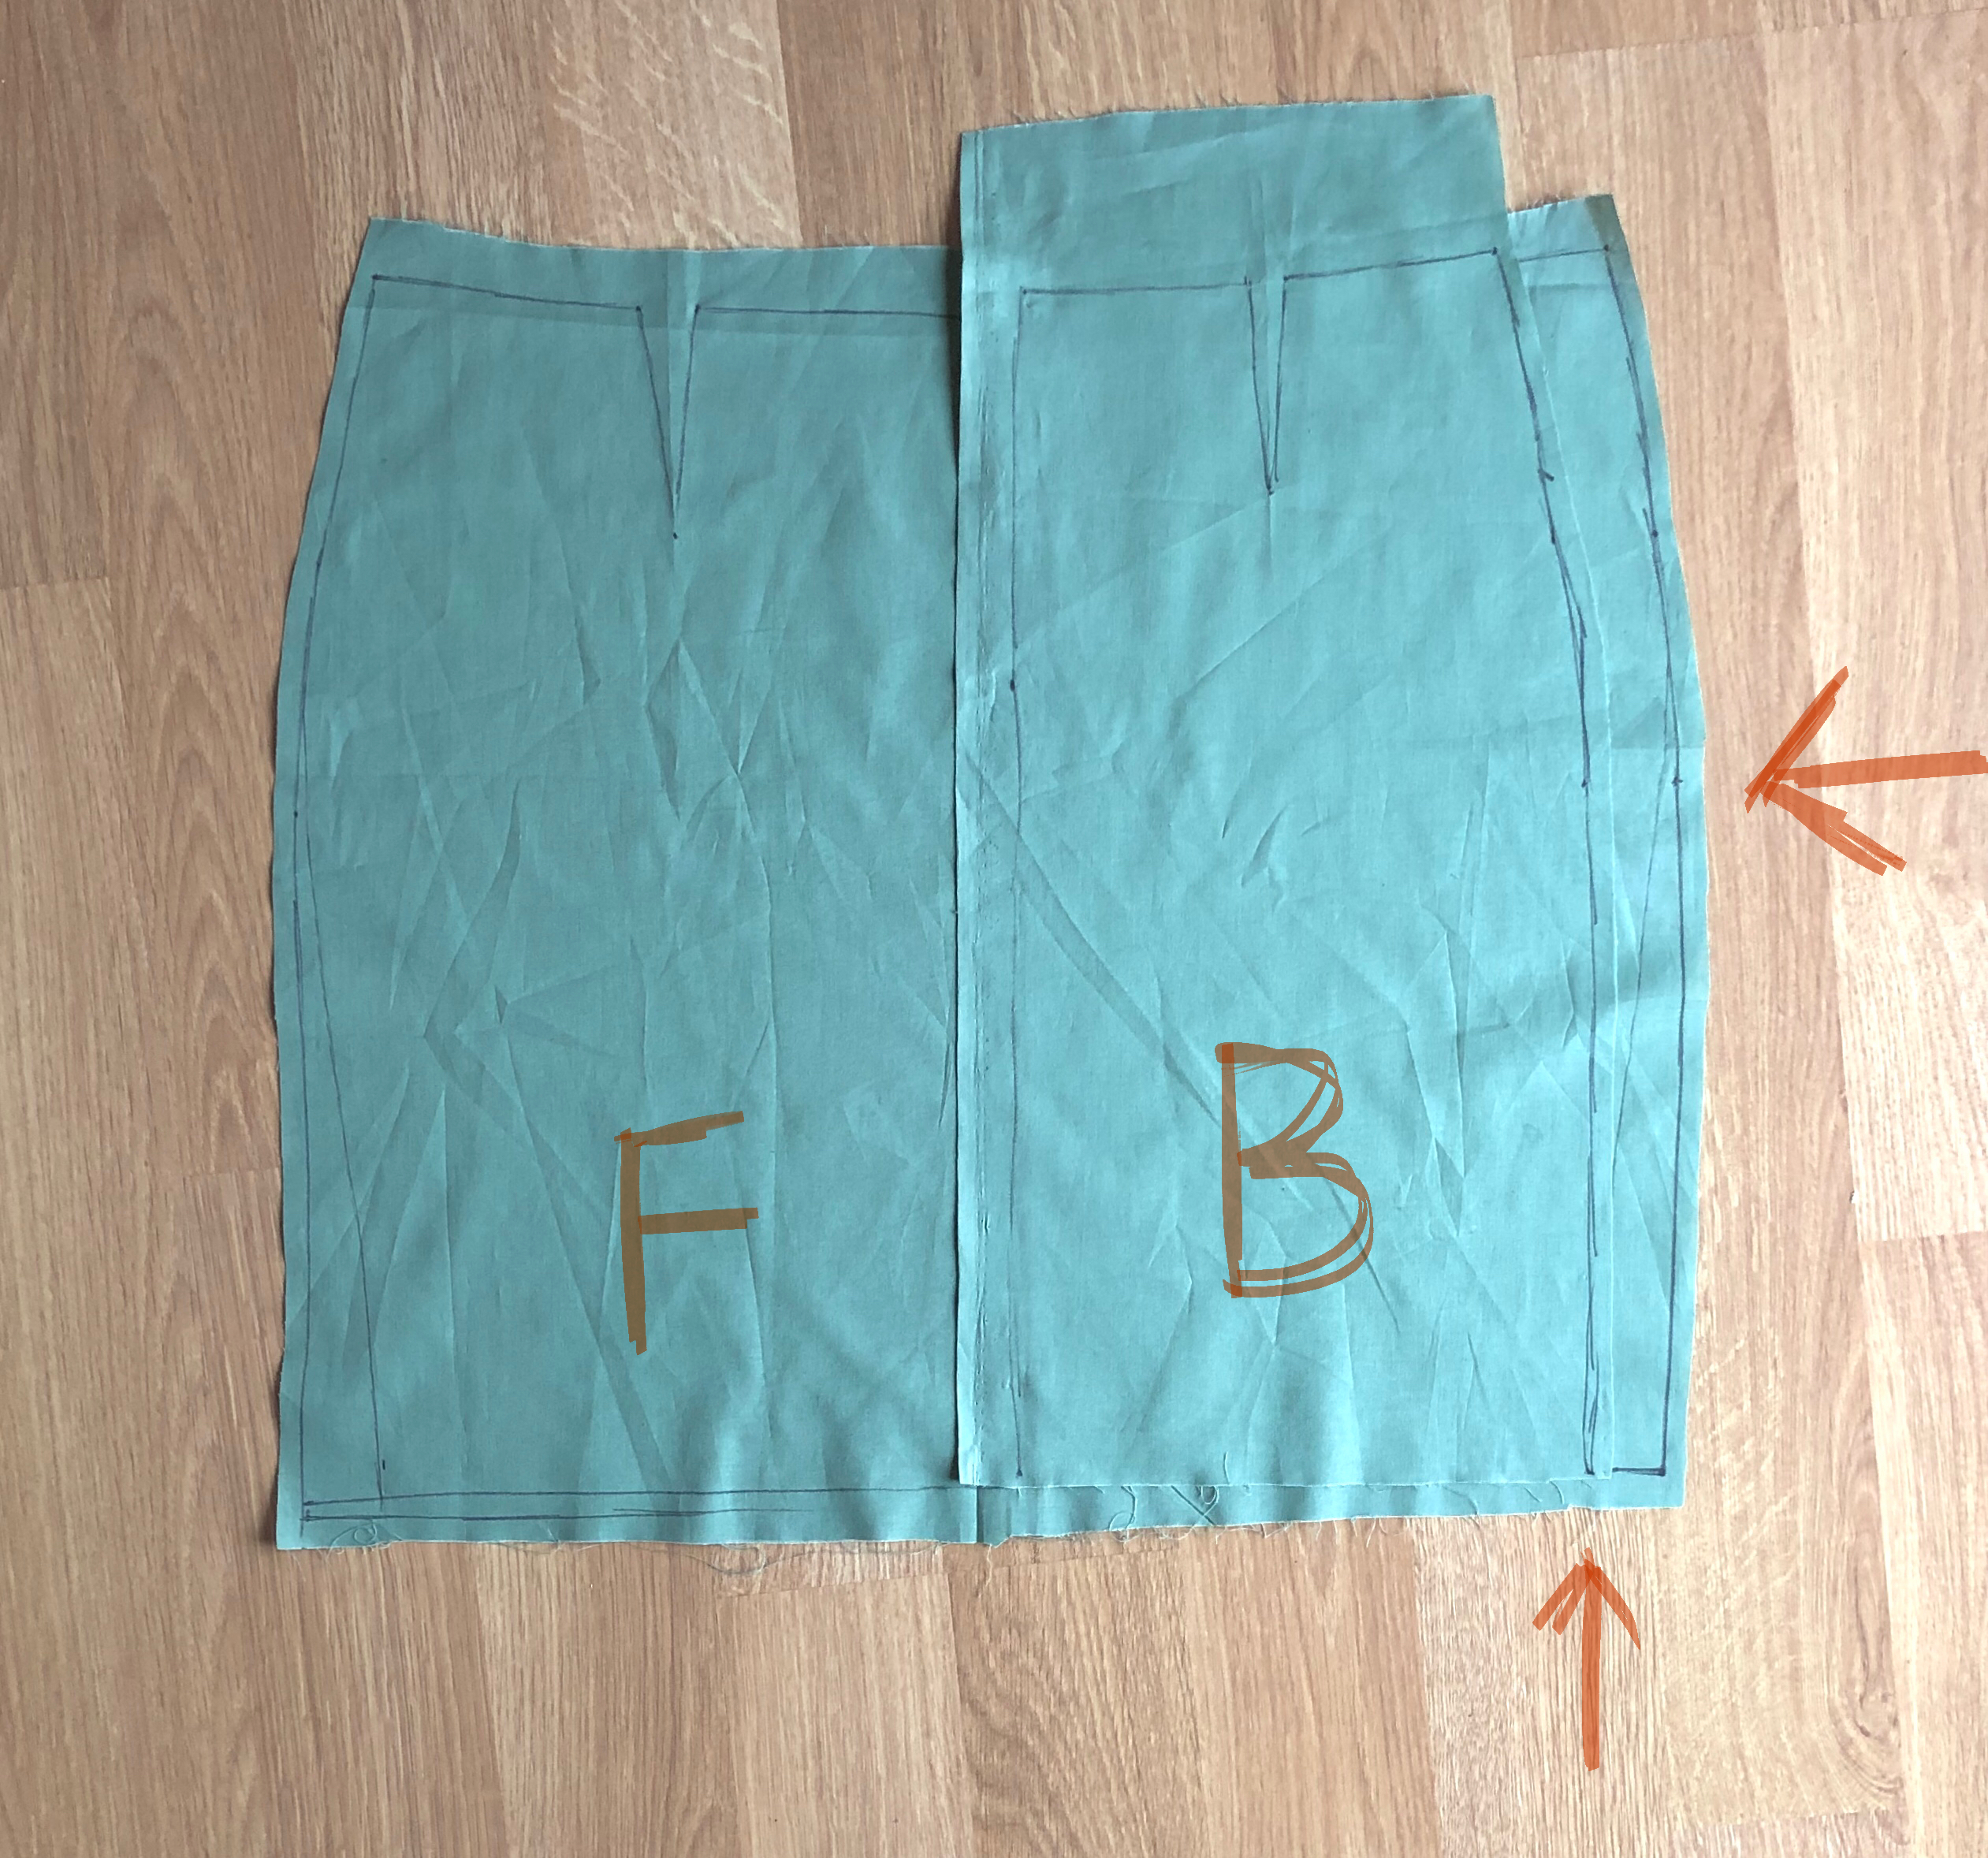
Align the pattern with the sloper at the low hip. (This is my preference, generally – using the unchanging hard skeletal structures of the body at the full hip and the high bust to choose pattern sizing and as a starting point for adjustments.) When sliding pattern pieces, try to keep them aligned with the XY grid formed by the center front and an imaginary line bisecting it at a 90 degree angle. The pieces will be moving vertically and horizontally, but shouldn’t be tilting.

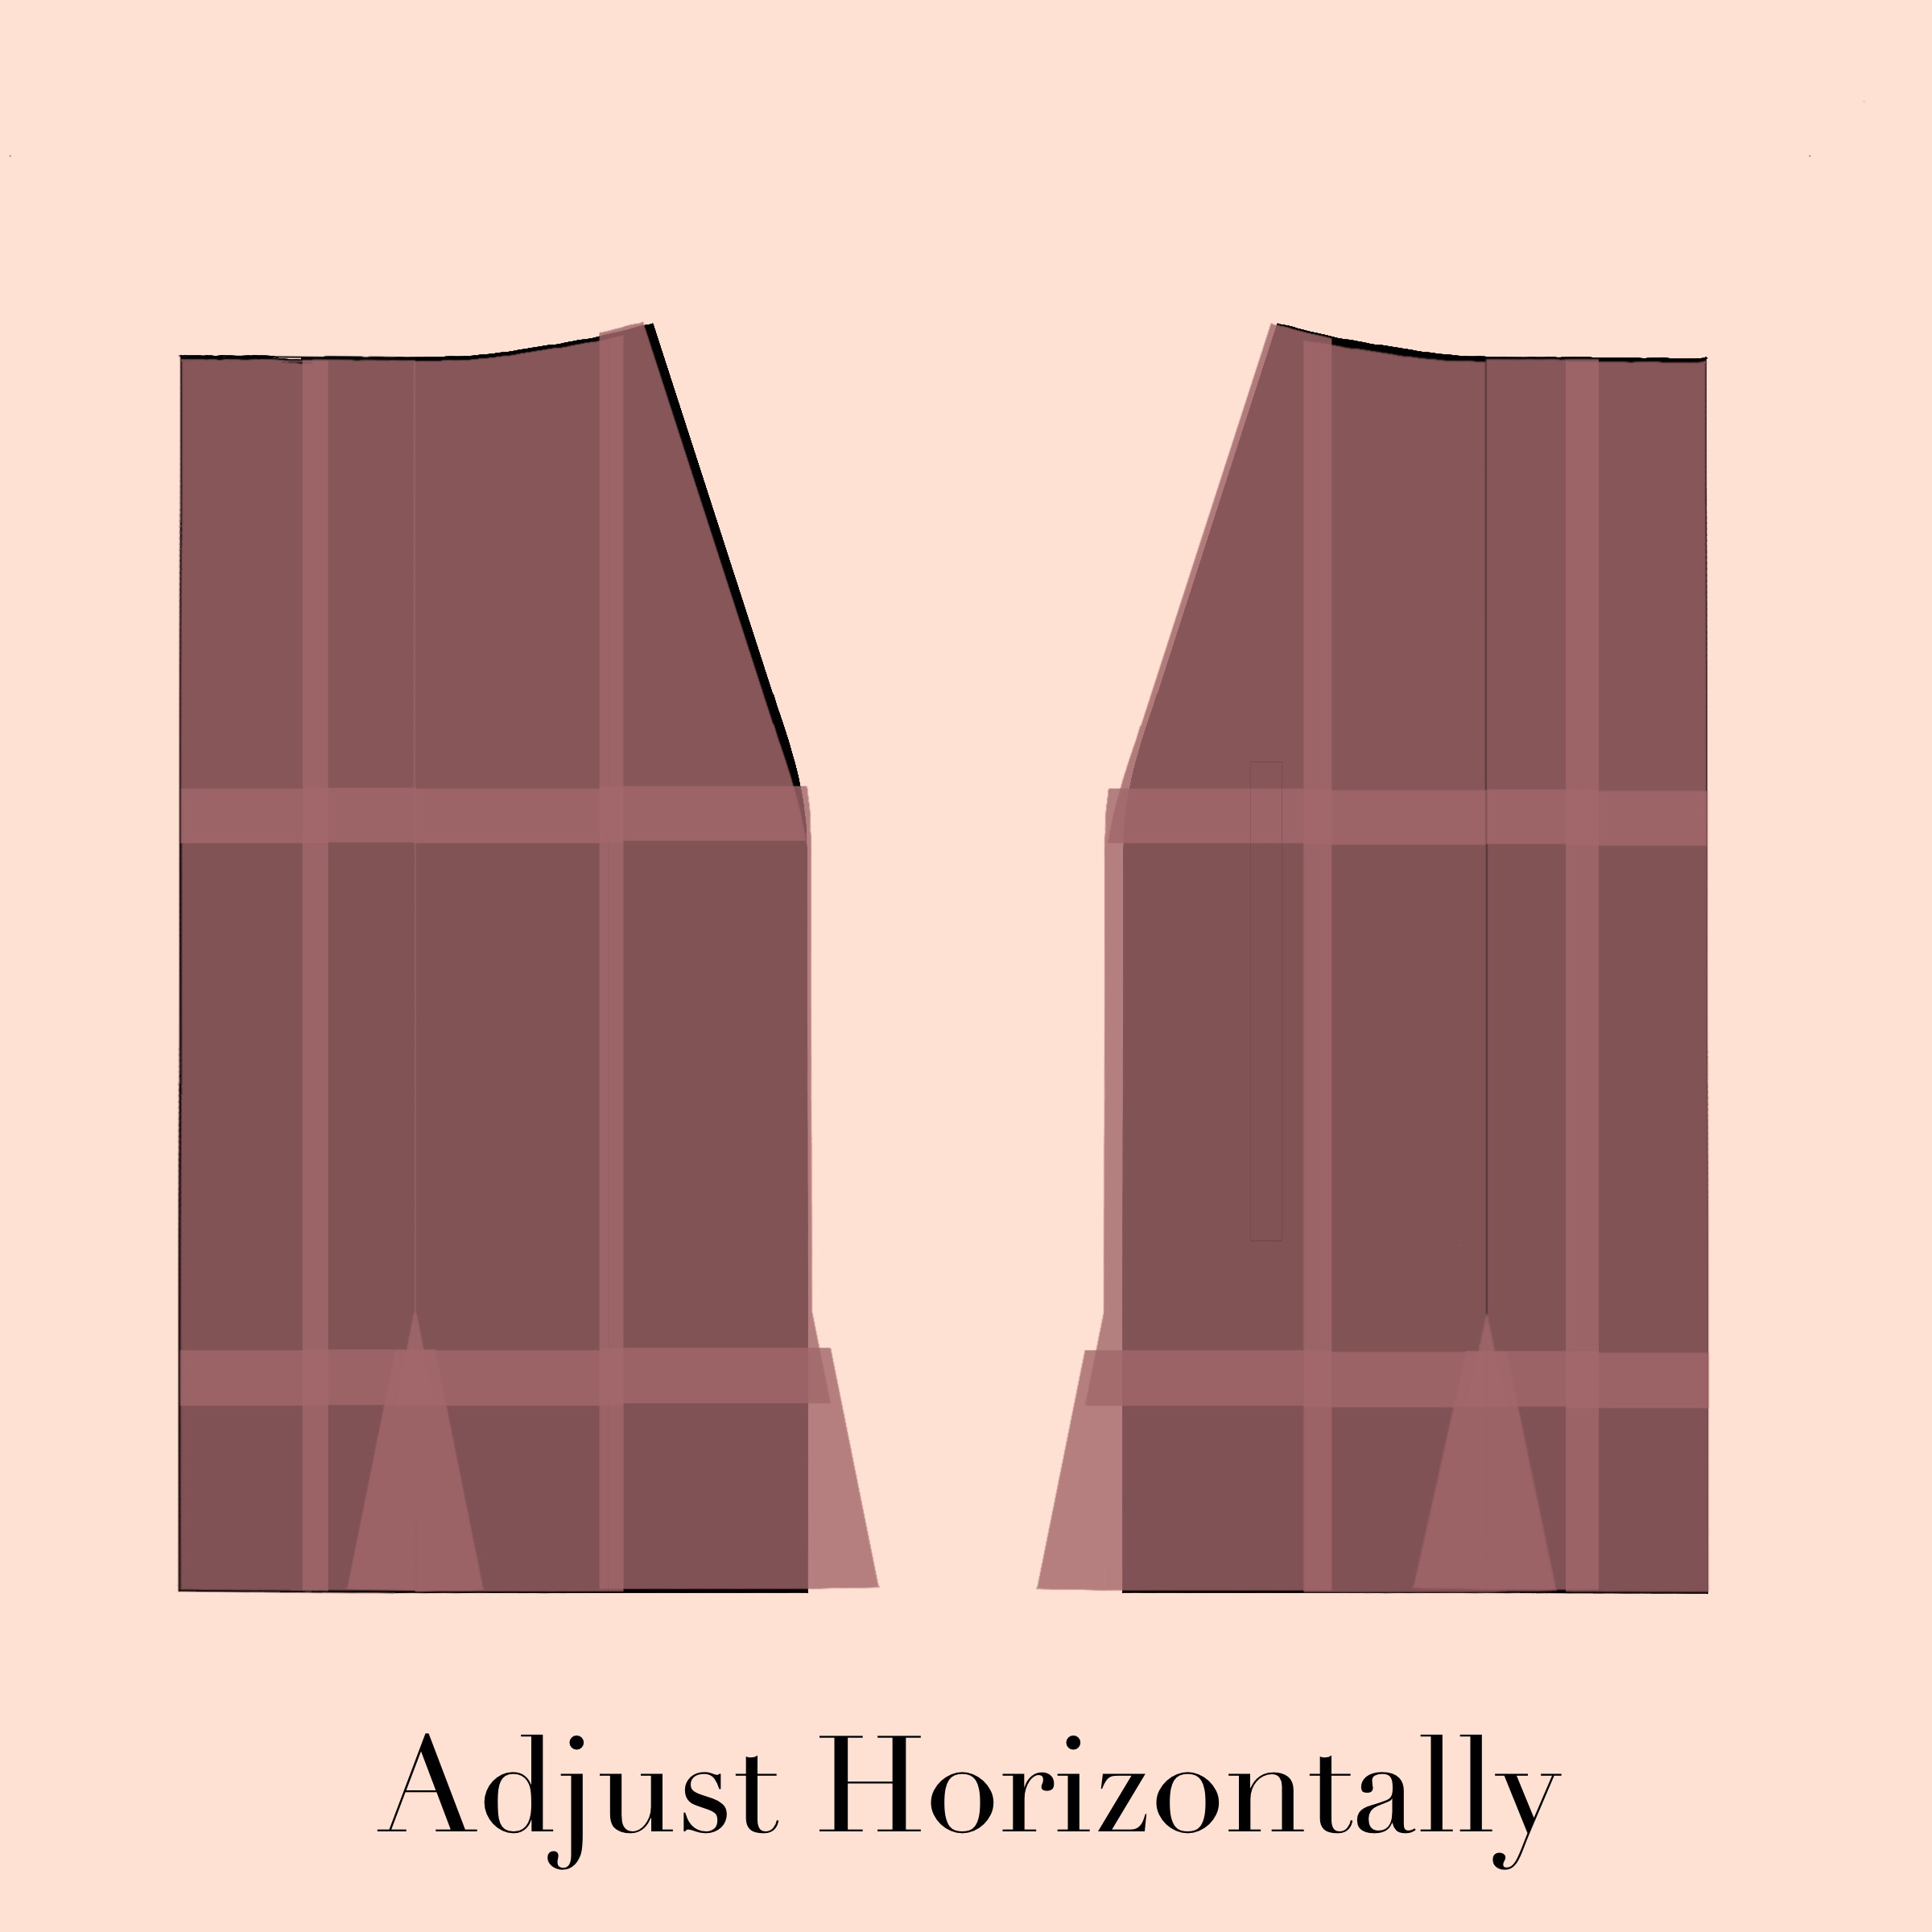
Adjust horizontally first. Cut along the horizontal grid lines and spread or overlap pieces to align to the top and bottom of the sloper. Keep the low hip of the pattern in alignment with the sloper low hip. It can be helpful to tape the pieces in place temporarily and to use scrap paper to tape and stabilize pieces in place when spreading them apart. The new position of the pattern top and bottom will be used to redraw your graded pattern.

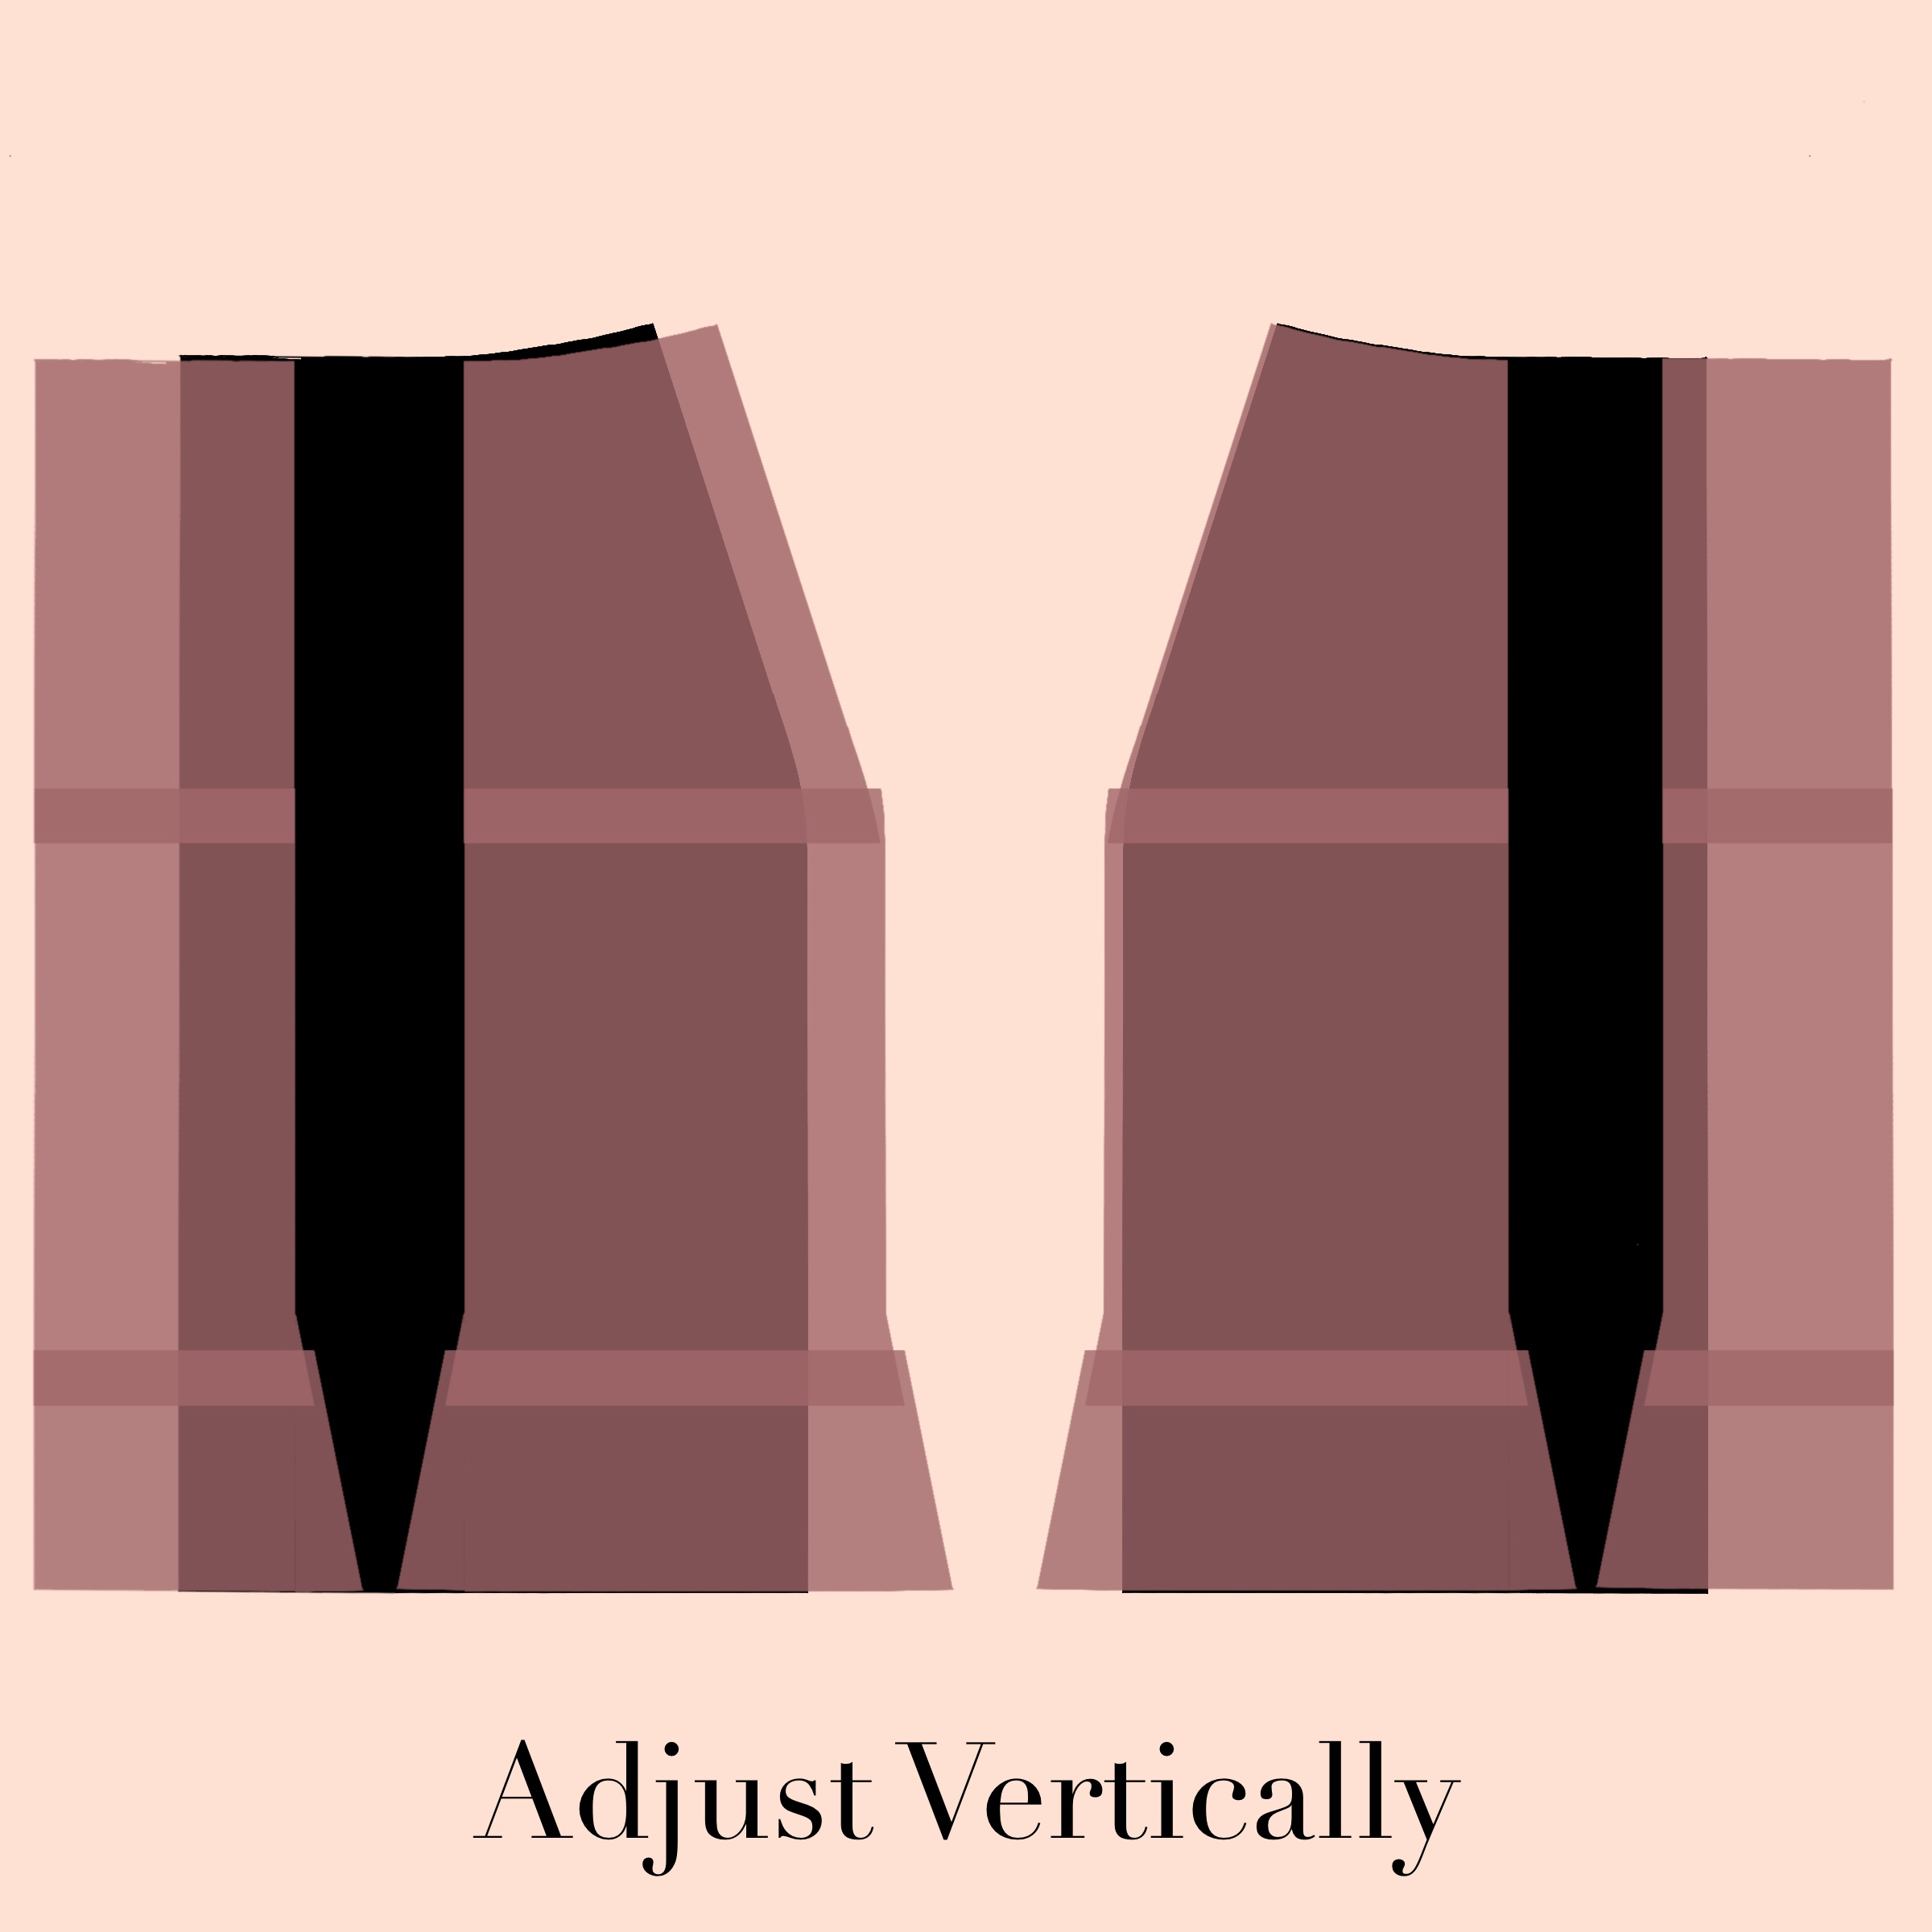
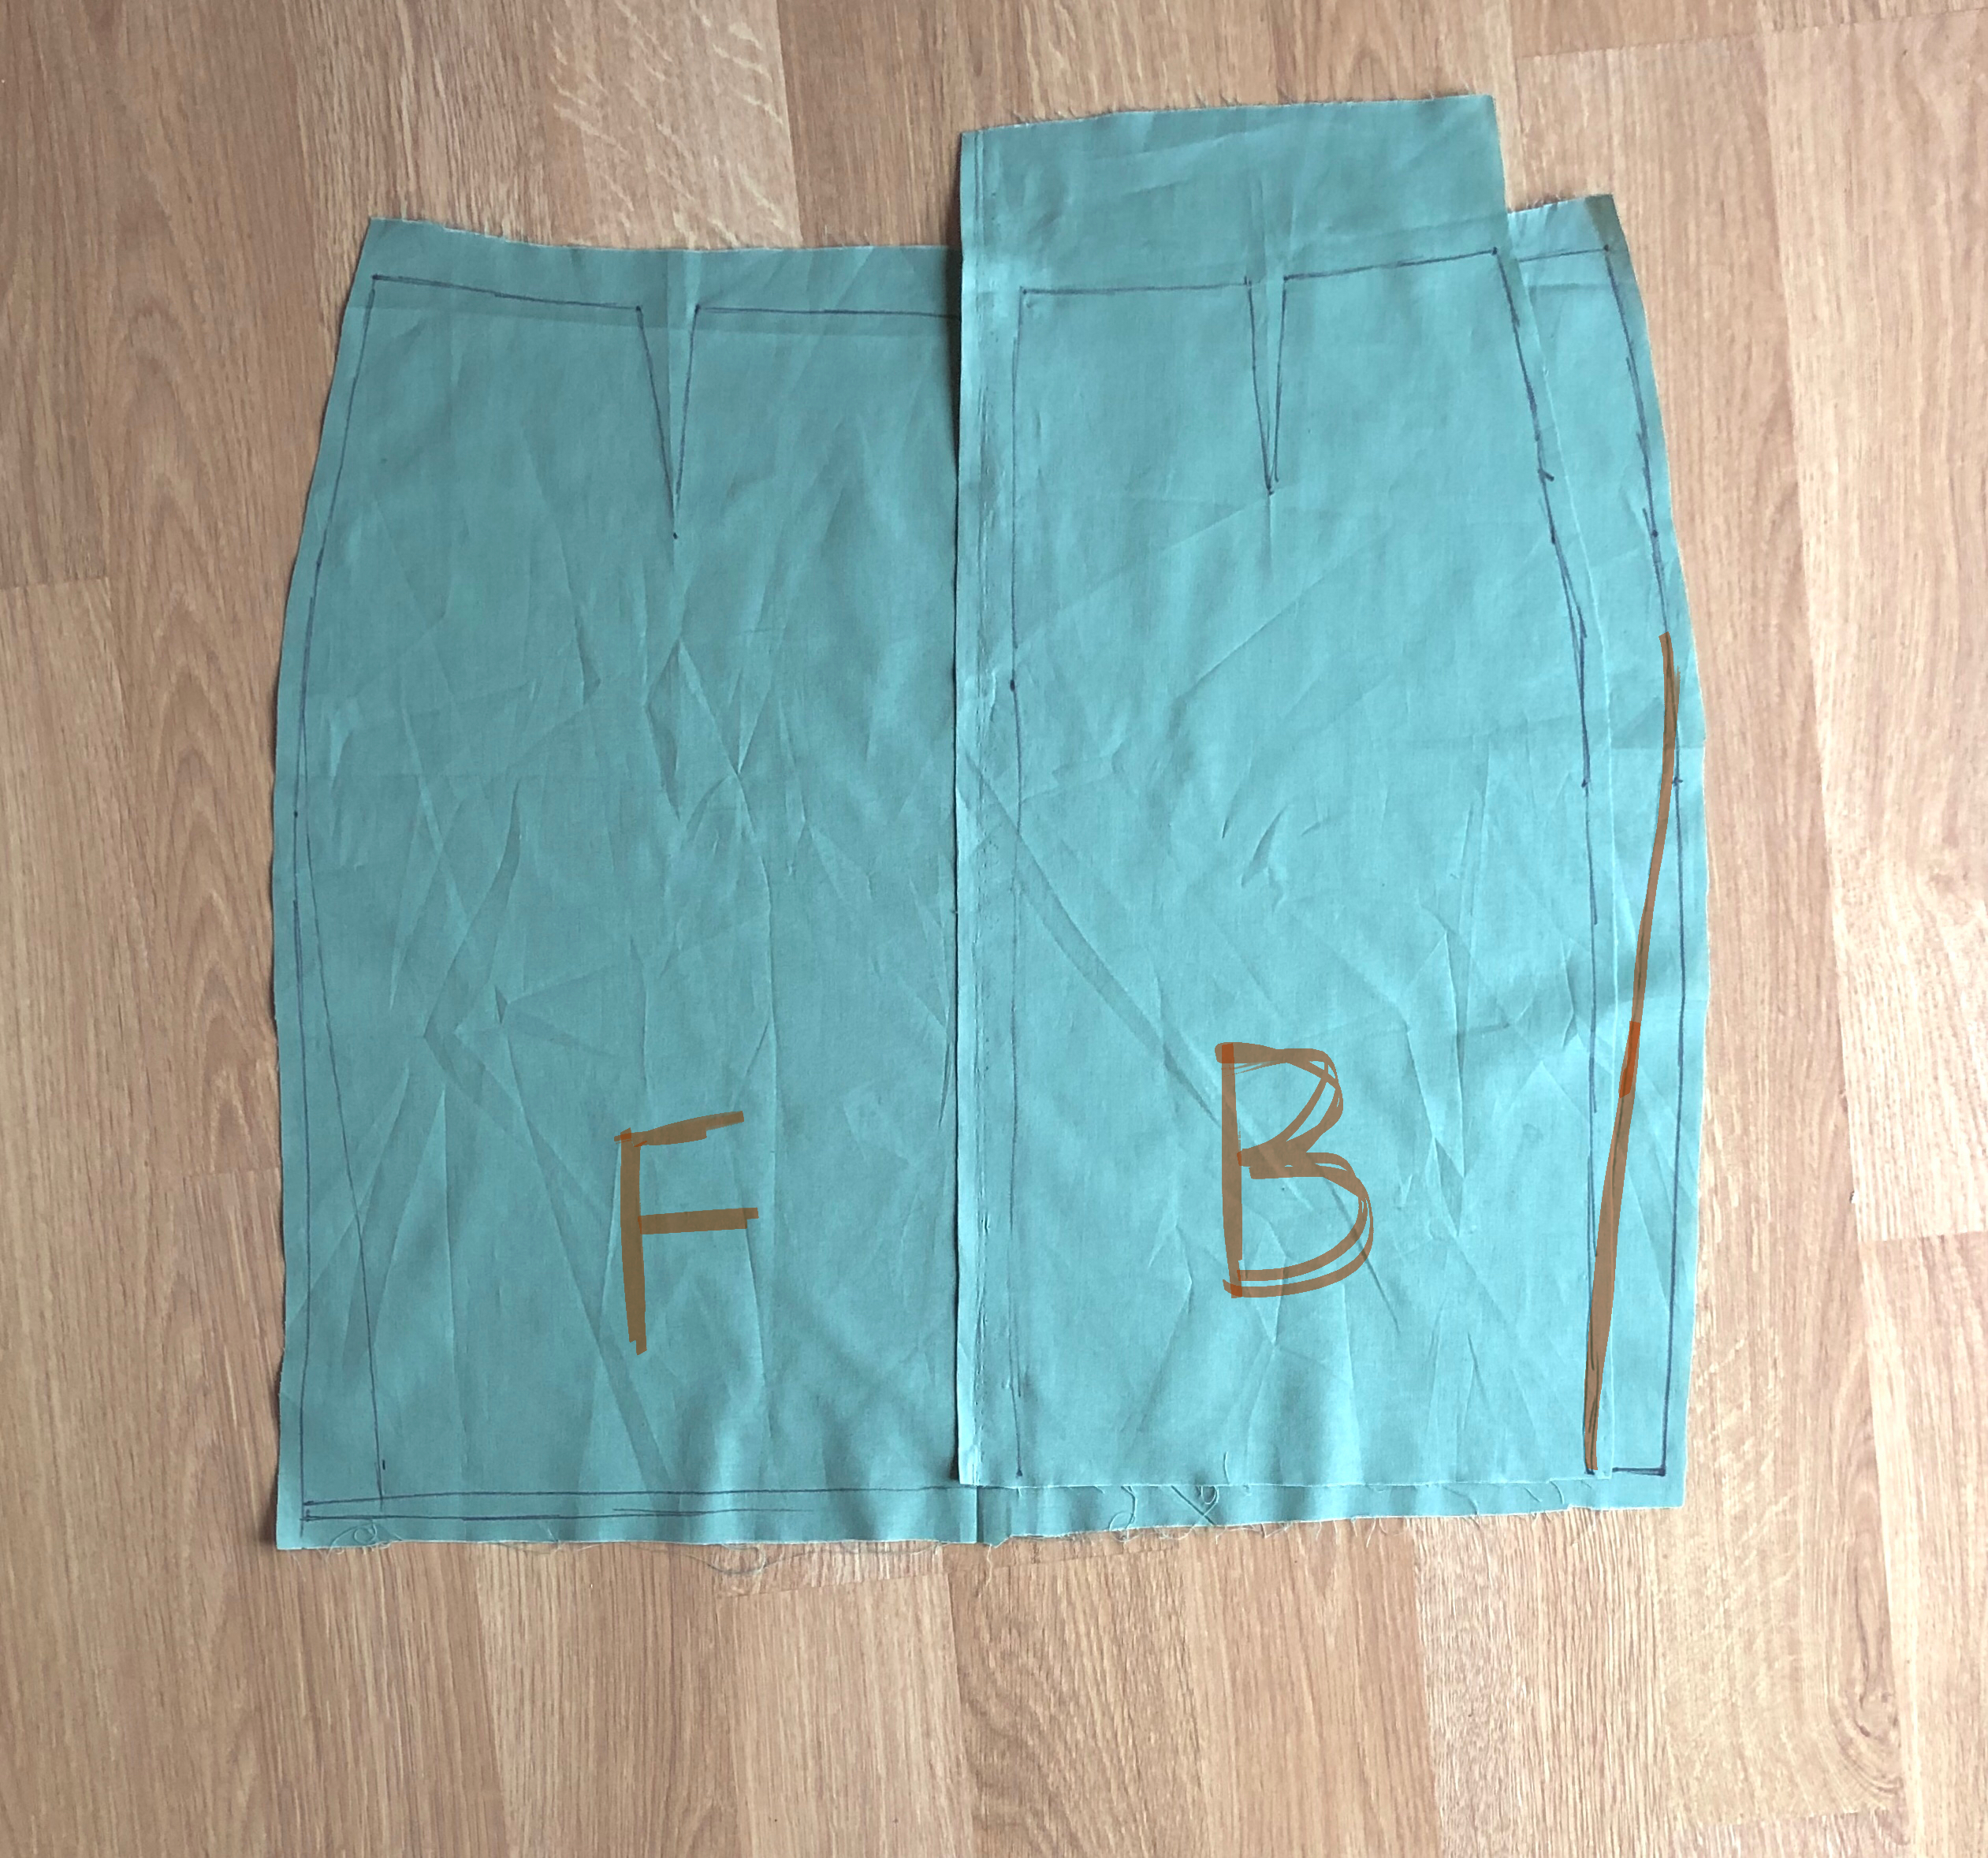
Then adjust vertically. Cut along the vertical grid lines and spread or overlap pieces to align them to the inner and outer edge of your sloper pattern. Tape into place. The new position of the pattern pieces will be used to redraw your graded pattern.

Redraw the pattern seams, smoothing and stretching or condensing curving lines as needed. True the front and back by making sure that side seams match up lengthwise. If the original pattern is symmetrical at the front and back side seam, the graded pattern should be as well.

Use the new pattern seamlines as a guide to redraft any attached facings, facings, or waistbands to fit the new pattern shape. Redraw seam allowances if desired.

Grading a Pattern Up Using a Sloper

Here is an example of how I would approach increasing a pattern in size. Let’s say I have a stretch pattern for a flared skirt that is a few sizes too small, but I have a sloper that is my desired size and fits my measurements.

First I trace the pattern onto a new sheet of paper, preserving my original pattern. Then I decide where the lines to slash the pattern will be based on the positioning for these lines in standard grading procedure. I draw these cut lines on the pattern front and back.

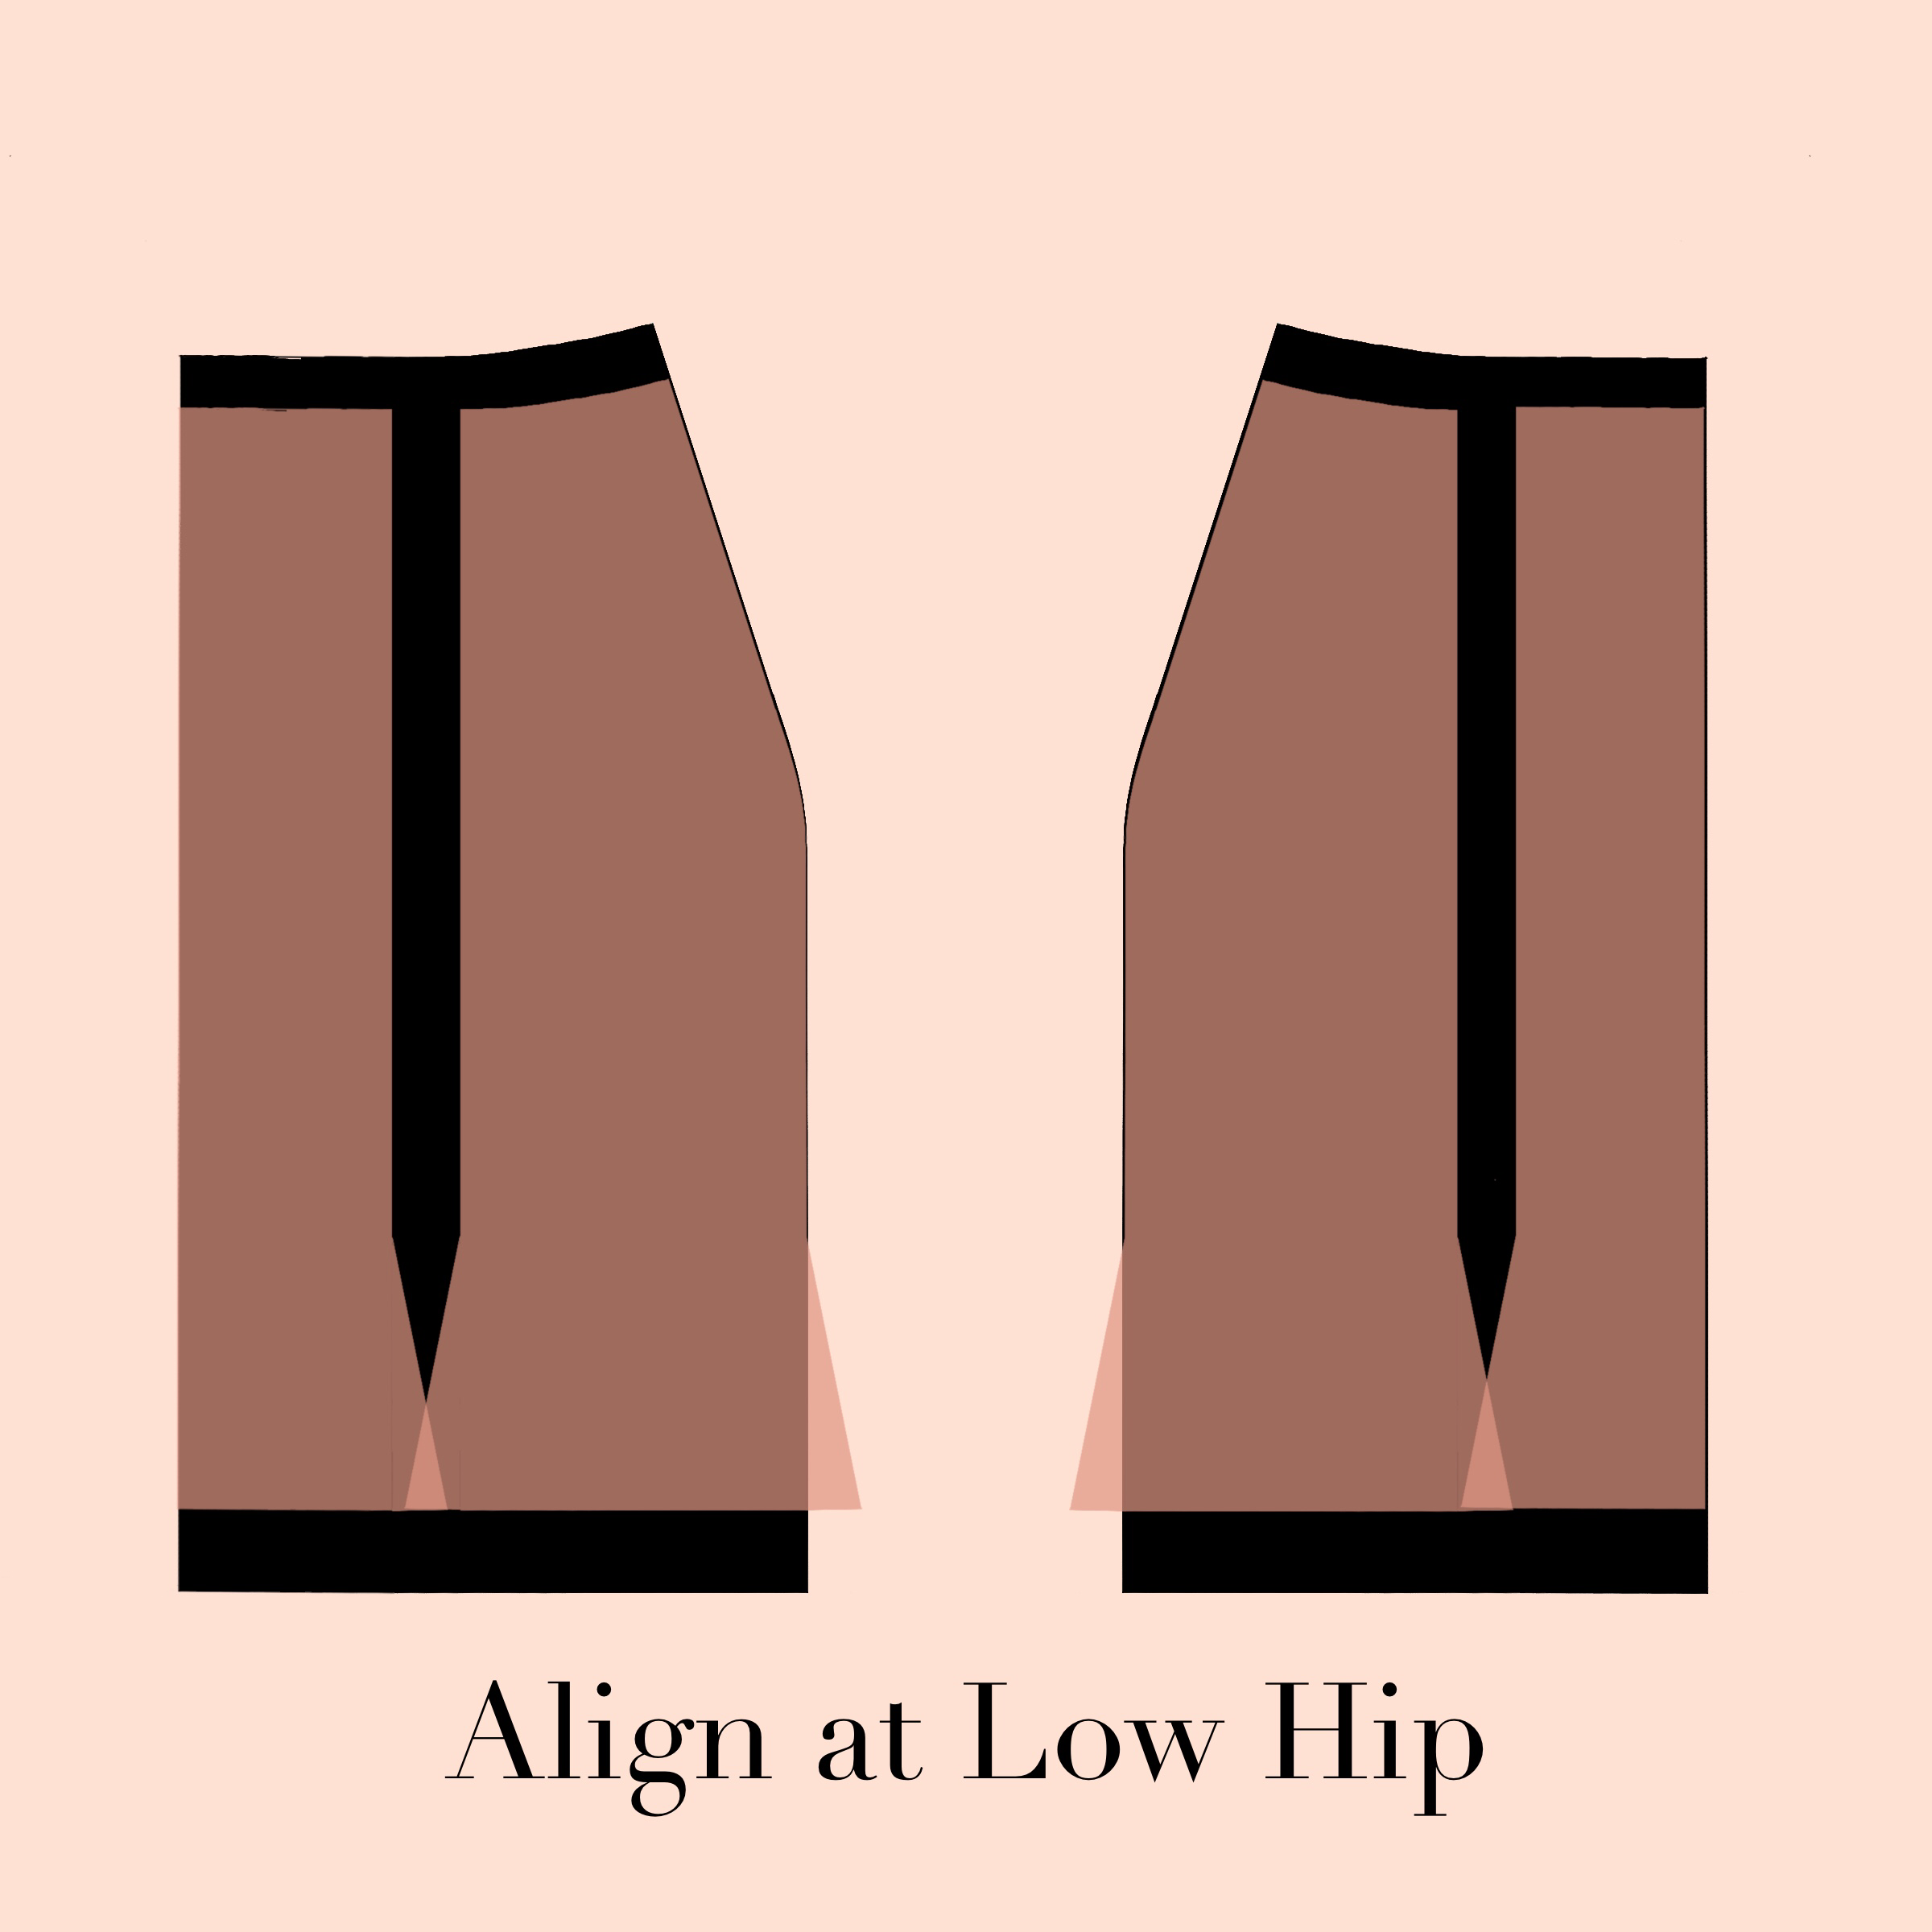
Then, I align the pattern and the sloper at the low hip. This is mostly just personal preference – I like to orient my pattern work with the bony structure of the hip and then adjust around the softer, more shapeable parts of the body. Then I make vertical adjustments first by slashing and spreading at the horizontal slash lines.

If my sloper is as long as the desired length of the final pattern, I want to use the top and bottom of the sloper to define the general position of the top and bottom of my graded pattern. I tape the pattern pieces temporarily in position so they don’t slide around while I adjust further.

Then I look at the pattern horizontally. The sloper establishes the general position that I should slide my pattern pieces into. The pattern pieces will probably extend beyond the horizontal edges of the sloper, because the pattern will have additional ease added here to give it its shape.

The new position of the pattern pieces acts as a guide for where to redraw the seam lines for the enlarged pattern. The outer seam shapes should be traced over and smoothed from the pattern position after spreading apart, as shown by the red dotted lines above. The position of the inner seams can be determined mathematically if you choose by determining the proportions of the original and maintaining that proportion in the enlarged pattern. (I’m pretty comfortable with eyeballing it for simple patterns, though.)

Where there is design ease included in the pattern, it may be necessary to adjust to match the proportions of the original pattern. In this case, if I’m enlarging the pattern significantly, the amount of design ease at the bottom may need to be increased slightly to match the proportions of design ease to the body measurement of the original. I might add a bit more volume to the bottom flare to keep the look of the pattern consistent, as shown in the red lines above. If I’ve only graded up a size or two, this may not be necessary, though, since the difference in proportion would be relatively small.

Then I true the seams by comparing the seamlines to make sure the lengths of all of my seams match up, redraft any facings or waistbands using the new pattern pieces as my guide, and add back seam allowances. My final results would look something like the yellow pattern pieces below:

Grading a Pattern Down Using a Sloper

Decreasing pattern size is a similar process, but pieces will be overlapped instead of spread apart. In this case, I have a pattern that is too large, and a sloper that is my desired size.

First I trace the pattern onto a new sheet of paper, preserving my original pattern. Then I decide where the lines to slash the pattern will be based on the positioning for these lines in standard grading procedure. I draw these cut lines on the pattern front and back.

Then, I align the pattern and the sloper at the low hip. Then I make vertical adjustments first by slashing the pattern at the horizontal slash lines and overlapping to align it with the top and bottom of the sloper. I tape the pattern pieces temporarily in position so they don’t slide around while I adjust further.

Then I look at the pattern horizontally. The sloper establishes the general position that I should slide my pattern pieces into. The pattern pieces will probably extend beyond the horizontal edges of the sloper, because the pattern will have additional ease added here to give it its shape.

The new position of the pattern pieces acts as a guide for where to redraw the seam lines for the enlarged pattern. The outer seam shapes should be traced over and smoothed from the pattern position after overlapping, as shown by the red dotted lines below. The position of the inner seams can be determined mathematically if you choose by determining the proportions of the original and maintaining that proportion in the enlarged pattern. (I’m pretty comfortable with eyeballing it for simple patterns, though.)

Where there is design ease included in the pattern, it may be necessary to adjust to match the proportions of the original pattern. In this case, if I’m reducing the pattern significantly, the amount of design ease at the bottom may need to be reduced slightly to match the proportions of design ease to the body measurement of the original. I might remove some volume to the bottom flare to keep the look of the pattern consistent, as shown in the red lines above. If I’ve only graded down a size or two, this may not be necessary, though, since the difference in proportion would be relatively small.

Then I true the seams by comparing the seamlines to make sure the lengths of all of my seams match up, redraft any facings or waistbands using the new pattern pieces as my guide, and add back seam allowances. My final results would look something like the yellow pattern pieces below:

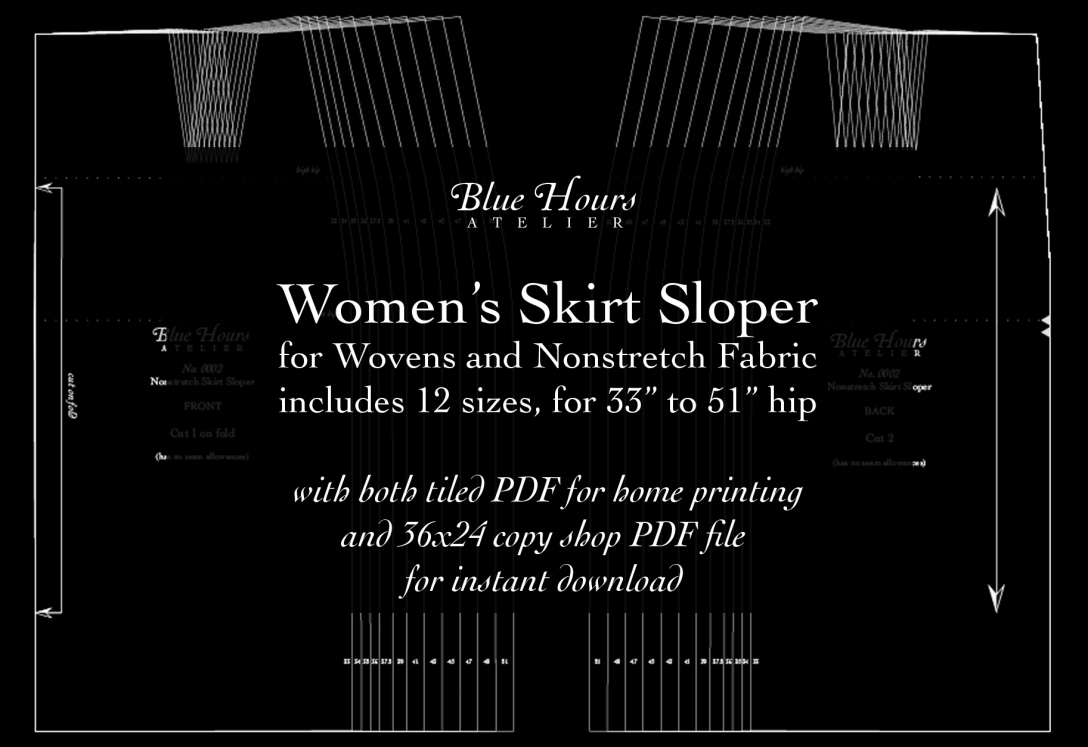
And that’s pretty much it for grading up and down with a skirt sloper. I hope this was helpful! Thanks again to the person who asked me about this process. If you have any questions about working with slopers, feel free to ask! And If you need a skirt sloper, I have several available at my Etsy shop here, including the stretch sloper pictured in the examples above. I hope everyone is safe and well and as contented as can be, given the craziness in the world at the moment.

Using Slopers: Full Abdomen Adjustments 

WHAT IS A FULL ABDOMEN ADJUSTMENT?

Ever struggled with getting patterns to fit a fuller abdomen/thicker waistline than patterns usually are drafted for? The full abdomen pattern adjustment (or, in my case, postpartum tummy adjustment!) adds more fabric to your pattern to cover the stomach area more comfortably. It adds volume for smoother fit to the body’s contours and more comfort.

I always have struggled with waistlines and the front abdominal area, and since my second pregnancy, my mommy tummy is more pronounced than it used to be. I really struggle with ready to wear sizing for the same reason – they just aren’t made for my body type, which is more like this (on my shiny new fancy croquis I painted!):

My body proportions lack waistline definition but also have a somewhat narrow hip structure, which causes a few special fitting issues that might be familiar to anyone with a full tummy area:

-waistbands dig in or won’t close if pants or skirts fit at the hip
-the belly pushes the front of clothing downward to settle below the belly, where it cuts in and exaggerates the curve of the belly in an unflattering way
-waistbands ride up or fall down if the garment fits at the waist because the lower body doesn’t fill out and provide resistance against the fabric at the high hip and full hip to help hold it in place.

To show this from the side view:

If you have similar fitting issues when sewing and/or discomfort in ready to wear, you might find that a full abdomen adjustment really helps. What follows is what works for me, and is kind of a Frankenstein method using bits and pieces from all the tutorials I’ve tried. So far, this combination of approaches has been the most successful for me and I’ll be doing a future blog to document how I apply it to a pants sloper, too. I claim no expertise on fitting, but am sharing this in the hope that it will help other sewists to get a better fit with less trial and error and less wasted sewing time and fabric.

So where to begin?

START WITH BODY MEASUREMENTS

At a minimum, you need your waist measurement (taken at the narrowest point of your torso, usually even with the elbow) and your low hip (sometimes called full hip) measurement, which measures your hips and buttocks at the fullest point. Usually the low hip is 8.5″ below the waist.

The usual approaches are to choose the pattern based on at least one of these measurements, adjusting to fit the other measurement if needed, but this doesn’t work as well with a full abdomen. Simply choosing a larger size adds to the front and back waistline evenly, which misaligns the side seam and loses waist shaping in back.

If you choose the size that fits your body at the waist and then reduce the pattern width to fit at the hips, you then lose the darted fit of the back pattern and will require adjustments there. Also with skirts this reduction at the hips strategy may work fine, but for pants it becomes more complicated. If you choose a size to fit the waist, then the proportions at the hip are going to be larger than your body. The leg proportions are probably smaller than those of the pattern, and then the complicated intersection of body segments happening at the crotch is going to be thrown off.

The other usual approach is to fit the body at hip, then slash and spread to expand at waist. While this works better, and fitting the bone structures (hip) and modifying to fit the soft tissue areas (the waist) is my preferred way to fit, this involves trial and error from the very start. I hate sewing more toiles/muslins than I have to.

The best approach, i think, is to measure the body in halves. Doing this allows you to analyze the distribution of mass on your figure more accurately, and to adjust only where needed.

One way to do this is to mark your side seam on the body on both sides, using something that won’t shift like tape or eyeliner pencil, and measure the back and front halves of the body separately. While the conventional pattern selection wisdom would have you choose the pattern based on your whole body measurement, but this approach to a full abdomen Then choose the size that fits each best, matching them at the the low hip and adjusting the side seam lengths to match. This preserves the fit of the back pattern and allows for more isolated adjustments where they are needed on the body.

With a full abdomen adjustment, there is another consideration when adapting the pattern to your measurements: the high hip (4-4.5″ below the waistline, approximately midway between your narrowest point at the waist and the low hip). This measurement can be fuller than the low hip, especially if you have narrow hips, as I do. For a sloper, which you want to fit closely to the body, it may seem desirable to match the body measurements exactly at the low hip to hug the body.

However, this is not flattering in actual garments unless the design is intended to emphasize the curvature of the lower stomach. For skirts and pants, it is usually far more flattering to skim over this curve rather than hugging it with fabric. so you’ll want to measure straight down from the low belly. Maria Denmark has a tutorial that illustrates how to do this beautifully (here).

Another trick to do this without a toile  or slashing and spreading the pattern is to take measurements differently at the full hip. Hold a ruler vertically flat against the lower belly, to extend a smooth line down to the full hip area to show you where to measure. It adds a little extra ease at the front full hip to skim the body instead of hugging up into the curve.

CHOOSE TWO PATTERN SIZES TO FIT FRONT AND BACK SEPARATELY

To choose sizes will require measuring the flat pattern or some math to figure out which size best matches each half of the body.  Skirt and pants have very little ease at the waist, since they rely on a tight fit here to anchor the garment in place. So you’ll be choosing the pattern pieces that come closest to your body measurements plus approximately 1/2″ of ease for movement. If you’re measuring a pattern piece, remember not to include seam allowances, omit the dart intake, and remember to double the measurement if you have to cut two of the piece. (For example, if your front pattern piece says cut two on the fold, measure the piece (leaving out the seam allowance and space inside the dart legs) and multiply it by two, then compare to your body measurement plus half the pattern ease.)

To give an example, here’s how pattern selection worked for me and my measurements (approx. 31″ waist, 39″ high hip, 37.5″ low hip):

My sloper pattern had half an inch of ease included and the side seam shifted 1/2” total toward the back. This seam shift isn’t terribly crucial, but is in theory the industry standard; if I were doing this again, I’d feel free to ignore it, but in this experiment, I was being as precise as I could.

So I chose the size equal to my back waist measurement minus the seam shift (-1/2”) plus half the pattern’s ease (+1/4”), so body measurement minus 1/4”. This worked out to be the 37.5” size, which matched up to the size I needed at the low hip in back as well. So my back proportions matched the standard pattern almost exactly.

In the front, though, my proportions are very different than the pattern proportions. My waist and high hip measurement aligns best to the 43″ size. The low hip doesn’t match up to my body measurement but is pretty close to my measurement taken with a ruler held straight down from my abdomen (as discussed above, wanting to skim rather than encase that curve).

full abdomen sloper adjustment unaltered skirt pieces
My unaltered pieces are a 37.5″ back and a 43″ front. (My sloper pattern is labeled using the low hip measurement instead of the imprecise numbering conventions of women’s clothing.)


ADJUSTING THE PATTERN

If this had been a typical pattern, the side seams of the front would be longer than the back. to fix this, i would align them at the low hip and trim away the excess from the top and bottom, also curving the waist slightly upward at the center if needed to give a little more vertical coverage over my belly.

To test the fit, I did a pin fitting first. I pinned the darts closed, pinned the side seams, slipped the garment on, then pinned the garment closed at what would be the zipper at the center back seam to simulate wearing it, so that if I need to adjust, I don’t have to seam rip and can adjust as I wear it.

By doing the math and measurements of body front and back separately first instead of slashing and spreading a muslin/toile version, I have a much better fit from the beginning with less work. the fit works perfectly at the waist and high hip. I have the close fit I want in back and my side seam hangs evenly at waist and high hip.

There is one further adjustment needed, though. since the front of my actual body is only wider than the back at the high hip. Since my back and front are the same size at the mid thigh or knee, the extra room isn’t needed there, and this extra space in the bottom of the skirt really throws off the hang and the side seams at the hem.

full abdomen sloper adjustment comparing front to back sizes align at hip and bottom edge
Align the pattern pieces along the center front and center back seams. Lay the back over the front. Starting at the low hip, taper the front pattern to be in proportion to the back pattern at the hemline.

To fix it, I laid the back pattern piece on the front, matching them up at the vertical line of center front/center back. At the low thigh/just above the knee I marked the width of the back piece. I want them to match here, approximately, remembering the slight seam shift adds 1/4” of width to each side of the front pattern piece. Then I use the pattern piece to redraw a smooth curve all the way up to the full hip of the front pattern.

full abdomen postpartum sewing pattern adjustment fix side seam
Blend the pattern to the smaller size at the hemline.


This isn’t perfect, because the grain line of the outer seam of the front is now more on the bias than the back, but this could be dealt with by cutting the front in two pieces and realigning the grain to the side seam for future garments.

Here are my final sloper pieces after all adjustments:

full abdomen postpartum sewing pattern adjustment sloper final

And that’s it! I hope this is helpful, and I’d love to hear  your tips and tricks and experiences dealing with this fit issue. Please forgive my wrinkly fabric. It’s cotton, and though it was pressed prior to shooting these pictures, my kiddos Godzilla anything on the floor:

my house is glorious chaos

I’ll be posting lots more on fitting issues, body proportions, and sloper adjustments as part of a wardrobe overhaul project I’m undertaking as we launch headlong into a new decade. 🙂 Happy New Year! Hope your holiday season was joyous and that Santa brought you all the pretty fabric,

-Amanda

Woven and Knit Sloper Patterns for Women’s Skirts

women's woven skirt sloper pattern PDF download

I have two new sloper patterns to share, a women’s skirt sloper for woven fabrics and a women’s skirt sloper for knits, both in 12 sizes. (Available through Etsy for instant download and in large format pdf for copy shop printing, too.) Drafted my first digital fashion flats and created a new logo, too! I’m *really* excited, because my efforts to work out all my sizing and grading standards consistently is starting to come together. From a pattern drafting standpoint, it’s important to me to develop a solid, consistent basis to draft from going forward, but also from a personal standpoint, I’m excited to be creating a full library of personalized slopers so that I can get the fit I want, consistently and easily. If I know exactly the baseline I need, I won’t have to sew muslins or toiles. So there will be more of these in the future, and more to come on how to use them, because although sewing is an excellent move for less waste and better consumption habits and putting quality over quantity, sewing muslins of everything is a waste of time and fabric that I hate, and probably lots of other sewers do, too.

So what is a sloper, generally speaking? A sloper is the basic starting point for pattern design, also known as a fitting shell. It’s a baseline with enough wearing ease to allow for movement and breathing, but no design ease and no details, and usually it doesn’t include seam allowances, since they complicate the process of altering the sloper.

Why use a sloper? Patterns almost never fit as is, because all patterns are drafted to fit an average set of measurements. Since there is so much variety in human body proportions, the designer has to choose an average to work from, in the hope that these body dimensions will be a good starting point for their customers. Unless your measurements match this set of baseline measurements, the pattern will need adjustment to better fit your body. Getting a great fit with a sloper allows you to do this process once and be able to replicate it again and again, rather than having to sew a test garment to fit each new pattern you sew.

The sloper is meant to be a two dimensional dress form. When you sew a sloper, the intent is to establish a great fit, and to then use this as a template to modify other garments. Since the sloper has no details and no design ease, it represents the minimum amount of fabric you require for a garment to comfortably cover your body and allow for movement. The sloper is the baseline, where the pattern contains design ease and detail to add style, structure, and movement to garments.

These slopers are drafted for a hip that’s 9” larger than the waist, which is the amount I settled on when I looked at ASTM sizing charts and studies of actual bodies. It’s a good starting place for a lot of people, though I have a more rectangularly proportioned figure, so I’ll have to add about 2-3” to the waist for a correct fit. When I made my size chart and grading rules, I looked at the somewhat idealized proportions some of the big pattern companies use and tried to use measurements that were based more on real bodies than their dress form proportions. My hope is that my sizing will fit more rectangular/apple shaped/pear shaped figures better, since statistically it seems to be more the norm than the hourglass in the real human population.

I have never been a big wearer of skirts for my own wardrobe, but between sweltering humid Missouri summer, being on a 50s/60s movie kick when baby wakes me up in the middle of the night and discovering the wonderful drama that is the tango skirt, I think I need to add some to my wardrobe. (Last night’s 3am insomnia feature was Cat on a Hot Tin Roof with Paul Newman and Elizabeth Taylor. Made a boring old pencil skirt look downright savage.) I also wanted to draft them because the skirt is really the bottom half of so many full body patterns like robes and coats that I felt like I should expand my knowledge of that type of lower body garment to better draft the full body ones.

I’m thinking of posting some step by step photos of the process of sloper sewing, fitting, and then adjusting patterns with them, because examples of actually using a personal sloper aren’t all that easy to find. It’s also a good way to start on the capsule wardrobe I’ve been wanting to sew when I Marie Kondo declutter the rest of my clothes again. The transition from pregnant body to postpartum body has complicated it a bit, too, since my figure isn’t quite the same as it was before and everything is trending lower and squishier than it used to. So I’m resolving to sew for the body I have, discard anything that doesn’t fit or can’t be altered to fit, and then take in as needed in the future. Clothing that just sort of fits is such a big part of the clutter in my house it’s silly, especially for someone with sewing/fitting on the brain so much.

Lots of lingerie and other sewing and crafting stuff to share, but I’ll save it for another day. My personal life is a fog of sleep deprivation and coffee but also baby giggles and summer vacation with my big kiddo, too. Hope summer finds you well, too, Gentle Reader.


Working with Ease Amounts in Commercial Patterns

The amount of ease in commercial sewing patterns can be a source of sizing confusion and fitting frustration. In this blog entry, I look at types of ease, industry standard amounts for different garment types, and actual ease amounts in a selection of corset, lingerie, and loose fitting commercial patterns from a range of eras. Click through to read more.

Ease amounts in commercial patterns are one of the eternally frustrating problems of contemporary sewing. The amount of ease included in designs seems to vary wildly from pattern to pattern, even from the same company, so that the home sewer finds her or himself needing to sew a muslin/toile for each pattern. It adds yet another layer of complication to the puzzle that is pattern size selection. But where does the confusion come from, exactly? I’m thinking there are a few main culprits: patterns drafted with ease amounts that don’t fit the actual garment type, inaccurate pattern photographs, and lack of finished garment measurements to give an objective way to analyze final fit. (For simplicity’s sake, I’m only going to consider patterns for woven fabrics at the moment.)

What exactly is ease?

It’s the amount of extra space added to a pattern in excess of actual body measurements to allow for movement and style. Wearing or fitting ease refers to a necessary small amount of space included in slopers and almost every pattern type (with the exception of corsets, some foundation garments, and stretch fabric patterns) that allow the wearer to breathe, sit, bend, and reach in the garment. This is usually around 2″ of additional space at the bust, 1″ at the waist, and 1.5″ at the hip, no matter what the pattern size.

Design ease is a more variable amount of space added to patterns to create different style types, create silhouettes, and to give movement to the garment. Design ease amounts are proportional and depend to some extent on the size of the garment, though there are general industry standards for different fits that are the approximately the same from pattern company to pattern company.

Ease Standards for Different Garment Types

Ease amounts and garment fit drawn to scale as a fashion flat.. Ease amounts in commercial patterns are a consistent source of fitting confusion and sewing frustration. For tips on understanding industry standard ease amounts and what is meant by different fits, click through for the full blog entry.
Ease amounts and garment fit shown to scale as a fashion flat..

There are about five different categories of fit that pattern companies generally use to describe their patterns. Though there is a lot of variation from garment style to garment style, and the top of the pattern may have one fit and the bottom have another, this can be helpful in understanding how much ease to expect the garment to have. The McCall website here offers a chart of ease amounts for various fits. This chart doesn’t differentiate between design and wearing ease, so my assumption is that this is the total amount added to the body measurement.

Close Fitting (includes 0-2 7/8 inches of design ease at the bust)
Fitted (includes 3-4 inches of design ease at the bust)
Semi Fitted (includes 4 1/8-5 inches of design ease at the bust)
Loose Fitting (includes 5 1/8-8 inches of design ease at the bust)
Very Loose (over 8 inches of design ease at the bust)

Slightly more design ease is added for garments that are layered on top of other garments, such as jackets and coats. The design ease included at the waist and hip varies depending on whether the garment has a waistband or where the garment hangs from the body.

There’s a great piece that goes more in depth on the subject (here), though I’m unsure about the exact design ease amounts it lists. (That chart matches the McCall chart, which I think includes wearing ease and design ease in its amounts, so the amounts of *design* ease added to body measurements are probably smaller than it describes.) It has some very helpful visual guides to what different fit styles look like on the body.

Wearing and design ease standards seem formulaic enough that it’s odd there’s so much inconsistency. So many people on sewing forums and doing pattern reviews describe problems with way too much ease for their size. So where does the confusion come in? Do pattern companies not stick to their described standards? Does grading add excessive ease for certain sizes? I examined a set of patterns to see how this works out for a few different garment fit types from different eras (because I have strange ideas about what constitutes a good time) and found a few issues I’ll examine in detail.

Grading Inconsistency and Wrong Ease Amounts for the Garment Type: Corset Patterns

Some of the problem may come from using the wrong pattern block or wrong design ease for the garment type, though this seems likely only for certain kinds of close-fitting garments like corsets and strapless bodices that require a very close fit to stay in place.

Butterick 4254 corset and stays pattern. Click through for a blog entry on garment ease and amounts in commercial patterns, including two contemporary corset patterns and issues with sizing and ease amount discrepancies.
Butterick 4254 corset and stays pattern.

I looked at Butterick 4254 View C, sizes 12, 14, and 16, which is a historically based late 19th century style corset with a front busk and a laced up back. At the bustline, the finished garment measurements printed on the pattern match the body exactly at the bust. At the waist, for size 12, the pattern matches the body exactly. For sizes 14 and 16, the pattern is 1/2 inch smaller than the waist. So for this particular pattern, there are two fit problems. First, the ease seems to vary irregularly by size at the waist, which is problematic for predicting fit. Second, the lacing gap for most corsets is usually about 2″, so if we add that, the final corset is not going to fit as a sewist would expect it to fit. If the sewist is wanting a garment that fits something like a Victorian corset, they’re going to be disappointed, because there’s no way a period garment included 2″ of ease, and a corset would have nipped in at least an inch or two at the waist as well. Sewists using this pattern on various boards usually recommend sizing down about two sizes, sometimes more, in order to get the fit that one would want in a corset.

I also looked at Butterick 5797, View A, sizes 12, 14, and 16. It’s described as a corset, close fitting, and labeled with “Making History” (though, alas, there’s no info on the specifics of that history included). This one closes with a zipper in front and has no lacing. I found that based on the final garment sizes given, at the bust there is a consistent 2″ of ease for all sizes. At the waist, for size 12 and 14, there is 2 1/2″ of ease, and for size 16, there is 3″ of ease. At the high hip, there was approximately 1 1/2″ for all sizes. For this pattern as with the other corset pattern, it isn’t going to fit like an actual corset at all, so a sewist expecting that is going to be disappointed, though they might suspect that from the zipper. (Without lacing to allow movement with breathing, the zero ease typical of a corset isn’t really desirable or comfortable). An argument could be made for having more design ease at the waist for larger sizes since design ease is proportional, but if that were the case, the ease amount should increase between size 12 and 14 by some increment as well, but a corset is usually expected to nip in at the waistline.

What’s frustrating is that two “historical” corset patterns from the same company seem to vary in the amount of ease they use for similar garments in a way that is not transparent. Even if you give them the benefit of the doubt on 4254 and pretend that 2″ that should be indicated for the lacing gap are part of the pattern ease, when you compare the two patterns, the ease amount doesn’t change in the same way between sizes, so how can you predict the fit accurately? If you know the best size for you in one pattern, that same size may not work in the other pattern. Looking at the pattern envelope raises another issue as well.

Is Pattern Envelope Photography Realistic?

The photo on the envelope of Butterick 5797 seems to fit the model as a contemporary corset might, if worn without the intention to nip the waist. But if the model were wearing the size indicated for her on the size chart, it’s very unlikely it would fit this way. If a strapless boned bodice had 2″ of ease at the bust, it probably wouldn’t stay in place. If the model’s garment had 2 1/2″-3″ of ease at the waist, it probably wouldn’t appear this form flattering on her.

My suspicion is that models on pattern envelopes almost never wear the sizes of the garment they would be told to select on the pattern envelope, and during the photo shoot, clothing is probably pinned with clips to flatter body curves and hang just right. The photos of this particular pattern look lovely, but what’s the point of great product photos that don’t accurately depict the fit of the product? It creates an expectation that’s going to be disappointed.

Ease Amounts in Commercial Patterns over Various Eras

1930s

I was curious about ease amounts and silhouettes in other commercial patterns and over different eras, so I looked at several more examples of different garment styles for the sake of comparison.

The oldest pattern I looked at was a dress from 1934 from Mabs Weekly, one of the fashion magazines of the era that often included a free pattern. This one would have been a fitted bodice style. I don’t have the original illustration of the garment, but the pattern is for a 36” bust. The final garment measurements weren’t listed on the pattern, so I measured the pieces themselves and subtracted the seam allowances to find the finished measurements. The finished measurement of the garment at the bustline is 39.5″, for 3.5″ total ease.

1940s Lingerie Pattern Ease

Advance 3067 slip pattern. Click through for a blog entry on garment ease and amounts in commercial patterns, including vintage and contemporary lingerie patterns and ease amount discrepancies.
Advance 3067 slip pattern.

I looked at another pattern, Advance 3067, for a slip from what I’d guess is the 40s from the envelope design and the lines. The slip doesn’t have a placket or closure and isn’t cut on the bias, so it’s close fitting but probably not as close to the body as some lingerie. (This image is borrowed from an Etsy listing here). I found that for a size listed as 32″ breast, the finished measurement (which I had to take from the pieces themselves) was 36″ after seam allowances were removed. At the waist, the garment had approximately 6.75″ of ease when darts and seam allowances were removed, which makes sense for a pullover style garment.

1950s Lingerie Pattern Ease

For this example, I examined a contemporary reissue of a 50’s era Simplicity bra pattern (Simplicity 4333). The contemporary version of the pattern is numbered 1426, and I looked at view C. *Represses rant about ugly contemporary pattern envelope design with all her might* But seriously, the 1980s wood stain exterior paint green of the Simplicity logo and the weird way the elements are balanced is just…no. NO.

There is some confusion with using the finished garment measurements in some reviews, as it’s unclear if the size represents the full bust. (My guess is probably yes, since that’s where the Simplicity site suggests measuring to select your pattern size. Personally, I think the high bust is the better starting point for accurate pattern selection, since it measures your frame rather than your breast fullness.) According to the size chart, the finished measurement matches the body measurement exactly at the bust.

Out of curiosity, I measured the pattern pieces for my likely size as well. For the size 12 pattern, the finished measurement is listed as 34″. But there is a button placket at the center back, and it’s unclear if those finished garment measurements include the amount that the band overlaps at the placket or not. I measured to the center line of that placket, essentially measuring the circumference of the garment when closed for wearing, and found that when seam allowances were removed, that size would actually be 33″, an inch smaller than the body, which isn’t going to be workable for a garment with no stretch. (Counting the overlap in the finished measurement would have given me a measurement of approximately 34 and 1/4″ full circumference.)

While there’s definitely some room for error on the part of my measuring, a lack of any ease for breathing and the lack of clarity in what the finished garment measurements actually mean are a problem. While the contemporary formulation of band size/cup size wasn’t being used in the ’50s, it seems odd to me that one of the Big 4 pattern companies couldn’t examine the pattern measurements and explain their sizing in a way that takes band size/cup size into account to better serve the needs of their current customers for the reissued version. If I could find the original pattern, I’d love to compare the ease standards and grading used in the original to the ones used in the reissue. I’m also curious how accurate the finished garment measurements printed on patterns usually are.

Contemporary Lingerie Pattern Ease

I looked at Vogue 8888 to get an idea of how much ease is used in contemporary lingerie pattern making as well. View A is a loose-fitting surplice robe. View C is a close fitting, bias cut pull over camisole. View F is a semi fitted pair of bias cut shorts.

What I found was that for the robe (View A), the bust included 6.5″ ease and the hip had 7.5″ of ease for all sizes. For the camisole, there was 3″ of ease at the bust for all sizes I checked, which might be just slightly above what the Big 4 ease charts describe as “close” fit by about 5/8″, but which makes sense given the lack of a closure and need to be able to pull it over the shoulders. For the shorts (View F), the hip had 3.5″ of ease. (I checked the actual pattern pieces for this view and found this measure to be accurate, too.) The waist had 8″ of ease, which, along with the stretch of the bias cut, would allow for them to be pulled over the hip without a placket or opening. These ease amounts aligned pretty accurately with the stated total ease amounts for the major pattern companies for different fits, and the ease amounts were the same for all sizes I looked at.

Contemporary Pattern Ease in Loose Fitting Garments

I looked at McCall 6649, a loose-fitting button up menswear style shirt in a B cup size, and found that the bust had 5 1/2″ of total ease, the waist had 6″ of total ease, and the hip had 6″ of total ease for all sizes I looked at (16, 18, and 20 for this pattern). So ease amounts were consistent, and matched the given ease chart amounts for a loose fit. I was curious, though, if the final garment actually fit as it’s depicted on the envelope or if it might be looser, especially at the waist. The model may be wearing a smaller size than the envelope would recommend for her body measurements, or it might be styled to be flattering, or maybe it’s just me.

I looked at one more “loose-fitting” pattern, the McCall 6465 loose tunic dress. For sizes 16, 18, and 20, ease amounts were consistent. It had 5.5″ of ease at the bust, 13.5″ of ease at the waist, and 8.5″ of ease at the hip. The ease amount at the waist seems large, but if the dress is pulled over either the shoulder or the hip, it would make sense for the narrowest part of the body to require more ease here. This one was a looser fit than the other pattern, so if a person was expecting “loose fit” to mean the same thing on both without pulling the patterns out to check the finished measurements, there might be some frustration with the results.

Conclusions

The patterns I looked at seemed mostly consistent with ease amounts described as “industry standard.” I can’t find much information on ease standards in ready to wear, so I’m curious how those industry standards are applied outside of patternmaking for home sewing.

If ease amounts in patterns are relatively standard, then where does the confusion and frustration come in? I’m thinking some of it is the stylized photography of pattern envelope photos. When we see a photo of a finished garment, there is a certain automatic assumption that the photo is more realistic than the highly stylized, exaggerated silhouettes of vintage pattern envelope fashion illustration. But the photos aren’t as realistic as they seem if the samples are potentially being selected to flatter the model and the garment rather than depicting the actual fit of the pattern if it were sewn to the model’s body size. This is compounded by the possibility that clothes are pinned in place or pinned closer to the body and that photo editing might be creating the illusion of closer waistlines or trimmer leg silhouettes than the garment really gives.

So what’s a sewist to do to avoid pulling her/his hair out? The best indicator of final fit is the finished garment measurements. You can check the total ease amount by subtracting actual body measurements on the measurement chart from the finished garment measurements printed on the tissue, if they’re present. If not, it’s worthwhile to measure the pieces at least at the bustline to get an idea of whether the fit the pattern is said to be is the fit you’re expecting, and the waist and hip measurements are helpful as well. If you have a sloper that you work with for pattern fitting, you can rotate the darts to the approximate position of the sewing pattern you’re comparing it to to see how much the additional space the sewing pattern has, and whether this works for you for the fit you’re seeking.

Finally, it’s a good idea to know what kind of ease you prefer in your garments, and a great way to do this is to measure ready to wear clothing you already have that fits the way you’re wanting your sewn garment to fit. For example, if you have a skirt that is just long enough and has the amount of ease you want in a close fit, measure its actual dimensions and compare with your body measurements to get an idea of what desirable fit is for you. I’m incredibly picky about how pants fit, so as soon as my pregnancy belly resumes a more semi-permanent, somewhat back to normal state, I will be measuring a few of my favorite pairs of jeans for exact inseam length, favorite boot cut flare amount, and crotch depth that is tight enough to give some curvy definition to my back end without being pinchy or uncomfortable. In my own patternmaking future, I hope to help with the ease confusion issue by listing final garment measurements clearly and offering consistent descriptions of fit or an explanation of the amount of ease so that, hopefully, the sewist can know what they are getting into without having to sew muslins of every pattern.

If you have frustrations with pattern fitting because of excess ease, I hope that this was helpful. Do you have any tips or strategies that help you to get consistent fitting results from commercial patterns? I’d love to hear them!

Adapting a Sloper to Your Measurements – The Maternity Sloper

I thought it might be useful to share the process of adapting a sloper pattern to actual body measurements, and what more extreme sport version of this could I do than showing how I adjusted my usual sloper size to fit the ever shifting, radical transformations of the pregnant bod? Things have shifted, swollen, and rapidly expanded in ways that I have never drafted for before. These changes are specific to certain body parts, so simply sizing up till something fits wouldn’t give me anything that fits my actual skeletal structure. I have to bust out the scissors, tape, scrap paper, and all the best swear words I learned from my time in the restaurant industry for this transformation.

I’m starting with my high bust measurement, which pre-pregnancy was 36″. (With swelling and rib cage expansion as everything gets displaced upward, my current measurement is *slightly* larger, but I’m choosing to disregard the slight discrepancy since the bones of my neck, shoulders, and upper chest are still basically the same. These bony structures are the place that most garments will hang from, so I’m choosing to prioritize this over the softer fleshy areas that have slightly swollen (or vastly expanded) where adjustments are easier to make because fewer planes of the body are intersecting.

After printing and assembling the sloper, I’m using my Body Measurements for Sloper Comparison worksheet to record the sloper measurements and my own body measurements.

front-and-back-waist-length-measurement
First, I check the vertical positioning of my front waist length, back waist length, and bust position. For my size, the front waist length of the sloper (taken from the high point of the shoulder to the waistline) is approximately 16.25.” My body measurement from high point shoulder to the area previously known as my waistline is approximately 15″. Since this is imprecise at best given my current shape, and because I know I’ll need additional length in the bodice front to cover my baby bump, I’m choosing not to adjust the waist position.

For the back waist length, the sloper measurement is approximately 16.75″ and my body measurement is 17″, so I’m not going to make any adjustments here.

bust-position-sloper-measurement
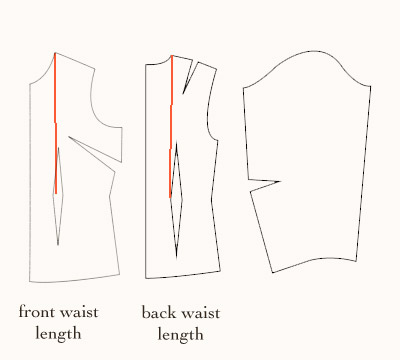
For the bust position, I measure the pattern from the high point shoulder to the bust point/apex/nipple, and the measurement is 9.5″. My actual body measurement is 10.5″, so for this area, I’m cutting the entire dart area out and shifting it 1″ lower and redrawing the side seam, and comparing to make sure the length still matches the back side seam length.

bust-position-sloper-adjustment

bust-position-sloper-adjustment-redrawn

vertical-adjustments-completed

Then I move on to the horizontal girth measurements, where things get really intense. The total waist circumference of my sloper is approximately 30.5″. My body measurement is about 41.5″ right now. The sloper measurement includes .5″ total ease at the waist for this size, so my total desired waist circumference in my adjusted sloper should include .5″ over my body measurement as well, so the total width of my personal sloper after adjustment should be 42″ total. The majority of that difference is in the front of my body, so when adjusting the sloper, most of the adjusting will be taking place in the front. From previous pattern work, though, I do know that my waist is proportionately larger than most patterns’ standard sizing, so for the sake of balanced distribution, I will add a bit to the back waist width as well.

The front waist measurement of the sloper is 16″, .25″ of which is ease, and my body measurement is 23.75″, which is 7.75″ of difference. If I add .25″ of ease, the total front adjustment I need is 8″. (I want to maintain at least about a half inch of wearing ease in my pattern, I want to be sure to add about a half inch over my total body measurement at the waist.)

24″ actual body and ease – 16″ sloper measurement = 8″ adjustment needed to full front bodice at the waist.

So I’ll be adding 8″ of extra width to the front waist, total. Since I’m working with the pattern piece that covers a quarter of the body, I’ll only be adding 4″ to the actual pattern piece. (All of these changes will be doubled in the actual fabric since this piece is cut out twice.)

For the pregnancy shape, the front waist darts are definitely not needed, (unless you’re going for something super fitted at the underbust, in which case you could shorten the dart to the length needed and end it higher, well above the waist). For my current purposes, I don’t need the dart at all. It’s 1″ wide at the waistline, so eliminating this dart adds 2″ of total width to the front bodice, or 1″ of the needed 4″ width in the quarter body pattern piece.

I still need to add 3″ to the quarter body front bodice piece, or 6″ to the full front bodice, at the waist. To determine where and how to add this extra width, I’m going to consider what amount I need for the back as well. The sloper measurement is 14.5″ in back, which is .25″ ease. My body measurement at the back waist is 17.75″. If I add .25″ to that body measurement for ease, the width I want the back waist to be is 18″. So for the back, the total adjustment I need is going to be:

18″ actual body and ease – 14.5″ sloper measurement = 3.5″ adjustment needed to full back bodice at the waist.

This means I’ll need 1.75″ added to the quarter body back pattern piece. The back dart is 1.25″ wide at the waist line, so one possibility would be to eliminate it, but I don’t want to do that and entirely lose the shaping it provides. Though my waist is wider than typical proportions, my back definitely does have curvature there that a dart allows the fabric to follow. I may narrow it slightly to add some width, but I’ll wait to see how much. Another possibility would be to slash and spread the pattern along something like a princess line hinged at the underarm area, but this is probably more complicated than what I need, and would involve changing the hip, too.

For the sake of simplicity and trying to add girth to the pattern in a way similar to the rectangular body shape I actually have, I’m going to reduce the waistline at the side seam by straightening it, making the same adjustment to the front bodice side seam, because those pieces must match in length and their alignment is crucial to the balance of the final pattern. This adjustment adds 1.25″ width to my quarter body pattern pieces in back and front. The remaining amount I need to add at the waist is .5″ to the quarter body back piece and 1.75″ to the quarter body front piece.

side-seam-adjustment

To finish the waist adjustment to the back, I’m going to narrow my back dart width by .5″, leaving me with a .75″ back dart for shaping. To finish the waist adjustment to the front, I’m going to add to the center front by essentially slashing and spreading along the line where the dart was to add space for the additional body volume here.
I want to slash and spread enough to make the waistline 1.75″ larger. (Interestingly, in historical patterns, the center front seam often was curved along this line. To me, this seems like a potentially more accurate two dimensional depiction of the actual body shape in the front of the torso, which is rarely flat, unless you’re very athletic and far more disciplined about food than I.) Another benefit to this pattern adjustment is that in the future, when/if/to whatever extent my body does return to normal, having a center front bodice seam will allow for easy repeat alterations, so my maternity wear isn’t necessarily going to be relegated to the back of the closet for the rest of time, but can shrink back down with me as needed.

all-waistline-adjustments

Next, I want to look at the high hip. The industry standard for this measurement is approximately 4″ below the waistline, with the full hip approximately 8″ below the waist, though of course this varies from person to person and between different figure types. I want to compare the high hip of the sloper (36″, .5″ of which is ease) to my high hip body measurement (39″), remembering to add .5″ of ease to my body measurement. I know from previous pattern work and from my belly bump that the entirety of this discrepancy is in the front of the pattern.

39.5″ actual body and ease – 36″ sloper measurement = 3.5″ adjustment needed to full front bodice at the high hip.

This will be 1.75″ needed in the quarter body front pattern piece. If I weren’t pregnant, I would probably slash and spread outward at the side seam to add the needed amount, but since the protrusion of my figure is along the center line, I’m going to add it to the center instead. Since I already slashed and spread at the waist to angle the sloper pattern outward and didn’t yet adjust the hip area, I can just measure this amount and alter the center front curvature to add or reduce as needed here. The amount that was already added at the hip by my previous waist adjustments works just fine here.

high-hip-adjusted

Then I want to look at the low hip measurement, which is approximately 8″ below the waist, give or take based on height and figure type. In my case, and in the case of any full abdomen to some extent, since the belly bump expands both vertically and horizontally, it will be a bit lower than this, especially in the center front. I’ll be adding extra length to the bottom center front to cover everything. The sloper measures 39.5″ here, with .5″ of that being ease. My body measurement is 41″ here. So I’ll add ease to the body measurement and then calculate to find my needed adjustment:

41.5″ actual body and ease – 39.5″ sloper measurement = 2″ adjustment needed to full front bodice.

So I only need to add 1″ horizontally to the quarter body front pattern piece at the low hip. My previous waist slash and spread adjustment angled the low hip line outward more than this, so I’m going to curve that line back in towards the original center front line a bit. I’m also going to add length here, too. My sloper measures vertically about 9.75″ from waistline to low hip, but my current body measurement is 12.75″ here. I’m going to add about 3″ vertically to cover this.

low-hip-and-full-abdomen-adjustment

And that’s it for the major adjustments for the pregnancy belly. I’ll have to add more to the center front as I continue to expand, but the principle is the same. This is by no means the definitive way or the only way to do this in the flat pattern. Most patterns I’ve seen for maternity tend to add extra room/ease at the side seams, which works too, but in a much more drapey way that feels a bit too much like a shower curtain to me. The shape here hugs the curve, much like the cup of a bra pattern curves to encase the shape, rather than just draping over it. The downside of a center front curve like this, though, is that if the curve is bigger than the actual body shape, there will be sagging and wrinkling like a sagging bra cup. But that center seam allows a lot of adjusting as needed to happen during fitting, and changes made there are more independent of the rest of the garment than altering at the side seam might be.

Tutorial on flat pattern adjustments for maternity by Blue Hours Atelier. Click through for more on how to adjust a bodice sloper for maternity.

I hope this was helpful, and I hope that my hormone addled brain didn’t make any blatantly obvious, embarrassing simple math errors. 🙂 There are some other adjustments I do to my own sloper for a forward shoulder and broad back that I’ll probably cover in a different post soon. Happy Friday!

Free Downloadable Sloper Patterns and a Website for Free Resources (!!!)

woven-bodice-sloper-cup-size-variations

I’m super excited to say that I have FINALLY designed and fleshed out a website that I feel good about. And on this website, you will find the *free downloadable sloper patterns* that I have been working on for approximately a year and a half. Why so long? Let’s just say that there are a lot of opportunities for screwing up some seemingly minor thing in the process of choosing sizing, developing grade rules, drafting, applying said grade rules, and modifying for cup sizes, not realizing it for a very long time, and then having to go back and start completely over because one thing affects 37 other things! 🙂 Which is not to say that I can guarantee these are perfect, but I’ve learned so much in the process of creating them that it has been time well spent, and I hope they can be useful.

These are the starting point for my pattern line, and I’m making them available as a potential fitting aid for my future patterns for anyone that chooses to use them, but mostly as my way of trying to contribute something that I hope can be useful to the online sewing community. The online crafting/sewing crowd is so inspiring and generous with encouragement and help and tips and tricks that it’s been a huge part of making this craft what it has become for me. So thank you, friends!

I’ve put every single size in my range up on my website as separate pdf files, and there are B, C, and D cup size variations for each one. They can be used for determining sizes and fit for my (upcoming) patterns, or they can be used as a sort of two dimensional dress form for working out exactly the fit you need for any pattern, or they can be used as a base for your own pattern drafting. I have some resources like a finished measurement sheet, a body measurement worksheet printable, and a tutorial on measuring yourself and adapting the sloper to your measurements on my website here. Feel free to share them with anyone that might find them helpful!

A nested version of the pattern that includes all sizes is available on my Etsy shop here, if you’d prefer it for grading between sizes or your own drafting purposes.
WHAT IS A SLOPER?
A sloper is the basic starting point for pattern design. Also known as a fitting shell, it is a baseline with enough wearing ease to allow for movement and breathing, but no design ease and no details. (It isn’t quite the same as a moulage, which fits even tighter, like a second skin, and it isn’t the same thing as a block, which is a basic pattern for a specified style, with design ease included, that can then be elaborated with details.) Slopers don’t include seam allowances.

WHAT IS A SLOPER USED FOR?
Patterns almost never fit right out of the envelope. This isn’t a failure of the pattern. All patterns (except bespoke ones) are drafted to an average set of measurements that falls somewhere in the middle of the vast spectrum of human shapes and sizes and body types. Unless your body dimensions happen to be very close to that average set of measurements used in drafting, your pattern will need adjusting to better fit your body. A sloper or fitting shell can help you to work out and keep a physical record of those adjustments.

A sloper is like a two dimensional dress form. You can use a sloper as a basis for designing your own patterns, or you can use it as a fitting aid to adjust patterns to your body measurements and preferred fit. In adapting a sloper to your own measurements, you establish a known minimum requirement for garments to fit, and you can establish the fit adjustments that you know you need to apply to every garment, instead of figuring them out anew for each pattern. The sloper provides a baseline for fit, where the pattern uses additional design ease, design lines, and detailing to give style, structure and movement to garments.

I wanted to draft my own set of slopers as a starting point for a few reasons. First, I wanted to start from a more realistic shape than the body model commercial companies usually assume. The industry standard body model is usually hourglass shaped, though statistically, most women do not have this shape. I wanted to use as a starting point a somewhat fuller waist and hip measurement than the Big 4 for a more rectangular body type, which statistically is more common, at least in certain European population samples. In developing grade rules, I tried to incorporate statistical measures of actual bodies rather than dress form increments or standard grades for tricky areas like shoulder length. My hope is that this will yield a better, more realistic fit, but the downside is that finding the right one for you will probably require taking your measurements and may not translate directly from what you’re used to using in a pattern from one of the Big 4 companies.

I also wanted to draft my own slopers to start with a very fitted baseline, and going forward, I want to offer patterns that are very clear about the amount of ease they include. Mostly this is because one of my recurring struggles in sewing from commercial patterns, especially trying to sew a historical range from late 19th century to 30s and 50s patterns to contemporary ones, is that the amounts of ease change so much over time and between manufacturers that it’s hard to know how something will fit without making a muslin of everything. And making muslins isn’t the best use of fabric and to me is the. most. boring. thing. ever. Personally, I prefer patterns that don’t include a ton of ease, and patterns from the Big 4 almost always have too much for my liking. So in my future drafts, I expect to use ease standards closer to the lower end of the industry standard range, and I intend to be super clear about that ease so that sewers know what to expect without having to try it and see quite so much.

demeter-nursing-bralette-burgundy-lace-gothic-lingerie

In other news, I added my first underwired and nursing bras to my etsy shop, because holy manic nesting impulses channeled into my creative pursuits instead of my godforsaken hoarder house, Batman! Pregnancy makes me feel like a crazy woman, but throwing myself into work is extremely therapeutic right now.

Coming soon to the blog: how to adapt a sloper for maternity, in which yours truly shall snarkily narrate an exploration of the changes pregnancy has wrought upon this physical form and how I deal with them in the flat pattern format. It will also serve as an extreme example of how to adapt a sloper to your body measurements. 🙂

Have you used slopers in your sewing? Have very strong opinions on the amount of ease one way or the other included in commercial patterns? I’d love to hear your experiences! 🙂

All About Bra Fitting: Bust Position and Torso Shape

For part three of my informal exploration into the elements of bra fit, I want to look at bust position and torso shape. A lot of bra advice focuses on the breast itself, and while that is hugely important, the torso that provides the base for the breast can have a dramatic effect on fit and comfort, too.

Since bra manufacturers are attempting to sell their design bra to as many people as possible, they have to settle on one averaged sizing standard that hopefully (sort of) fits as many of their customers as possible as a basis for their bra designs. As anyone who sews knows, it’s hard to fit a wide range of bodies with a specific sizing standard without the fit being off somewhere for most people, which is why patterns rarely fit perfectly right out of the envelope. The proportions of certain body measurements like back torso width to front torso width, breast diameter, and breast spacing can vary widely between women, but for production purposes for any given bra brand, there are only a single, averaged set of measures being used, unless the brand specializes in a particular subset of body types (petite, curvy, tall, plus sizes).

What this means is that if you have body proportions that differ dramatically from that standard, you may have certain fit problems. A simple, very common fit issue happens when bust spacing is different than the assumed standard, which is one to two finger widths apart. If your breasts have less space than this or are touching in the center, underwires in a standard bra don’t rest against the sternum, but instead sit painfully on top of or jab into the breast tissue, and there may be some gaping at the outer side of the cup. (A possible solution to this is a plunge style bra or a bra with a very low, narrow gore.) If your breasts are more widely spaced than the assumed standard, this will usually mean that the cup gapes in the center front near the gore while wires jab or rest on top of the breast tissue on the outer edge of the breast. (Bras with a wider center gore can help with this, and shorter wired styles like demi bras can help with wire issues on the outside of the breast.) Some other common bust position issues arise if your breasts have a wide or narrow root (more on this in a hugely-relevant-to-this-stuff future in-depth look at breast shape), or if your back is particularly broad or narrow. Both of these may throw off the proportions of the bra wings to the cup placement, landing underwires in the wrong place relative to the breast.

But there are also other, less obvious factors of body anatomy that complicate bra fit. Overall ribcage shape, both vertically and horizontally speaking, can dramatically affect how a bra rests against the body and whether the breast tissue can then fully supported by the cups. Since the majority of a bra’s support is provided by the bra band and the cups, if these aren’t positioned in a way to effectively hold and distribute the weight of breast tissue, the bra is unlikely to offer much support or comfort. Most mass bra production uses a horizontally oval shaped, vertically gradually tapered to the waistline type of rib cage shape as their baseline for shaping the bra band and positioning bra cups within it. But, of course, not all rib cages are shaped this way.

Here’s a great illustration of rib shapes viewed from the side that comes from a site (Butterfly Collection Blog) that seems down at the moment. (I don’t agree with the shape terminology used here, because I’ve seen rib flare describe something else in other contexts, curved vs. rounded is confusing, etc, but the visual is great).

Torso and Bra Fit

Vertically speaking, rib cages can be very straight, and barely taper to the waist at all, especially in more rectangular torso shapes without a very defined waistline. Rib cages can also be rounded or what might be called barrel chested, which means the ribs don’t taper inward toward the waistline as much as the standard but are more curved outward. Rib cages can be very dramatically tapered inward toward the waistline, especially in dramatic hourglass type shapes with a very small waist. Each of these variations will change the ratio of band to cup, and can require different adjustments to the vertical shape of the band to help it fit more closely to the body as it must in order to give adequate support..

Horizontally speaking, rib cages can have a variety of shapes other than oval that can mean the way breast tissue fills cups is different than with the standard oval shape. Here is an illustration of rib cage shapes in cross section that might help explain. It happens to be male, but you can get an idea of how breast tissue stacked on these shapes would cause breasts to project differently:

thoracic-cage-43-638

The “standard” chest has an oval shaped front and relatively flat chest wall on which the typical bra can rest evenly against the body. On a more barrel shaped chest, the chest wall is more rounded, and when a standard bra is positioned on this shape, bra cups may point outward in what is often called an east/west position. I’m not an expert on anatomy and my knowledge here is limited, but I’d expect that bodies exist in a continuum of shapes, and that the projecting rib cage (pectus carinatum) and inwardly curved rib cage (pectus excavatum) pictured here are probably extreme examples of shapes that occur to a lesser degree in plenty of people.

From what I’ve been able to find about these variations, a convex, outwardly curving front rib cage shape causes a range of fit problems because of how a bra rests against this shape and where the breast tissue is distributed relative to the resulting angle of the bra cups. Bra cups may be too far apart, with gaping at the sides and not enough fullness in the center front of the cup. Fashion Incubator has a great in depth write up on this particular shape with some illustrative pictures here.

My intuition is that with a chest wall that curves in a more concave way in front, the fit problems in a standard bra might be similar but reversed. My guess is that a standard bra would be tilted inward in a way that it would smoosh the cups together. The problem then is that the cups will be positioned differently than the breast tissue is actually distributed on the body, so there may be some gapping in the center front of the cups, and they might not be full enough to contain all the breast tissue at the sides. I suspect underwires might be especially uncomfortable in the center for this body type.

This is a lot of information and it seems a bit overwhelming, but my belief is that better fit begins with a better understanding of one’s own body shape. Knowing the physical factors that affect bra fit can help you know where to begin to look for answers. The internet has some amazing resources that deal with issues like these in depth, like Her Room, which links to recommended bra brands known to work well for specific fit issues, or Bratabase, which is a community dedicated to finding good fit and reviewing bra brands by actual wearers. There’s even a reddit community dedicated to A Bra That Fits.

I also feel like there is a huge amount of psychological baggage that comes along with bra fitting. A bra that flatters us can make us feel not only comfortable but attractive and confident. Trying on 37 bras and not ever being able to feel good about the results has this nasty way of eating away at your confidence. Never being able to find a standard bra that fit well or looked good on me for at least a decade of adulthood (along with a ton of jokes about being small chested in the era of cleavage and push up bra fashion) gave me a lot of negative feels about my appearance. Sadly, I know my experience is very, very, very common, and that no matter what shape or size they are, it’s all too easy for women (and men) to feel that there is something inferior or inadequate about their bodies. I’d like to yell it from the rooftops now that just because a person’s body doesn’t fit the “standard” doesn’t mean it’s somehow lesser or there’s something “wrong.” All fit standards are abstractions, not ideals. And even the fit “problems” I describe above aren’t “problems” so much as merely shape differences that just require style tweaks or certain adjustments in order to achieve support and comfort.

I think that’s it for today (*climbs down from favored soapbox*), but my next deep dive in bra fitting will explore the very related issue of breast shape and underwire types. (For quick reference, here are part one, Anatomy of a Bra and How to Know if a Bra Fits and part two, All About the Bra Band: It’s Cantilevered!).


All About the Bra Band: It’s Cantilevered!

For part two of my exploration of the bra, an in depth look at the bra band, its relationship to cup size, and its role in complicating everything about finding a bra that fits. 

The bra band is really the base of the bra. It’s where the vast majority of the support comes from, and the support it provides is cantilevered horizontally from the close fitted band and the cups holding the weight of the bust up, rather than support by suspending weight from the shoulders, which hurts and doesn’t work very well. 

vertigo cantilevered bra
Oh, yes, Jimmy, it is a veritable marvel of modern engineering.

The bra band also establishes circumference of the torso at the underbust (for simplicity, I’m disregarding for a moment the way that the old plus four inches issue muddies the waters for certain sizing systems). Bra band size is the starting point for how we describe bra sizes. Cup sizes are relative, and the letters actually have no meaning without a bra band to give them context. Even though we talk about double Ds or B cups as if they describe an objective size, they actually don’t mean anything, because they are relative to the band size that defines them. Here’s a better visual explanation of how cup size relates to torso/band size:

The way that we write bra sizes as a numerical value and a letter is kind of like a little math equation where the bra band is the base circumference of the body at the underbust, and each letter increase adds an inch to this to end up with enough room for the circumference of the bust at the fullest point:

AA = .5 inch

A = 1 inch

B = 2 inch

C = 3 inch

D = 4 inch

DD or E = 5 inch

And upward, though the specific letters used sometimes vary from manufacturer to manufacturer or European system versus American sizing system, etc. If you wrote it as a math problem, it would be something like this: 

Numerical band size/underbust circumference + letter to specify extra cup inches = full bust circumference

So for a 36B, it’s basically an equation that says: 36″ rib cage + 2″ total added in the cups = 38″ full bust measurement. This is why sister sizing works, where you can go down a band size but a cup letter, or up a band size and down a cup letter, to approximate a fit like your exact size (more on this another day).  

This sounds simple enough, but then everything gets complicated, because A) different fabrics are reduced by different amounts depending on stretch and recovery properties, so a band designed for a 36″ rib cage probably will measure smaller than that, B) all bodies are not the same and the broad backed and non-standard torso-ed among us (*raises both hands*) are statistical outliers who can’t find an appropriate size this way, and C) the plus 4 phenomenon.

The plus four thing is an often repeated piece of advice bra fitting – take your actual rib cage measurement, if it’s even, add four inches, and if it’s odd, add five inches to get your band size. To me, this seems illogical and stupidly complicated, and it seems more intuitive to just use your actual rib cage measurement. There are interesting historical reasons that this developed that I’m reading up on and will write about, but it seems to have been a vanity sizing tick that happened around the ‘50s or ‘60s when bra sizing as we now know it began to emerge as an industry standard. Things get really, really complicated these days, because sizing standards vary by market (American, UK, EU, Japanese, Australian, to name a few), and because in the US market, some companies no longer add these inches into the band sizes, and some companies do. This means a 36 band brand A might not be drafted for the same rib circumference as brand B, so your 36B is not the same size across brands. For those of us who don’t want to try on 37 bras at the mall to find one with a good fit, this is exasperating.

This isn’t exactly the bra manufacturer’s fault, since it is very hard to accommodate the wide range of bust shapes, sizes, and body proportions that exist in the real world into a single approximation. It’s a complicated supply/demand and consumer knowledge problem. Even if there were more variations available, most of us (my pre-lingerie-addiction self included) would not know where to begin to understand our particular shape and support needs. That being said, some kind of standardization on band measurement seems to me like it would make it much easier for all of us. (In my own drafting and bra sizing, I use an exact rib cage measurement as a starting point, since the plus four model assumes a certain standard tapered rib cage typical of more of an hourglass shape than the vast majority of women have. Statistically most of us are much more rectangular.)

I’ll be rambling about bust position next in my sprawling Ted talk on the mechanics of the bra. 🙂 I’d love to hear any thoughts, and if anyone knows more about the weird history of bra size standards, I’d love to hear more on this.

Anatomy of a Bra and How to Know if a Bra Fits

I’m working on an in depth guide to bra sizes, bra types, some common fit issues, and in particular, how to use all of this information to have a better idea of what to look for in a bra shop or when specifying sizing and style needs in a bespoke bra. Prior to making lingerie, this was all a mystery to me, so I thought it might be helpful to share it as I write it out. This will be the first part in a multi-part series on the intricacies of the bra. 🙂

The Anatomy of a Bra. 

anatomy-of-a-bra

How to Tell if a Bra Fits

Start with the band, which is the part that encircles the torso, made of the center gore, the front cradle that holds the cups, and the back wings. It should fit snugly on the loosest hook when the bra is new. (The elastic will stretch over time, so the other hooks allow you to adjust for this. ) It should be close fitting but comfortable, and ideally, two fingers should be able to fit between the band and your body, but not more. It should be level all the way around the body, and not ride up in the back.

In an underwired bra, the center gore of the bra should lie flat against the sternum, unless you have very full breasts that touch at the base of the breast. If the gore is held away from the sternum, the cups are probably too small.

The cups should fully encase the breast tissue from the breast root without flattening breast tissue or having tissue spill out from the cup. If the underwires or center gore are held away from the chest wall, the cups don’t have enough depth. If tissue is spilling over the top of the cup or under it at the sides or underarm, the cup size probably isn’t correct. Cup size is complicated by a few factors that I’ll explore in depth in a few days, particularly breast shape and breast position on the torso. If the cup puckers or gapes, sometimes this means the cup is too small, but this isn’t always the case. With certain breast shapes, some brands and cup styles can gape even if the size is correct. This is an issue close to my heart and is a big part of why I started making lingerie, so I’ll explore this further in the near future as well.

When trying on bras, to ensure that all the breast tissue is in the cup, the stoop and swoop technique can really help. It can have a dramatic impact on comfort, fit, appearance, and overall functionality of the cup. To do this, when putting the bra on, bend forward at the waist and use gravity to help gather all your breast tissue toward the front and position it inside the cup. Often breast tissue that isn’t gathered up into the cup can be smashed down by underwires or out the sides of the bra. If the tissue isn’t entirely in the cup, it isn’t being well supported, and this can be uncomfortable and less flattering than a well fitting cup. This can be really helpful for the well-endowed trying to find a truly supportive bra size. It helps with smaller busts, too, though, and can make a surprising difference in cup size and the fullness of tissue within the cup. Curvy Kate has a great video here:

The cups and the frame should work together to position the breasts high on the body, and they should provide most of the support. The straps should only provide about 10% of the support and should function mostly to keep the upper cup positioned correctly. If straps are digging into your shoulders or leaving marks, the band should be adjusted to provide better support.

I hope this is helpful, and I’d love to hear any other tips and tricks to getting a great bra fit. 🙂 Check back soon for the next part, which will explore the bra band and its role in sizing inconsistency.

8 weeks down, 32 to go. :/

We had the first prenatal visit and ultrasound a few days ago, which has helped, in that I have gone two whole actual days without uncontrollably sobbing every 3 hours. It’s good to feel some agency or some control over my emotions for now, and to feel actually energetic enough to want to try to do something.

The first visit was reassuring, in that I liked this doctor better than my first, in that my partner was with me throughout it this time, in that the (*gulp* transvaginal alien probe) ultrasound showed enough detail that we could see little arms moving and wiggling happening in real time. During the first pregnancy, my son didn’t become a real little person to me until much later, when I could watch him bounce around with elbows and feet and knees poking out of my belly. Sometimes the thought of a little person down there is a comfort. Sometimes, though, it induces a little throb of claustrophobia, as if this body is too crowded and I can’t escape it. Some women love it, and more power to them, but it feels a bit like being a host in an Alien movie sometimes, like something might burst out. (P.s. body horror as a genre is not working for me right now.)

The physical changes and the discomforts are more immediately obvious to me than during my first pregnancy.  I’m already showing and uncomfortable in my clothes. My lower abdomen is more sensitive to pressure, so wearing pants low or unbuttoned isn’t going to work like it did till about month 6 of pregnancy number one. I have worn pajama pants to take my son to school *twice* now, which is unheard of for someone who uses clothing as a social armor to hide behind.

So my mission for Easter weekend is to make some pants. They have to come up over the bump in the front, and for comfort’s sake, I’ll be going with a back zipper closure on pretty much everything for the next year of my life. At this point, a basic full abdomen alteration will suffice, I think. Hot Patterns has the best tutorial I’ve seen so far on how to do this (here). An illustration of the flat pattern changes from their page:

fitting-full-abdomen-6

I have a pair of very large men’s dress pants that I bought from Goodwill that I might disassemble for fabric for this one, if my energy holds up. Updates to follow. 🙂