Wardrobe Building: Underlayers

oliver-wendell-holmes-january-blue-flowers

(source)

Happy New Year. ‘Tis the season, I suppose, of navel gazing, doomed promises to oneself, aspirational yearnings. Mine usually involve decluttering and increasing my focus, which is why they typically fail to materialize. My nature is what it is.

I think I have a brain that is addicted to systems and systematizing. I was never very interested in all the fripperies and ebbs and flows of fashion until the last few years of my life. Once I started to see it as a system of recurring variances with social connections that ebbs and flows historically, it began to fascinate me. Now I’m like, excuse me, sir, do you have a second to talk about the recurrence of the flounce as a design element in the last 200 years?

I get really interested in wardrobe planning sometimes, too, but this is where a minimalistic focus might just be able to sneak in to my world. There are some great systems that break down wardrobe creation into addictive little chunks of lists and worksheets like Into Mind’s, here–she has a book and a workbook, as well as a ton of free materials on her website. (I think her system would be great for breaking down things other than wardrobes, too–like my cooking aspirations!)  For a similar system for planning what items to actually sew,  Wardrobe Architect is fantastic too. There are vintage inspired ones, actual vintage ones, French ones, minimalist ones, capsule ones, the blogosphere goes on and on. It is funny the way that a perfect wardrobe seems to carry the promise of success, confidence, grace, coherence. If I can dress like a Hitchcock ice queen, surely my life will fall into place glamorously, yes?

I have emerged in the last few years with a relatively stable sense of my style. I learn toward dark minimalism basics with small touches of bohemian and gothic flair–simple presentation with an air of nostalgia or romanticism. Think Morticia Addams or Vanessa Ives in trousers. Mads Mikkelsen’s Hannibal with a 1930s closet. Scully in a silk blouse and garter belt under that suit. I don’t do full blown femininity like gowns or dresses, nor do I like to show much skin. But I like little touches like a tailored waistline, cowl neckline or lace cuffs. I secretly wish I could wear a medieval ruff to the grocery store.

My sewing over the last few months has been somewhat guided by this style exploration. I decided to start with underthings, since I’m most picky and least satisfied by contemporary ready to wear in this regard, and because why not start at the bottom layer, my closest fit, the least ease and work my way out? Socks, underwear, camisoles, basic knit blouse shells. I also decided to stop fighting it and embrace sewing with knits–they’re more comfortable to wear, and my wardrobe needs are not at all elaborate since I work remotely. I may love trying to sew Vionnet dresses, but it’s silly for me to spend a month on one that I won’t be happy with and will wear maybe once in five years. But a drawer full of flattering, comfortable knit blouses that have some style to them? Yes, please. Also, since the significant other has been sharing his love of the pajama jean with messianic zeal, I have resolved to one day create a stable knit type pant pattern that can be stabilized enough in the right areas to pass as business casual. Also, I am much more likely to actually do my workout if I can do it in the clothes I have on. The more layers of resistance I have working against me being healthy, the easier it is to say screw it, and as silly as it sounds, not having to change into specialized gear will make a difference.

My New Years resolutions are simple enough–sew a new lingerie wardrobe and discard everything old, worn out or unflattering in my wardrobe. Work toward a satisfying, expressive, inspiring wardrobe guided by my style. Work out more so I feel better, and feel better in my clothes. Eat healthier so that I feel better and have more energy to accomplish my goals. Be more selective in my acquisition of material things, trying to opt for quality over quantity in all things, especially my wardrobe. Work on my sewing/writing space so that instead of being full of scraps and broken sewing machine parts and crafting clutter I have an enjoyable place to do my actual work. Try to acquire fewer things but more experiences of working through problems. Work towards my goals in small, steady increments instead of my sweeping general enthusiasms.

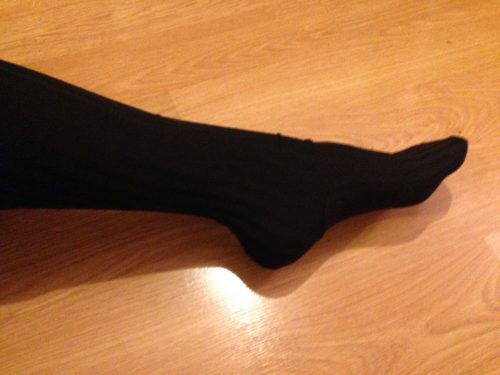
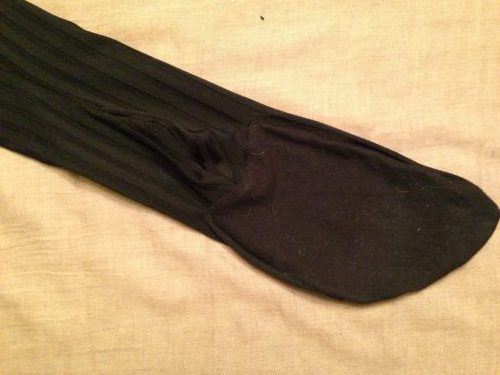
Toward that end, a finished object. Stockings, in the style of the 1700s, self drafted:

img_1344
I was going for a somewhat Victorian feel with the self stripe fabric and solid sole.
img_1348
center back seam with v-effect when sewn into shape.
img_1347
view from the bottom of the sole.
img_1346
side view.
img_1345
in choosing a stable knit rather than softer rayon spandex of my first attempts, the finished seams look much better and the fit is more stable.


Pattern Drafting: Basic Blouse for Forward Shoulder/Broad Back Fit

Over the last weekend, I decided to knuckle down and try drafting a pattern for a shirt from my own measurements. As I’d ranted previously, despite sewing something in the ballpark of 20 shirts over the last year from various patterns and with various modifications, nothing would end up fitting correctly without looking like a feed sack. So I consulted the Esther Pivnick Fundamentals of Patterndrafting book (freely available for download here) and proceeded to measure myself and fire down some synaptic pathways that have not been used since high school geometry. It was, essentially, a Klingon ritual of pain.


If I ever do it again I will a) draw actual lines on my body with a cheap eyeliner pencil so that there is no risk of measuring from different places and b) compile a worksheet to fill in measurements and label points for easier translation when actually drafting them. Hopefully no one catches me doing this because it might look a little too “it puts the lotion in the basket” for non sewers to understand. My measurements must have been a bit off, because the garment I ended up with was bigger than needed and didn’t really fit my midsection. The dart I ended up with in the front is, well, huge, which seems incorrect because my bust/waist/hip measurements are all within a few inches of 36, so there is almost no need for dart control to take in difference. BUT IT DID FIT MY SHOULDERS, which means IDGAF about having to redraft the waist.. I’m almost finished with the third test garment, which is a totally wearable buttondown blouse that allows for super fantastic happy funtime full motion of my arms. I can drive in it, I can raise my arms in it, I can EXERCISE in it (highly unlikely, but possible). Photos to come!

So here is what I learned about fitting a broad back and forward/curved shoulders:

-Adjust the angle of the shoulder seam on the front and the back bodice pieces. It’s easiest to lay them out so that they are butting up against each other at the shoulder seam. Adjust at the actual sewing line, not the seam allowance line, and add seam allowance back to your pattern pieces afterward. Consider the point where the shoulder seam meets the neck an anchor point. This does not change. The armhole also doesn’t change position. But the point at the end of the shoulder seam should be moved forward, usually just a small amount–for me about 1cm was perfect. Then redraw the shoulder seam line from the center anchor point to the end point on both the front and the back pattern piece. You’re essentially adding fabric to the back piece and subtracting it from the front. For me this makes the garment hang much better. But again, don’t move the armhole itself. Some things I’ve read have recommended shifting the curve of the sleeve pattern piece so that the sleeve cap ease is situated with the most fullness exactly over the ball of the shoulder, but I’ve found this adjustment to be unnecessary.

-Don’t mistakenly think broadening the shoulder seam and/or enlarging the armscye will add more freedom of movement. Been there, failed that. What you really need is to isolate the shoulder, which, almost counterintuitively, means the bodice comes high into the crook of the arm (think of what a gusset would cover). It also means the end of the shoulder seam should be behind the shoulder point, not quite on top of it. For me finding my shoulder point, subtracting about 3/4″, and angling the whole armhole back to meet this point made an enormous difference. It places the ball of the shoulder in a position to actually utilize the space in the sleeve cap to move.

-For the broad back/big shoulderblade area, I have in the past tried adding extra fabric at the lower third of the back and front armscye. Sometimes this works, sometimes it doesn’t. Sometimes it works but looks a little more 1950s dolman sleeve than I would like. But this time, I adjusted the bodice. In the Pivnick instructions she points out that the point at the tip of the side bodice, where the bodice side seam meets the sleeve seam, can be extended out horizontally up to 1″ to allow for greater movement (with no necessary change to the sleeve pattern, as I understand it). I did this and blended it into the previous line of the side seam and it seems to have worked very well.

And now that I have a basic pattern that fits, with a bit more refining, I should have a basic block to use for experimentation and I may, just *maybe*, be coming out of my shirtmaking rut.