I have been sewing bras off and on for the last three months. I blame a Craftsy sale for ensnaring me, yet again, in my usual cycle of: oooh, this looks interesting, this class is on sale–I’ll buy it to watch later after I finish what I’m working on now–I’m bored or stalled with current project–I watch just enough Craftsy course to get obsessed with new subject but not enough to actually know how to do it– I try project in creative-lust-fueled mad rush–I fail–watch more class–try again–fail–I repeat again until too bored to continue with original subject or my project is, almost despite my inefficient learning methodology, successful. This may be the only time I’ve ever come close to completing a successful project based on Craftsy viewing.
So please excuse me while I revel in this bra:
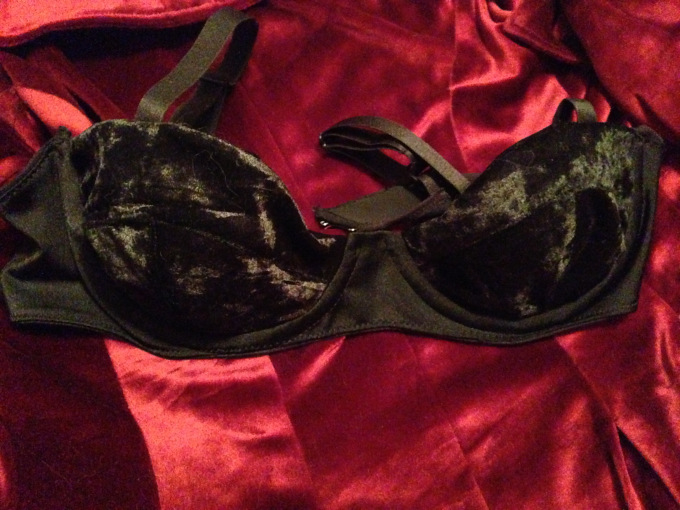
This is a self drafted, full band, underwired bra with pretty much full coverage. This bra is the first and only bra I have ever worn that ACTUALLY FITS ME. I understand now why women wear these things, because it actually does lift and support my breast tissue instead of smashing it down under too-small underwires and too narrow cups.
In this project, as in most of my sewing projects, at least half of the issue has been coming to a better understanding of my actual body mass as it relates to the ideal of a sewing pattern or the median compromise of ready to wear sizing. Bras have never fit me because my body does not fit either the standard of sewing patterns or the fit standards of bra manufacturers, and to be fair, neither industry could possibly be expected to accommodate every shape. But I wish I had understood decades ago how to deal with my body type.
As bras go, no matter the manufacturer or the size I tried, I have always been plagued by one of three problems: sad, empty bra cups; underwires stabbing into my actual breast tissue or preformed cups that don’t conform to anything like my breast shape; too narrowly spaced cups. These issues were also part of my problem trying to sew my first few bras using something like standard pattern sizing as well. It turns out that while, yeah, my breasts are on the smaller side, they aren’t quite as small as I thought. What they are is shallow with a broad root, and the tissue has a sort of tear drop distribution. So for my sewing adventures, once I had the band size right, I adjusted the bridge at center front to get the spacing of the cup bottom/cradle from breast to breast. Then I adjusted the width of the cup bottom/cradle to fit my exact breast width and the placement of that on the band. Finally, I adjusted the cups for the fullness on bottom with much less fullness on top. (This involved a lot of cardboard cutouts, smooshing my boobs around and marking on them with eyeliner, some plastic wrap and tape, and about a billion iterations.)
Long story short, for anyone with a broad rib cage and similar fit issues, I’d suggest experimenting with underwires; I had been wearing ones that were at least three sizes too small for my entire adult life. Also consider the shape of your breast tissue, because if it’s non-typical, no pattern will fit without adjustment to fit that.
But back to my glorious triumph:


This bra has a milliskin band, fold over elastic binding, powernet for the back band, and glorious, glorious stretch velvet for the cup fabric outside *and* the cup lining. (I cut it with the direction of stretch differently for the lining and the outer fabric so that the fabric would be stable and supportive enough–if the stretch is in opposing directions theoretically it will work, and it did work beautifully here.) It’s my way of saying sorry to my boobs for mistreating them with horrible fitting bras for all these years. It feels amazing. It feels so amazing it’s like my boobs are being held aloft by the careful hands of Eric from True Blood all day long. Since it actually holds all of my breast tissue, instead of underwires or cups smooshing some of it down and sitting on top of my actual boobs, this bra looks much better under clothes, makes my bust look larger and is more flattering.
What I also love about this bra is that except for the elastic it is made from the carnage of past sewing failures, painstakingly picked apart and repurposed for this fit experiment. The hook and eye tape was once a failed moulage closure. The velvet was a failed bodysuit. The powernet was scavenged from an earlier bra attempt that fit terribly. The channeling and underwires were stolen from my second-most-recent finished object that didn’t fit–my satin covered foam cup red lace bra:
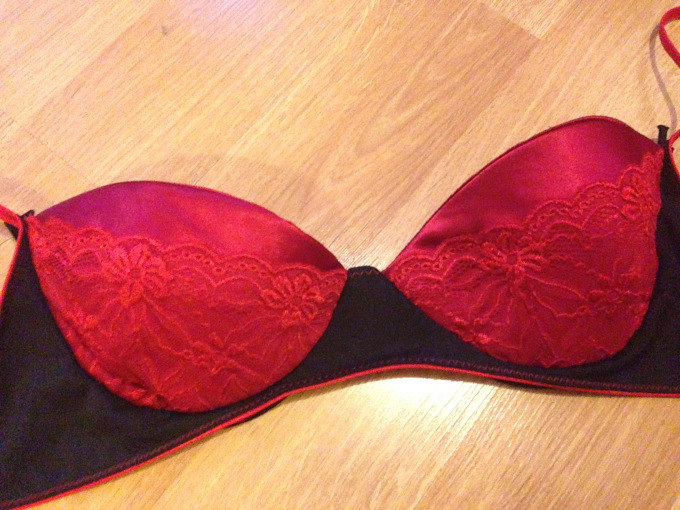
This bra turned out great, but the cups were a bit too full when it was entirely done, and there was no way to correct that without ruining the seamless look I was going for. So I deconstructed it and will reuse the band and the lace on a future attempt.
I don’t throw my failures away, because usually I can find some way to reuse odds and ends, and also because it’s a great way to track how far I’ve come. When I get frustrated that I can’t seem to get a certain project right, seeing how terrible I did when I started and how much I’ve learned along the way, even if I’m not getting wearable garments yet, is a great motivator. I have had a LOT of bras not work out:

This is just a sampling of the many many attempts I went through learning how to work with spandex and mesh and powernet, playing with foam shapes, trying to get the band right, then not realizing the flat, unflattering look was because my cups were too small and were actually minimizing my tissue, then realizing that my breast tissue was even wider than I originally thought. Even though the Craftsy courses with Beverly Johnson are fantastic, there’s a certain real world comprehension of body shapes and how to deal with that geometry that requires experimentation, I think, or at least for me. I’m excited to see how my next one turns out.
