Woven and Knit Sloper Patterns for Women’s Skirts

women's woven skirt sloper pattern PDF download

I have two new sloper patterns to share, a women’s skirt sloper for woven fabrics and a women’s skirt sloper for knits, both in 12 sizes. (Available through Etsy for instant download and in large format pdf for copy shop printing, too.) Drafted my first digital fashion flats and created a new logo, too! I’m *really* excited, because my efforts to work out all my sizing and grading standards consistently is starting to come together. From a pattern drafting standpoint, it’s important to me to develop a solid, consistent basis to draft from going forward, but also from a personal standpoint, I’m excited to be creating a full library of personalized slopers so that I can get the fit I want, consistently and easily. If I know exactly the baseline I need, I won’t have to sew muslins or toiles. So there will be more of these in the future, and more to come on how to use them, because although sewing is an excellent move for less waste and better consumption habits and putting quality over quantity, sewing muslins of everything is a waste of time and fabric that I hate, and probably lots of other sewers do, too.

So what is a sloper, generally speaking? A sloper is the basic starting point for pattern design, also known as a fitting shell. It’s a baseline with enough wearing ease to allow for movement and breathing, but no design ease and no details, and usually it doesn’t include seam allowances, since they complicate the process of altering the sloper.

Why use a sloper? Patterns almost never fit as is, because all patterns are drafted to fit an average set of measurements. Since there is so much variety in human body proportions, the designer has to choose an average to work from, in the hope that these body dimensions will be a good starting point for their customers. Unless your measurements match this set of baseline measurements, the pattern will need adjustment to better fit your body. Getting a great fit with a sloper allows you to do this process once and be able to replicate it again and again, rather than having to sew a test garment to fit each new pattern you sew.

The sloper is meant to be a two dimensional dress form. When you sew a sloper, the intent is to establish a great fit, and to then use this as a template to modify other garments. Since the sloper has no details and no design ease, it represents the minimum amount of fabric you require for a garment to comfortably cover your body and allow for movement. The sloper is the baseline, where the pattern contains design ease and detail to add style, structure, and movement to garments.

These slopers are drafted for a hip that’s 9” larger than the waist, which is the amount I settled on when I looked at ASTM sizing charts and studies of actual bodies. It’s a good starting place for a lot of people, though I have a more rectangularly proportioned figure, so I’ll have to add about 2-3” to the waist for a correct fit. When I made my size chart and grading rules, I looked at the somewhat idealized proportions some of the big pattern companies use and tried to use measurements that were based more on real bodies than their dress form proportions. My hope is that my sizing will fit more rectangular/apple shaped/pear shaped figures better, since statistically it seems to be more the norm than the hourglass in the real human population.

I have never been a big wearer of skirts for my own wardrobe, but between sweltering humid Missouri summer, being on a 50s/60s movie kick when baby wakes me up in the middle of the night and discovering the wonderful drama that is the tango skirt, I think I need to add some to my wardrobe. (Last night’s 3am insomnia feature was Cat on a Hot Tin Roof with Paul Newman and Elizabeth Taylor. Made a boring old pencil skirt look downright savage.) I also wanted to draft them because the skirt is really the bottom half of so many full body patterns like robes and coats that I felt like I should expand my knowledge of that type of lower body garment to better draft the full body ones.

I’m thinking of posting some step by step photos of the process of sloper sewing, fitting, and then adjusting patterns with them, because examples of actually using a personal sloper aren’t all that easy to find. It’s also a good way to start on the capsule wardrobe I’ve been wanting to sew when I Marie Kondo declutter the rest of my clothes again. The transition from pregnant body to postpartum body has complicated it a bit, too, since my figure isn’t quite the same as it was before and everything is trending lower and squishier than it used to. So I’m resolving to sew for the body I have, discard anything that doesn’t fit or can’t be altered to fit, and then take in as needed in the future. Clothing that just sort of fits is such a big part of the clutter in my house it’s silly, especially for someone with sewing/fitting on the brain so much.

Lots of lingerie and other sewing and crafting stuff to share, but I’ll save it for another day. My personal life is a fog of sleep deprivation and coffee but also baby giggles and summer vacation with my big kiddo, too. Hope summer finds you well, too, Gentle Reader.


Adapting a Sloper to Your Measurements – The Maternity Sloper

I thought it might be useful to share the process of adapting a sloper pattern to actual body measurements, and what more extreme sport version of this could I do than showing how I adjusted my usual sloper size to fit the ever shifting, radical transformations of the pregnant bod? Things have shifted, swollen, and rapidly expanded in ways that I have never drafted for before. These changes are specific to certain body parts, so simply sizing up till something fits wouldn’t give me anything that fits my actual skeletal structure. I have to bust out the scissors, tape, scrap paper, and all the best swear words I learned from my time in the restaurant industry for this transformation.

I’m starting with my high bust measurement, which pre-pregnancy was 36″. (With swelling and rib cage expansion as everything gets displaced upward, my current measurement is *slightly* larger, but I’m choosing to disregard the slight discrepancy since the bones of my neck, shoulders, and upper chest are still basically the same. These bony structures are the place that most garments will hang from, so I’m choosing to prioritize this over the softer fleshy areas that have slightly swollen (or vastly expanded) where adjustments are easier to make because fewer planes of the body are intersecting.

After printing and assembling the sloper, I’m using my Body Measurements for Sloper Comparison worksheet to record the sloper measurements and my own body measurements.

front-and-back-waist-length-measurement
First, I check the vertical positioning of my front waist length, back waist length, and bust position. For my size, the front waist length of the sloper (taken from the high point of the shoulder to the waistline) is approximately 16.25.” My body measurement from high point shoulder to the area previously known as my waistline is approximately 15″. Since this is imprecise at best given my current shape, and because I know I’ll need additional length in the bodice front to cover my baby bump, I’m choosing not to adjust the waist position.

For the back waist length, the sloper measurement is approximately 16.75″ and my body measurement is 17″, so I’m not going to make any adjustments here.

bust-position-sloper-measurement
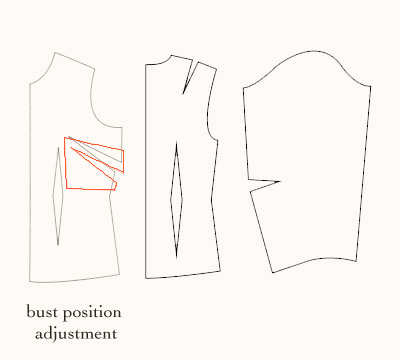
For the bust position, I measure the pattern from the high point shoulder to the bust point/apex/nipple, and the measurement is 9.5″. My actual body measurement is 10.5″, so for this area, I’m cutting the entire dart area out and shifting it 1″ lower and redrawing the side seam, and comparing to make sure the length still matches the back side seam length.

bust-position-sloper-adjustment

bust-position-sloper-adjustment-redrawn

vertical-adjustments-completed

Then I move on to the horizontal girth measurements, where things get really intense. The total waist circumference of my sloper is approximately 30.5″. My body measurement is about 41.5″ right now. The sloper measurement includes .5″ total ease at the waist for this size, so my total desired waist circumference in my adjusted sloper should include .5″ over my body measurement as well, so the total width of my personal sloper after adjustment should be 42″ total. The majority of that difference is in the front of my body, so when adjusting the sloper, most of the adjusting will be taking place in the front. From previous pattern work, though, I do know that my waist is proportionately larger than most patterns’ standard sizing, so for the sake of balanced distribution, I will add a bit to the back waist width as well.

The front waist measurement of the sloper is 16″, .25″ of which is ease, and my body measurement is 23.75″, which is 7.75″ of difference. If I add .25″ of ease, the total front adjustment I need is 8″. (I want to maintain at least about a half inch of wearing ease in my pattern, I want to be sure to add about a half inch over my total body measurement at the waist.)

24″ actual body and ease – 16″ sloper measurement = 8″ adjustment needed to full front bodice at the waist.

So I’ll be adding 8″ of extra width to the front waist, total. Since I’m working with the pattern piece that covers a quarter of the body, I’ll only be adding 4″ to the actual pattern piece. (All of these changes will be doubled in the actual fabric since this piece is cut out twice.)

For the pregnancy shape, the front waist darts are definitely not needed, (unless you’re going for something super fitted at the underbust, in which case you could shorten the dart to the length needed and end it higher, well above the waist). For my current purposes, I don’t need the dart at all. It’s 1″ wide at the waistline, so eliminating this dart adds 2″ of total width to the front bodice, or 1″ of the needed 4″ width in the quarter body pattern piece.

I still need to add 3″ to the quarter body front bodice piece, or 6″ to the full front bodice, at the waist. To determine where and how to add this extra width, I’m going to consider what amount I need for the back as well. The sloper measurement is 14.5″ in back, which is .25″ ease. My body measurement at the back waist is 17.75″. If I add .25″ to that body measurement for ease, the width I want the back waist to be is 18″. So for the back, the total adjustment I need is going to be:

18″ actual body and ease – 14.5″ sloper measurement = 3.5″ adjustment needed to full back bodice at the waist.

This means I’ll need 1.75″ added to the quarter body back pattern piece. The back dart is 1.25″ wide at the waist line, so one possibility would be to eliminate it, but I don’t want to do that and entirely lose the shaping it provides. Though my waist is wider than typical proportions, my back definitely does have curvature there that a dart allows the fabric to follow. I may narrow it slightly to add some width, but I’ll wait to see how much. Another possibility would be to slash and spread the pattern along something like a princess line hinged at the underarm area, but this is probably more complicated than what I need, and would involve changing the hip, too.

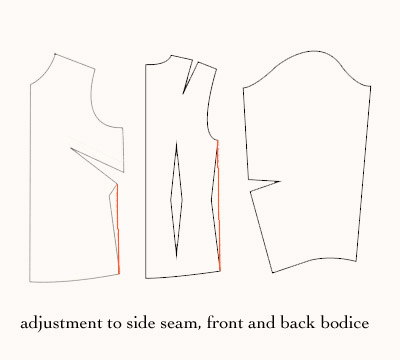
For the sake of simplicity and trying to add girth to the pattern in a way similar to the rectangular body shape I actually have, I’m going to reduce the waistline at the side seam by straightening it, making the same adjustment to the front bodice side seam, because those pieces must match in length and their alignment is crucial to the balance of the final pattern. This adjustment adds 1.25″ width to my quarter body pattern pieces in back and front. The remaining amount I need to add at the waist is .5″ to the quarter body back piece and 1.75″ to the quarter body front piece.

side-seam-adjustment

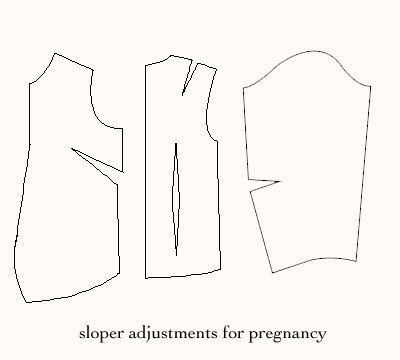
To finish the waist adjustment to the back, I’m going to narrow my back dart width by .5″, leaving me with a .75″ back dart for shaping. To finish the waist adjustment to the front, I’m going to add to the center front by essentially slashing and spreading along the line where the dart was to add space for the additional body volume here.
I want to slash and spread enough to make the waistline 1.75″ larger. (Interestingly, in historical patterns, the center front seam often was curved along this line. To me, this seems like a potentially more accurate two dimensional depiction of the actual body shape in the front of the torso, which is rarely flat, unless you’re very athletic and far more disciplined about food than I.) Another benefit to this pattern adjustment is that in the future, when/if/to whatever extent my body does return to normal, having a center front bodice seam will allow for easy repeat alterations, so my maternity wear isn’t necessarily going to be relegated to the back of the closet for the rest of time, but can shrink back down with me as needed.

all-waistline-adjustments

Next, I want to look at the high hip. The industry standard for this measurement is approximately 4″ below the waistline, with the full hip approximately 8″ below the waist, though of course this varies from person to person and between different figure types. I want to compare the high hip of the sloper (36″, .5″ of which is ease) to my high hip body measurement (39″), remembering to add .5″ of ease to my body measurement. I know from previous pattern work and from my belly bump that the entirety of this discrepancy is in the front of the pattern.

39.5″ actual body and ease – 36″ sloper measurement = 3.5″ adjustment needed to full front bodice at the high hip.

This will be 1.75″ needed in the quarter body front pattern piece. If I weren’t pregnant, I would probably slash and spread outward at the side seam to add the needed amount, but since the protrusion of my figure is along the center line, I’m going to add it to the center instead. Since I already slashed and spread at the waist to angle the sloper pattern outward and didn’t yet adjust the hip area, I can just measure this amount and alter the center front curvature to add or reduce as needed here. The amount that was already added at the hip by my previous waist adjustments works just fine here.

high-hip-adjusted

Then I want to look at the low hip measurement, which is approximately 8″ below the waist, give or take based on height and figure type. In my case, and in the case of any full abdomen to some extent, since the belly bump expands both vertically and horizontally, it will be a bit lower than this, especially in the center front. I’ll be adding extra length to the bottom center front to cover everything. The sloper measures 39.5″ here, with .5″ of that being ease. My body measurement is 41″ here. So I’ll add ease to the body measurement and then calculate to find my needed adjustment:

41.5″ actual body and ease – 39.5″ sloper measurement = 2″ adjustment needed to full front bodice.

So I only need to add 1″ horizontally to the quarter body front pattern piece at the low hip. My previous waist slash and spread adjustment angled the low hip line outward more than this, so I’m going to curve that line back in towards the original center front line a bit. I’m also going to add length here, too. My sloper measures vertically about 9.75″ from waistline to low hip, but my current body measurement is 12.75″ here. I’m going to add about 3″ vertically to cover this.

low-hip-and-full-abdomen-adjustment

And that’s it for the major adjustments for the pregnancy belly. I’ll have to add more to the center front as I continue to expand, but the principle is the same. This is by no means the definitive way or the only way to do this in the flat pattern. Most patterns I’ve seen for maternity tend to add extra room/ease at the side seams, which works too, but in a much more drapey way that feels a bit too much like a shower curtain to me. The shape here hugs the curve, much like the cup of a bra pattern curves to encase the shape, rather than just draping over it. The downside of a center front curve like this, though, is that if the curve is bigger than the actual body shape, there will be sagging and wrinkling like a sagging bra cup. But that center seam allows a lot of adjusting as needed to happen during fitting, and changes made there are more independent of the rest of the garment than altering at the side seam might be.

Tutorial on flat pattern adjustments for maternity by Blue Hours Atelier. Click through for more on how to adjust a bodice sloper for maternity.

I hope this was helpful, and I hope that my hormone addled brain didn’t make any blatantly obvious, embarrassing simple math errors. 🙂 There are some other adjustments I do to my own sloper for a forward shoulder and broad back that I’ll probably cover in a different post soon. Happy Friday!

Free Downloadable Sloper Patterns and a Website for Free Resources (!!!)

woven-bodice-sloper-cup-size-variations

I’m super excited to say that I have FINALLY designed and fleshed out a website that I feel good about. And on this website, you will find the *free downloadable sloper patterns* that I have been working on for approximately a year and a half. Why so long? Let’s just say that there are a lot of opportunities for screwing up some seemingly minor thing in the process of choosing sizing, developing grade rules, drafting, applying said grade rules, and modifying for cup sizes, not realizing it for a very long time, and then having to go back and start completely over because one thing affects 37 other things! 🙂 Which is not to say that I can guarantee these are perfect, but I’ve learned so much in the process of creating them that it has been time well spent, and I hope they can be useful.

These are the starting point for my pattern line, and I’m making them available as a potential fitting aid for my future patterns for anyone that chooses to use them, but mostly as my way of trying to contribute something that I hope can be useful to the online sewing community. The online crafting/sewing crowd is so inspiring and generous with encouragement and help and tips and tricks that it’s been a huge part of making this craft what it has become for me. So thank you, friends!

I’ve put every single size in my range up on my website as separate pdf files, and there are B, C, and D cup size variations for each one. They can be used for determining sizes and fit for my (upcoming) patterns, or they can be used as a sort of two dimensional dress form for working out exactly the fit you need for any pattern, or they can be used as a base for your own pattern drafting. I have some resources like a finished measurement sheet, a body measurement worksheet printable, and a tutorial on measuring yourself and adapting the sloper to your measurements on my website here. Feel free to share them with anyone that might find them helpful!

A nested version of the pattern that includes all sizes is available on my Etsy shop here, if you’d prefer it for grading between sizes or your own drafting purposes.
WHAT IS A SLOPER?
A sloper is the basic starting point for pattern design. Also known as a fitting shell, it is a baseline with enough wearing ease to allow for movement and breathing, but no design ease and no details. (It isn’t quite the same as a moulage, which fits even tighter, like a second skin, and it isn’t the same thing as a block, which is a basic pattern for a specified style, with design ease included, that can then be elaborated with details.) Slopers don’t include seam allowances.

WHAT IS A SLOPER USED FOR?
Patterns almost never fit right out of the envelope. This isn’t a failure of the pattern. All patterns (except bespoke ones) are drafted to an average set of measurements that falls somewhere in the middle of the vast spectrum of human shapes and sizes and body types. Unless your body dimensions happen to be very close to that average set of measurements used in drafting, your pattern will need adjusting to better fit your body. A sloper or fitting shell can help you to work out and keep a physical record of those adjustments.

A sloper is like a two dimensional dress form. You can use a sloper as a basis for designing your own patterns, or you can use it as a fitting aid to adjust patterns to your body measurements and preferred fit. In adapting a sloper to your own measurements, you establish a known minimum requirement for garments to fit, and you can establish the fit adjustments that you know you need to apply to every garment, instead of figuring them out anew for each pattern. The sloper provides a baseline for fit, where the pattern uses additional design ease, design lines, and detailing to give style, structure and movement to garments.

I wanted to draft my own set of slopers as a starting point for a few reasons. First, I wanted to start from a more realistic shape than the body model commercial companies usually assume. The industry standard body model is usually hourglass shaped, though statistically, most women do not have this shape. I wanted to use as a starting point a somewhat fuller waist and hip measurement than the Big 4 for a more rectangular body type, which statistically is more common, at least in certain European population samples. In developing grade rules, I tried to incorporate statistical measures of actual bodies rather than dress form increments or standard grades for tricky areas like shoulder length. My hope is that this will yield a better, more realistic fit, but the downside is that finding the right one for you will probably require taking your measurements and may not translate directly from what you’re used to using in a pattern from one of the Big 4 companies.

I also wanted to draft my own slopers to start with a very fitted baseline, and going forward, I want to offer patterns that are very clear about the amount of ease they include. Mostly this is because one of my recurring struggles in sewing from commercial patterns, especially trying to sew a historical range from late 19th century to 30s and 50s patterns to contemporary ones, is that the amounts of ease change so much over time and between manufacturers that it’s hard to know how something will fit without making a muslin of everything. And making muslins isn’t the best use of fabric and to me is the. most. boring. thing. ever. Personally, I prefer patterns that don’t include a ton of ease, and patterns from the Big 4 almost always have too much for my liking. So in my future drafts, I expect to use ease standards closer to the lower end of the industry standard range, and I intend to be super clear about that ease so that sewers know what to expect without having to try it and see quite so much.

demeter-nursing-bralette-burgundy-lace-gothic-lingerie

In other news, I added my first underwired and nursing bras to my etsy shop, because holy manic nesting impulses channeled into my creative pursuits instead of my godforsaken hoarder house, Batman! Pregnancy makes me feel like a crazy woman, but throwing myself into work is extremely therapeutic right now.

Coming soon to the blog: how to adapt a sloper for maternity, in which yours truly shall snarkily narrate an exploration of the changes pregnancy has wrought upon this physical form and how I deal with them in the flat pattern format. It will also serve as an extreme example of how to adapt a sloper to your body measurements. 🙂

Have you used slopers in your sewing? Have very strong opinions on the amount of ease one way or the other included in commercial patterns? I’d love to hear your experiences! 🙂

Fitting Woes and Effin Slopers.

Grumpycat_meme1

I’ve sewn three slopers in the last two days. The only explanations I had left were a) I’m deformed b) I’m deformed and a terrible measurer or c) I’m deformed, a terrible measurer and I suck at digital drafting.

Let me show you why I am deformed. This is my dad:

dadbeingstatuesquelol

Don’t get me wrong, he was the best dad. He was funny and smart and so very, very kind. I miss him every single day, and credit him with what little patience and persistence I have. While my dad’s physique was quite the accomplishment, and while I am, of course, ever appreciative of the glorious blend of Arnold Schwarzenegger-isms and raw egg protein concoctions that comprised my childhood, THOSE BACK PROPORTIONS THOUGH. I inherited those lats, and I curse them every time I sew. (Alas I inherited neither his motivation to be super fit nor his abs, although I do okay–no sugar, healthy eating, etc. I just loathe any exercise that isn’t walking or dancing around my living room like Thom Yorke. Don’t do this barefoot; it’s a good way to break your foot. Ask me how I know this.) Also: my posture plagued my dad. He designed workouts to fix my forward shoulders, which back then I didn’t care about, being a stubborn kid who stooped mostly out of shyness. I still notice myself doing this when the social anxiety kicks in. The combination of broad man back I inherited from a long line of farmer strong brawler folk and my grunge era forward stoop means that fitting a bodice is a nightmare. NIGHTMARE. I also have pretty much no waistline and narrow hips, so that’s not fun when all my vintage patterns are drafted for someone who wore a girdle from age ten. I have been stubbornly fighting with the various pattern fitting possibilities since I began sewing. In the last few days, in a veritable paroxysm of determination, I have tried:

-a forward shoulder adjustment
-a round back adjustment
-a broad shoulder adjustment
-a sloped shoulder adjustment
-lowered armhole
-shoulder seam darts
-neck darts
-drafting a bodice block from my measurements using two different systems

It has been so incredibly frustrating. I can get a block to fit my torso, kind of, using these methods. But as soon as I add sleeves, my broad back renders any forward motion of my arms impossible. The fit is uncomfortable AF. So after the failure of attempt number 3, I broke out the duct tape dress form and tried draping again. I tried this in the past, but wasn’t very practiced, so my results weren’t the best and I sort of let it fall by the wayside. But this time, after all the math and all the frustration, it was easy as pie.

I was going about it all wrong. I’m not deformed; I just have a manbody. And I’m not even that bad at drafting, but all the formulas I was using were based on creating blocks for a much more stereotypically feminine form. The final blocks I came up via draping look way more like this:

mensvest

than anything even vaguely resembling this:

woman's sloper2

and I wonder how many other women with petite, larger waisted, broad backed figures are also making themselves crazy trying to make the formulas work for them when (it would seem) the basic proportions involved are wrong from the start. From now on for myself it’s all man-blocks. I actually had already gone this route for a few pairs of pants, hellbent on not risking the cameltoe look. They work great, actually. And since most of what I want to sew channels Lilith from Frasier and the tailored suit look, blocks designed for men with a slight bust adjustment might be far less of a headache for me.

If anyone else has been through the gauntlet of these particular fitting issues and knows of any solutions, I would *love* to hear about it! I’m also very curious about the theoretical differences in drafting for men vs women. It seems like the tailor / couturier-dressmaker traditions were historically quite separate industries, which I don’t fully understand the reasons for and will have to read up on.  But it seems like the basic methods of drafting should be universal, regardless of the figure? I’m also curious about how many people have fitting problems because of the standard male vs standard female figure used for drafting…