Vintage Sewing Library: W. D. F. Vincent on Shirtmaking; early 1900s shirt miscellany


I’m having a mini-obsession at the moment, trying to learn to make a proper shirt. The boyfriend is in dire need of some new ones, so, armed with a Craftsy course by David Page Coffin on shirtmaking details, this book from late 1890s-early 1900s? by the W. D. F. Vincent, prolific editor of Tailor and Cutter, and a heavy dose of Boardwalk Empire = weekend filled!

Parenthetically, I should say that really, really love the David Page Coffin Craftsy courses. He has an interesting way of approaching his areas of interest, which I find relatable with my usual pattern of get obsessively interested + read a bajillion things tangentially related to subject –> try to synthesize firehose of information in way that makes sense and breaks subject down into components. Of course, I think my process is complicated by attention deficit/distractability issues (which is why I sewed a pair of pants and a cut-on Mandarin collar kimono experiment blouse a whim this week, instead of, oh, say, a SHIRT). But I really enjoy his way of breaking down the problem of shirt or trouser making into a core pattern and interchangeable detail elements, rather than being another dressmaking sew along this is how you do it from start to finish kind of course. This course doesn’t really cover how to construct or draft the bare bones shirt pattern itself, but that’s where the W. D. F. Vincent comes in.

sacshirt


yoke-back-fronted-forepartfronted-part-variationsdirectmeasureshirts-from-lounge

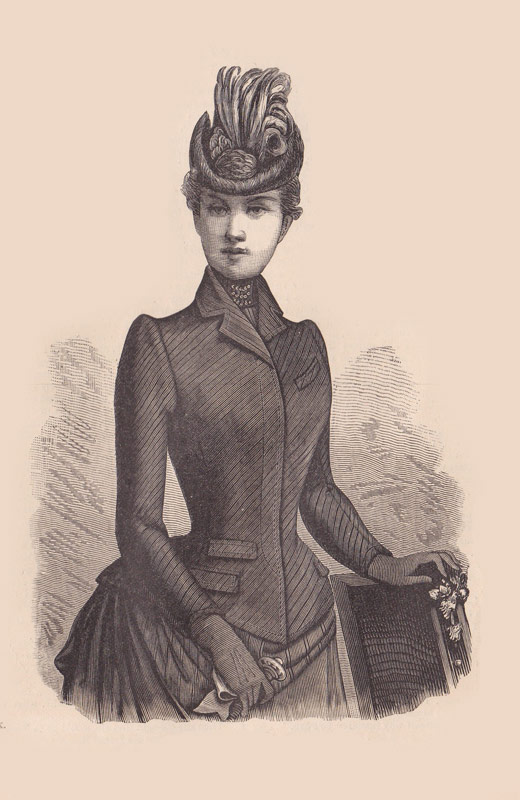
Detachable collars are familiar enough to me from Peaky Blinders and the mini-obsession with them I had while binge-watching that show, but I wasn’t fully aware that the shirt fronts (or “detachable shirt bosoms”) were also detachable. Apparently these were made in detachable and even disposable form:

1912-fiberloid_shirt_dickey

Apparently they were made in cardboard, paper and other materials for kinds of work like waiting tables, where it was easier to just trash the false front rather than launder one.

Then I vaguely remembered seeing the Bugs Bunny opera skit and suddenly the world became comprehensible:

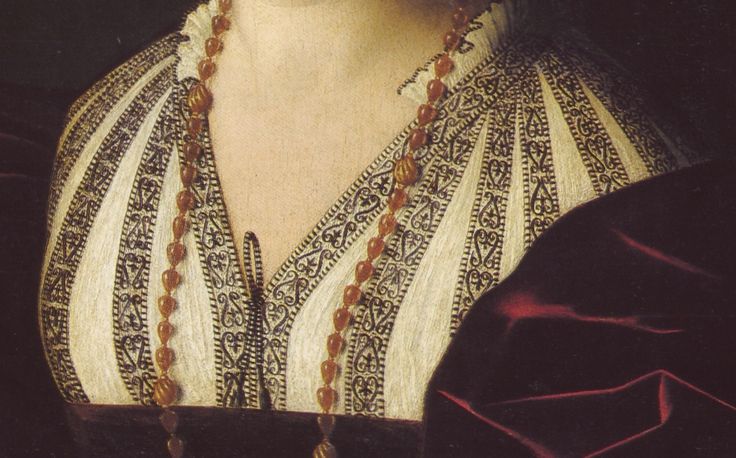
When the singer’s layers start to unfurl, you see his detachable collar come off, his shirt front roll up, his suspenders holding everything in place. Apparently these detachable shirt fronts were typically held in place with buttons to the trouser front. Thank you, google patents! Also, fun fact, apparently they didn’t incorporate this into the elaborate, very accurate costuming for Downton Abbey and you can sometimes see these formal fronts bunching up on the actors where they would not have if buttoned properly. (citing my source) Apparently shirts of the era would have had a button there, where loops like this could fasten:

trouser-button-detachable-front


Patents reveal a variety of fronts and fastening configurations (I have a patent fetish, not gonna lie):


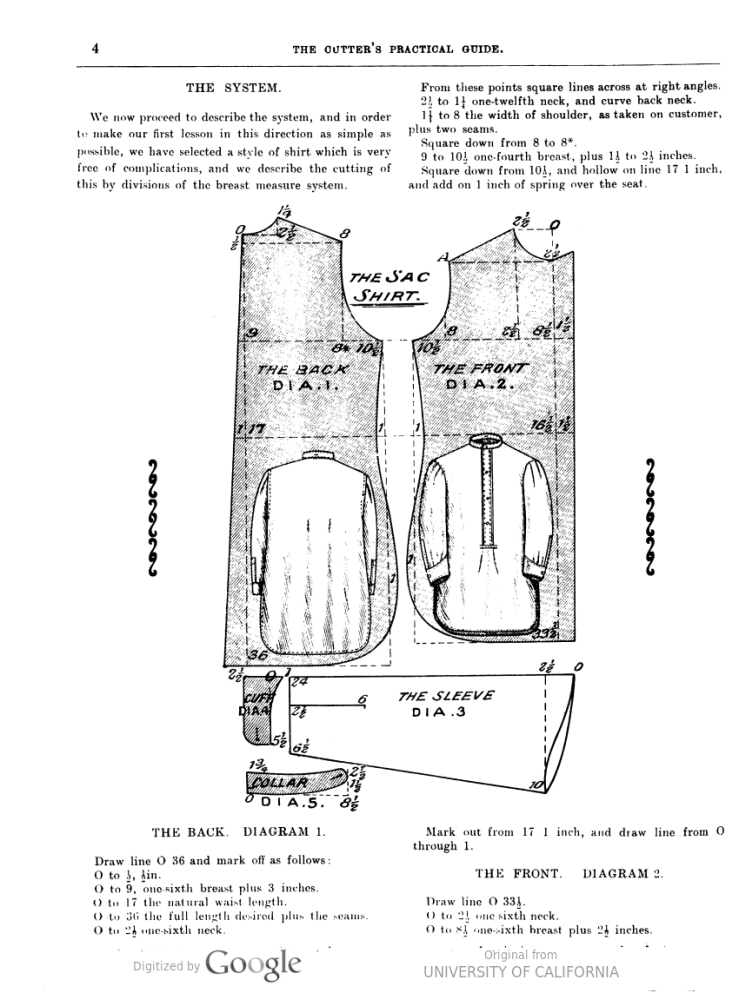
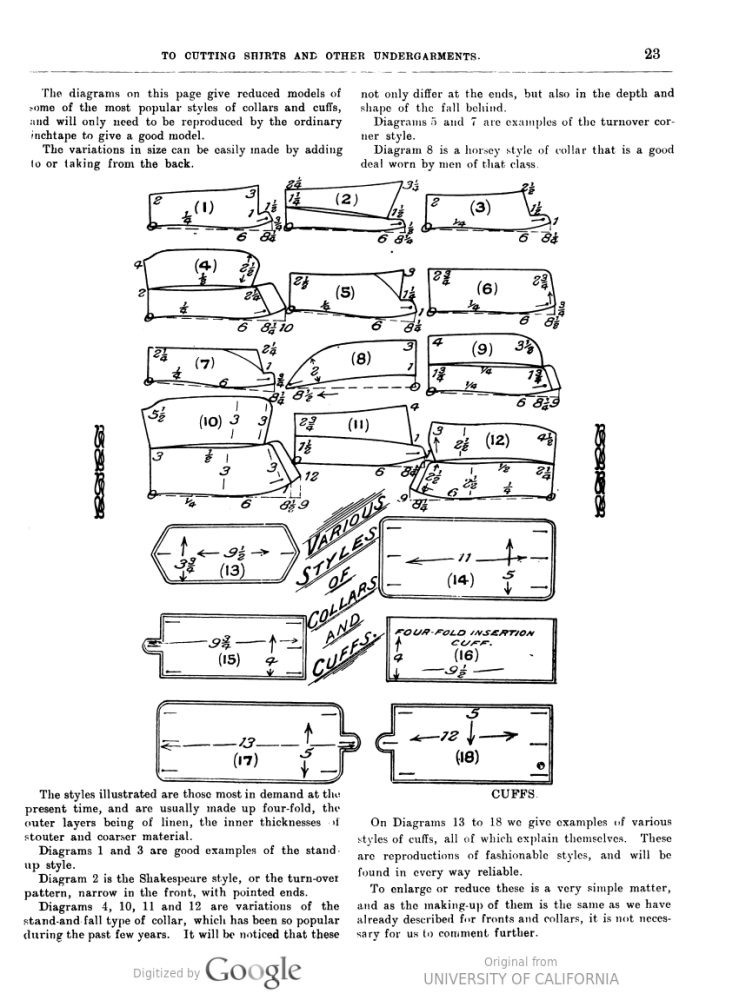
And the cherry on top–did I mention detachable collars in the Vincent book? Because this is sewing porn right here.

collars-and-cuffs


I think that’s about all the overcaffeinated tangents I’ve got. Happy weekend!

There Will Be Blood; or, Amanda Works on Hand Sewing and other August Sewing Randomness

Often I find myself hesitant to post because I’m never satisfied with the work I’ve done and tend to not complete things as often as some sewers. Often I discover mid-project the shoulder slant isn’t right or the fit is off in some way that will prevent me from ever wearing the garment so in the fabric scrap pile it goes. But this month, I actually finished two things! Self drafted corsets, no less. They aren’t perfect, but I’m going to try not to look at my sewing that way from the point on…instead I’m going to appreciate everything I learned this month, and the skills I started to acquire while doing these projects…like inserting boning, adding eyelets, encasing boning channels, inserting a busk, cording, hand stitching, adding puller loops to a corset, etc…

201608-corset-1-front
An underbust/waist cincher in black shantung and cotton duck.
201608-corset-1-back
My first go at inserting eyelets.

I liked this corset and wore it for a full day to test the fit and how it behaved actually on my body. Since it didn’t have a busk and is somewhat long for my short torso, I found it a bit uncomfortable for some activity. My grandma helped me lace it up initially and since grandma was a very accomplished lacer of corsets back in the 50s when the ladies in her family took it to near tightlacing levels for an evening out, it was quite the study in masochism until I loosened it up a bit. Driving in it was absolutely miserable because it somehow seemed to be too long for comfort while at the same time riding up and compressing my rib cage to a degree that was miserable. I think part of the problem might be the ratio of my hip / waist / bust being what it is; without the valley of a significantly defined waist to rest it, if I didn’t have it cinched very tight it sort of drifted. I think a waist tape might help with this, and/or converting the corset to a proper underbust where the bust might help it stay in position.

So then I tried a shorter version:

img_0066

201608-corset-2
Puller loops for the win! These are the loops that look out of place above–most of the time the lace goes from one side to the other but to create a puller loop, go to the hole directly above where the cord last came through. Keep a lot of slack in the lacing here. Lace up the rest in the normal crossover pattern. Then when you’re lacing it up, you tie it at the top or bottom or wherever as usual, but you can pull the puller loops to tighten and then tie them off in a bow too. I found this made it much much easier to remove them too!

The shorter version is more comfortable but sort of wanders freely over my rectangular torso. Also the shorter version seems to give a much less satisfying line, since my proportions are what they are, and the corset seems to actually add a bit of girth even as it smooths the line of the torso. For me, the result wasn’t hourglassy; my ribs are too large for that figure flattery. The look is much more abrupt and I discovered when I squish in everything, it creates a nice squidgey little roll of displaced fat between my underbust and the top of the corset. Oof. I’m sure with practice and some habitual waist shaping these things would be less of an issue for me. (Also, I cut the bias binding far too narrow, so it’s a bit messy, but I found hand sewing the binding to be the most soothing activity ever. It’s what I do at school pickup time when I’m trying to quell my social awkwardness around my parent peers. Go ahead, mfers, ask me about my obsessive interest. I DARE you.)

On the uncompleted front, I tried a Renaissance era set of stays and also a set of 1810s-ish conical stays; they didn’t work out for me. (Large ribcage + small bust + large waist = bust fabric floppage and/or unflattering boob squishdown with nothing left to spill over like some heaving bosomed Jane Austen romantic-yet-snarky heroine.) But I learned so much!

cordingisfun
Cording is time and thread consuming but actually pretty magical. Same with handsewn eyelets. This is done here with plain old yarn and muslin for practice 🙂

Now I’m on to a simple pattern for a very simple corset with gores for shaping. It’s self drafted and it’s a crude trial run I’m giving myself full permission to make a mess of. It’s in cotton duck with a front busk and back lacing. I inserted a busk for the first time. I did a ton of hand sewing on it for practice, even though it’s terribly inefficient and I have torn the living sh*t out of my fingers in the process.

Super sewing tip–if you get blood on a garment you’re sewing, saliva does a fantastic job of removing it before it stains. Just spit on the spots and rub. Probably something to do with enzymes breaking down the blood. Also–beeswax is your friend. This is rapidly turning into my favorite thing to do.

handsewing

goredcorset1
Be it ever so humble, my hand stitching is starting to resemble a proper line.

Happy almost autumn…getting excited for the return of layered clothing!

Rabbit Hole of the Day: WTF is a Fichu?

I watch a LOT of period dramas. (Aptly named, quoth the partner. Har har.) And I read a lot of old timey sewing materials, so I know I’ve seen a fichu collar, and I have seen it referenced in pattern books, but ask me what it actually IS and/or how to make it and I don’t really know. So…wikipedia says:

A fichu is a large, square kerchief worn by women to fill in the low neckline of a bodice. It originated in the United Kingdom in the 18th century and remained popular there and in France through the 19th with many variations,[1] as well as in the United States.[2] The fichu was generally of linen fabric and was folded diagonally into a triangle and tied, pinned, or tucked into the bodice in front.

I’ve seen it in books from the 1800s, and especially like this example from Godey’s (source):

GodeysNov1862

Here are some gorgeous examples from 1780s era paintings by Adelaide Labille-Guiard, whose story is fascinating in its own right–I had never heard of her before researching fichus, but she was a talented painter who defied convention by learning painting at all in a mentoring system that typically denied access to women and went on to earn a living as a professional painter and teacher of her craft, painted royalty, and even divorced and remarried in the 17oos! (source for paintings; source of biographical info)


Some more pretty pictures of unknown origin:


And here are some examples from museum collections (all from The Met, I believe, via pinterest and here):

So how might one sew up one of these pieces of lacy frilly uber feminine indulgences? Like so (from Peterson’s Magazine, found on this treasure trove of historical pattern inspiration here):

fichu petersons magazine june 1877

Or like this, from an unknown source but originally viewed (here):

fichu1 dressdiariesdotlivejournaldotcom

Tea In a Teacup has a great, in depth post on different varieties of fichus and how one might construct and embroider the different shapes (here). She created the following diagram, which is a great starting place for sewing up a few of my own to slip under vests or into necklines that scoop a bit lower than I’d like (what can I say, I’m a prude about my decollete):

teainateacup1

Also cool to see was the ways this historical article comes back from time to time in fashion cycles, as does everything, it seems. (Except maybe the monokini.) For sewing inspiration and some styling and interpretation ideas, here are way too many images of fichus, fichu collars and fichu-esque drapery, mostly from Etsy, Pinterest, Ebay and the Vintage Pattern Wikia. The vast majority of actual fashion pieces are from Dior in the 50s/modern day:

Hour count for 10k hours project: 298

Current Sewing Projects: Knit Blouses and Victorian Blazers, Oh My

I want so many things on my sewing table. Impossible things. Impractical things.

Camiknickers.

7221aefa7f049f40805764e9dbd870fb

Black tulle tutus and sunglasses and spring cool.

0448ce27b55c43f963b4e14f899e8715

To draft the perfect catsuit.

f0d5f98e2b3bf9a88801dde901a8621e

But more than anything this week, I have been working on a Victorian style blazer. Something like this, but sleeker, more vampirey. This is a Burda jacket from the Hills are Alive or something about the sound of music, but my brain is taking it to a dark nuclear post-apocalyptic place. I loathe the running stitches and the pockets and the boxy fit, and I don’t like the position of the front bust darts either. So like this but not really like this at all except the high shoulder and the high-ish back neckline. *shrug* I also have been irritated in the past by the lack of seam allowance on Burda patterns, so I definitely won’t be buying this one. Just eyecandy. Also: do you think that’s really her hair, or is that a weave? It’s a serious hunk of hair there.

c392960c746cad8d6af1cb533ed0bace

My partner hates poofey shoulders. So of course those have to happen. Because like Lady Gaga, I’m a free b***h, baby, and I LIKE a little old timey high sleeve cap if it doesn’t poof vertically. I’m thinking a single button closure in the front, a shawl collar, with a high back neck. I’ll probably give it a go in denim waste fabric for now, saving my red herringbone suiting for when I get the fit right.

I’ve actually had a good sewing week–I tried using  a vest pattern to draft a bodice for a jacket, and used my 1880s sleeve from the recent tailored jacket attempt. The fit is nearly perfect, except for the shoulders. When I move my arms forward, it pulls on the front of my shoulder and on the back, along the edge of the scye near my scapula. All my reading of historical tailoring stuff has me wanting to try a new approach on my next attempt. They talk about getting armholes TIGHT, which seems to be sort of the opposite of the slash and spread suggestions I’m used to seeing and trying and failing miserably with. The idea, as I understand, is that the better the fit of the bodice, even–and maybe especially–in the armscye area, the more independent the sleeve movement will be from the more stationary bodice. Instead of lowering the armhole or adding more back ease and sacrificing the hard earned fit, I’m going to try adding more fabric to the bodice armhole, but not only in my usual vertical direction–I’m going to shift the side seam outward and slightly up. With my back being broad and somewhat rounded at the shoulder/scapula line, as well as slightly hunched forward, my back is taking up fabric from the sleeve and my shoulders/back extend in this weird diagonal way compared to the standard form. What I want to do is cover my entire back with the bodice, so that the ease in the sleeve isn’t used up by my back mass. If that makes sense. We’ll see!

I took my jacket attempt #1 and chalk lined it all up trying to figure out where to add. I even bought some hook and eye tape, since I haven’t gotten over my buttonhole aversion just yet. So drafting and cutting attempt 2 is my project for tonight!

Another thing to consider is sleeve pitch. Sleeve pitch, as I understand very roughly, is the sort of rotation of the sleeve in the scye. Most of the time the center top of the sleeve is aligned with the shoulder seam in the usual high position on top of the shoulder. But with stooped posture or forward shoulders or very erect postures, tailors *seem* from my reading to rotate the sleeve slightly within the scye to accomodate. This keeps the grainline in the right position relative to the arm. So with my shoulder being rotated forward maybe 10-15 degrees from standard (this would be set “high” in the tailoring parlance, I think), I might try rotating my sleeve forward to keep the hang correct. What I’m curious about in this case, though, is whether it matters at all that this might throw off the match up of underarm sleeves and side seams. Would one need to shift the underarm seam? In my case with the 1880s style two piece sleeve it doesn’t matter at all, though.

I’ve been branching out and sewing with knit fabrics quite a bit too. I resisted it for ages, seeing it as something like playing an electric guitar to sound good because your technique isn’t good enough to play acoustic. But the perfectionist in me loves the lack of fraying seam edges and the lazy instant gratification craver in me who has been sewing for three years with precious little wardrobe action to show for it ADORES the fact that I can sew up something quickly that forgives minor fitting issues. So far in the last two weeks I’ve made: two great fitting, exceedingly comfortable pairs of thongs (which I intend to make a pattern of to send out into the world soon!), a princess seamed scarf collared 1930s style blouse and another more Edwardian-ish high necked, poofy gathered sleeve blouse in a sleek, pretty ITY knit! Not gonna lie, I’m pretty stoked. That’s like a year’s worth of finished objects for me, and ALL self drafted. Someday, when I find a tripod, I’ll have to post pictures. It’s an incredible feeling to find that my spread-so-thin sewing attentions come together sometimes and actually produce something.

Also, the weather is BEAUTIFUL here. I love it.


Happy weekend!


Sewing Machines: Slantomatic 401

I’ve been trying to rotate some of my favorite machines recently. I love my Necchi machines so much that I could sew on them forever and never feel like I was missing out on anything (is there such a thing as sewing machine monogamy?) but variety is the spice of life, they say. Also I want to use the others enough to keep them well maintained and to break some of the older ones back in to optimal performance. So I’m revisiting some of my Singer machines.

I currently have two Slantomatic 401s. One of them came to me perfectly tuned, oiled, adjusted. It was the first vintage sewing machines I purchased for myself when I began sewing regularly and the Walmart plastic Brother sewing machine just wasn’t working for me anymore. The first time I sewed with it, I was in love. Compared to the rickety, inconsistent stitch quality of the bargain basement Brother, with its dismal white lump design and utter lack of aesthetic appeal, it was heavenly. The stitches are gorgeous and the feed is so consistent that I can turn my work and sew perfectly over the stitches that came before. *swoon*

It converted me to a vintage machine enthusiast forever. It’s gear driven, which gives it a feeling of solidity and precision like nothing I’d sewn on before. Internally it’s all metal, save for one part–there is a very large, crucial gear on the handwheel that is actually textolite, a very durable plastic material. Unlike many of the plastic and nylon materials Singer used over the years, it doesn’t seem prone to breaking, thankfully. (For more info, see Old Sewing Gear’s great blog here.) It has zig zag, a blind hem stitch, and three step zig zag stitch built in, as well as a ton of other decorative stitch possibilities. The needle position is adjustable and the needle plate has measurements engraved in it, which is really helpful with seam allowances.

I bought another in awful shape as a clean up project. It was caked in weird greasy gunk externally, which was impossible to get off without alcohol soaked q tips. It was varnished up internally as well, which alcohol works well to clean up–it evaporates quickly enough that it isn’t as much of a problem near wiring as something like WD40 would be (which the jury seems out on using to loosen stuck sewing machines anyway). The camstack and gears that allow for the decorative stitching were bound up as well–I had to use a hair dryer multiple times to allow the warming and cooling of the metal to expand and contract the parts enough to work the oil in and loosen up everything. Now it sticks a bit from time to time, but overall it’s working wonderfully.

So that’s my current go to machine for my foray into sewing with jersey. With a ballpoint needle, it works incredibly well for this purpose. I thought I’d share some photos of mine and some of the technical information I’ve found over the years. (Apologies to the original source of the schematic–although the manual can be found on the Singer website, I’m no longer sure where the schematic is from. And the service manual was made available by Donald of Sewing Dude – his post here. His blog is very informative and very, very funny!)

singer 401a – manual

singer 401a – schematic

singer-401-service-manual from Sewing Dude blog


Free Vintage Sewing Library: Etsy Seller of Shame Edition

Brace yourself, the snarkiness is coming. As well as links to free stuff, for spite and because they’re amazing.

Soooo…I’ve been very into tailoring research lately. Cruising the web at all hours of the night for some sweet, sleek menswear resources. And I’ve found quite a few great ones on archive.org…that I see AGAIN on etsy.com marketed as the sellers’ own work. As I’ve said before and will say again, I think this is a horrible thing to do. I generally hesitate to call anyone out on this stuff because I’d hate to be wrong. BUT. Antique books are an extremely expensive hobby. I know this firsthand, because there are so, so many things I drool over and cannot afford even if I can find them. And it is virtually impossible to find enough old tailoring materials to compile a very large collection, even if I wanted to spend huge amounts of money on it. So when I see an etsy seller like HowToBooks who deals exclusively in collector’s item/antique books that are listed in ways that bury the actual title/author deep in the description (if they are stated at all) AND who sells items I have found on archive.org–seriously 95% of this seller’s dressmaking/tailoring content is listed there–I know they’re a jerk who’s just taken free materials to sell as their own. Let me elaborate:

“Design Your Own Clothes Mens TAILORING and TUXEDO PATTERNS Formal Wear Tailored Suits” by HowToBooks is actually the 1907 edition of Croonborg’s Grand Edition of Supreme System of Cutting Men’s Garments. Available completely free, here, courtesy of the good folks (likely librarians and interns who spend hours slaving over a scanner) at archive.org.

“Men’s Tailoring the Red Book for Men’s Tailoring 1917” is another Croonborg text–actually called New Supreme System for the Cutting of Men’s Garments. I know for an absolute fact this seller stole this one off of archive.org, because they include a picture of the table of contents that contains a pencil mark that is the EXACT same on the free version of the archive.org pdf available, for free, here.

This seller has a lot of great things listed in their shop. Don’t pay for them. They’re probably all available for free.

There is another etsy seller named BuriedTreasureChest that I found during my search for tailoring references that does the same shady stuff. This jerkface also sells the Red Book of Men’s Tailoring–the same Croonberg text, with the SAME PENCIL MARKINGS on the table of contents. No joke.

They also sell “Victorian Costumes Patterns Book” which is really The Diamond Garment Cutter from 1895. I know they stole it from archive.org because on the page featured on their listing, there is a penciled in “137” that is also visible on…you guessed it…the archive.org version, available free of charge in all its glory here.

This bothers me because libraries are my spiritual homeland (and that smell=heaven)  and also because I know what it’s like to spend 10 hours scanning and editing a book because you’re a design/typography/arts and crafts junkie who truly loves these books and wants to partially fund the obsession. As a matter of principle it really, REALLY bothers me when people profit off of the work of others as these sellers are doing. It also bothers me when people don’t cite their sources. It might be petty of me, but HowToBooks has about 4500 sales at current count–if each one of those is $4, then some jerkface has made about 16k, give or take, off of stolen books. Screw them. Screw them so much.

Whew. Sorry, it’s been a stressful work week.

ooftheshining

On a happier note, I’ve been hand sewing and it is the best kind of Zen medicine. At least, now that I learned to condition the thread with beeswax. I’ve been working on a wearable muslin of a vest to get a better bodice sloper. It’s actually going very well, and only needs buttonholes now. I also finished my wearable muslin / first attempt at sewing with chiffon. It’s a simple tunic type shirt with set in sleeves and a high scarf collar that ties in front, and gathered sleeves with tie closures. It fits and it has that romantic-young-man-in-a-Jane-Austen-romance look that I like so much. So that’s encouraging.


Vintage Sewing Library: Medieval Embroidery Inspirations

This is the rabbit hole I’ve been down today. Medieval blackwork embroidery:

All of the above examples are from medieval portraiture except for the photograph, which is from (here).  There is a gorgeous reproduction of the cuff above, which is from Holbein’s portrait of Jane Seymour during the Tudor era. This version was done by Alexandra Gray (more info here).

3493160_orig

I’ve found a few great sources for this on archive.org–one is a book from 1532 from Alessandro Peganino, because when I go vintage, I go VINTAGE. Here are some of the illustrations it includes:

The original book is available for free (here). I’m hoping to incorporate some of these designs as trimming details on some of my 1920s tunic attempts!

Projects for the Week: Tailoring Research and Jacket Muslin

I’ve been a Victorian sewing researching FOOL for the last week or so. (My hourly breakdown for the week at the bottom of the post bears this out.) I sewed a muslin today for my current drafting project, this 1880s pattern:

1887-young-ladys-tailor-jacket

I’m going to have to give it another couple of tries; the shoulder line is farther back than the typical center shoulder seam, and I didn’t account for that properly when I worked it up digitally. Also, when making something like this in heavier fabric the failings of my current bodice sloper become really obvious; my armhole gapes way more than I’m okay with. So back to the drawing board with this one. The plus side: my set in sleeves are getting much better! Also first time I’ve ever sewn up a two piece sleeve and I like the fit quite a bit. I wasn’t sure how this would work out without a bustle, either, but it wasn’t bad at all. Something I’ve learned about 1880s patterns–they include no seam allowances, no grain line indications and their instructions are as helpful as: “draft a concealed button fly and add buttons,” or “add facings” even though there are no pattern pieces for facings. So it’s quite a stretch for my skills. Also, pattern illustrations lie. But we all know that all too well.

I’ve been researching jackets and old school tailoring generally and thought I’d share some of my finds! My favorite things right now tend to be very fitted and formal, with a classic bodice shaping:

They also kind of look like something Tywin Lannister would wear as armor, but hey, a good fit is a good fit.

Hourly tracking:

1/2 8hrs of reading and looking up Victorian tailoring books. Archive.org is my bff. Google play has a lot of resources too, but, oddly enough, their search function is crap so you kind of have to stumble over things by looking at suggestions. Direct searching by name or author doesn’t work well at all.

1/3 10hrs of reading W. D. F. Vincent tailoring books and women’s cutting historical manuals

1/4 1hr of Pinterest surfing of vintage fashion

1/5 2hrs Pinterest surfing: Alexander McQueen, women’s tailored jackets

1/6 1hr reading Gertie Sews Vintage Casual

1/7 3hrs studying fashions, fashion history on Pinterest, drafting a pattern for a lady’s tailored jacket circa 1880s, deconstructing old clothes for raw materials

IMG_5036
Move it, kitteh, I’m trying to cut fabric!

1/8 3hrs deconstructing old clothes for raw material, pattern drafting, printing and assembling my tailored jacket pattern

IMG_5033
Be it ever so humble, I drafted it myself. 🙂

1/9 10hrs sewing a muslin of the jacket, researching fit issues, attempting a rub off duplication of a similar bodice to study the fit

IMG_5038
Kitteh stole my chair. 

For a total of: 38hrs this week, and grand total of 55h35min toward my 10000 hours!


Victoria Baylor’s 10,000 Hours of Sewing Challenge

Being a BurdaStyle lurker/sometimes student of Burda Style Academy’s video classes, Victoria Baylor’s tailoring and fit courses sparked my interest, which led me to her website, Ten Thousand Hours of Sewing. Of course I immediately fell in love with the idea of taking her challenge, which she outlines in depth:

10,000 Hour Sewing Challenge Rules

I have to do the following:

-Try to Complete a sewing project each week (2 weeks max for complicated projects.

– Devote 1000 hours a year to sewing or doing sewing related activities. This amounts to 83 hours a month or ~3 hours a day.

– Keep track of all the time I spend sewing and reading, studying, or watching sewing related materials and post it.

– Explore pattern drafting

– Explore draping

-Familiarize myself with the work of famous fashion designers.


This helps me meet related personal goals of blogging more about my learning process, and to complete more projects before my attention deficit pulls me off in some other direction. Since my sewing interests are very broad, my self-challenge is broad too–I’m including my work on the sewing machines themselves, since they’re the tools of my attempted craftsmanship. I’m also kind of lumping in my vintage book digitization efforts, since I’m getting myself elbow deep in vintage sewing wisdom on a semi daily basis.

giphy

Here is my personalized version of the challenge:

Official Start Date: 1/1/16

-complete one sewing project per week

-digitize two resources per week, whether that’s vintage fashion, sewing lessons, or vintage patterns for reproduction

-1000hrs/year or about 3 hours per day

-produce one digital pattern per week

-blog about my obsessions/progress/struggles/obscene tirades twice per week

It’s a lot. But I do a lot as it is, and this will help focus me, I think, and make me feel more accomplished about how much I’m learning (and have learned) over the last two-three years of teaching myself even if I still am not happy with my basic bodice sloper after said three years.

So here’s what I’ve been working on/reading on over the last week and a half since I started tracking my hobby time:

12/22/15 1hr working on 1904 treadle. It now sews proper stitches, adjusted shuttle tension, cleaned tension assembly. Needs to have the stitch length mechanism freed up.

12/23/15 20min studying infinity scarf construction

12/24/15 2hrs sewing infinity scarf and my scarf tie chiffon blouse project

12/25/15 2 hrs reading my Xmas gifts! The Cut of Women’s Clothing by Waugh and Vionnet by Betty Kirche (i feel so loved <3)

12/27/15 2hrs doing fashion research on blazers, waistcoats, Victorian era hoods (because I was cold when I was reading and that’s how my brain works)

12/28/15 1hr sketching and studying designs

12/30/15 1hr reading Waugh, 2hrs working on chiffon scarf tie blouse, 1hr researching wrap patterns

12/31/15 1.5hrs research on shrugs and boleros. 45min sketching and planning coat project. 3hrs designing and testing shrug pattern. Finished object: black chiffon shrug!

For a grand total of…17h 35min!

Which is pretty remarkable given that I also fell down a David Bowie rabbit hole over the holiday because I JUST found out he has a new album out this week. And as if David Bowie in his natural state wasn’t enough postmodern wonderful, here’s Michael C. Hall, performing the new single as David Bowie, before the album even comes out. (Michael C. Hall is the star of an off Broadway play cowritten by Bowie called Lazarus, a continuation of The Man Who Fell to Earth.) swoonage, all around.

Happy holidays 🙂


Weekend Project: Treadle Tune Up!

I have crafter ADD.

I am still working on the perfectly fitted yet moveable bodice/sleeve–I’m on attempt #6 in the last three weeks, I believe, and have used up all of my muslin hoard in various attempts, but will be launching into the next iteration tomorrow. I let myself do one attempt every 2-3 days lest the frustration reach throw-a-sewing-machine point. I think I’ve almost got it, though 🙂

As a respite from said frustration, and because I always visit my grandparents on the weekend, and because my grandparents aid and abet my showing machine addiction by sending me sewing machine porn pictures during their flea market outings AND allowing me to stash my overflow in their basement, I decided to finish rebelting my Singer treadle! Months ago, my grandpa and I went on an hours-long drive to pick up this Craigslist find in a very cantankerous ex-hippy older man’s basement. He became much friendlier when I made it obvious I was not out to haggle and did not want to dismantle the machine and sell it as a foo-foo shabby chic table. Nothing against shabby chic, but seeing whitewashed cast iron hurts my little bitter heart. Apparently his too. He said he had bought it decades ago and an ex girlfriend used to sew on it during the 70s, but he had never gotten around to refinishing it as he’d hoped. It was dusty and had some staining and damage to the wood surface, and the machine is varnished and the decals have some serious wear. But that’s part of its appeal. There’s an aesthetic ideal called wabi sabi in Japan that I think of with old machines and antiques–beauty in imperfection, beauty in the natural cycle of decay with time, wear from use. I’ll spare you that rant, mostly, but it’s a fascinating subject. For example:

tumblr_mkfx5d5hp91ry2m62o1_540

So anyway, my treadle. It needed a belt, and a TON of oil, and some serious scrubbing and loosening of varnished parts. Replacing a treadle belt isn’t hard, exactly–you just buy a precut length of leather belting, or measure it with a string over its path through all the turns of the flywheel and balance wheel, and then you trim it to the point that it’s got enough tension against the wheels to turn the machine, but not too tight. According to the interwebz, a slightly loose belt works better, and some people even recommend violin bow rosin to help with the grip. (This and much more wisdom on treadle tips and tricks here.) It took some fiddling to get the length just right, and my grandpa used a very small drill bit to drill a hole on either end of the belt. The edges need to be trimmed so that the two ends of the belt butt up to one another, and then you crimp the staple that usually comes with the belting shut securely by squishing it just right with a pair of pliers. Grandpa has mad skills in this department. Tricky but nothing compared to the storm of swear words that I unleash on a vintage Husqvarna. I love the simplicity of these old machines so much. There is a very Zen pleasure that comes from playing around with them–and in the treadling action itself. It takes some getting used to, since the wheel will move in either direction when you initially start to pedal and it will break your thread if it moves away from you (for a Singer treadle–White and some other models move the opposite direction, though). But using a slight turn of the handwheel with my right hand to convince it to move the right direction really helps. So does using my hand to bring the wheel to a complete stop. I’m sure it gets easier with time and practice.

ad482788-770d-4fe6-8e1a-6d042b83e3f4

All cleaned up, cast iron cleaned with a rag and sewing machine oil, etc.

76ecbd99-d0d3-464c-aaa9-8db6eb328f84 (1)

Sphinx decals. So cool! Evidently the discovery of King Tut’s tomb led to Egyptomania in fashion during the 20s.

ac604c70-1548-4a0d-b45d-244b23c237ee

My grandpa shared a big chunk of the mancave for my machinery. I think he enjoys it, too.  The treadle to the right is table only, and was a gift from some friends who wanted it to go to a nice new obsessive’s home. It was missing the front drawer and the wooden pitman rod connecting the flywheel on the base to the treadle pedal part had been broken. So after months of scouring online, I found replacements for both. Evidently the pitman rods were made in metal as well as wood–I wish there were a contemporary source for these, although I suspect someone with woodworking skills would have no problem making a new wooden one. Alas, I do not.  My grandpa repainted the legs as he remembers them from his childhood. He did a wonderful job on them!

abb54768-8a04-468c-b618-896ae99a0611

The woman who it originally belonged to apparently loved that distinctive 70s green that the drawers are painted in. I don’t, and I hope to use some Citristrip one day to remove it. My partner jokes that one day I’m going to get us haunted by messing with the wrong antique. Let’s hope it’s not by refurbishing this one.

And also…I’ve been working on the pattern for this!

1887-young-ladys-tailor-jacket

It’s from a fashion magazine during the 1880s that came with a huge pattern insert. The pattern pieces are all printed on top of one another, so I have my work cut out for me. It’s quite a tangle. But–once I get my sloper perfected; fingers crossed for try #6–I’m looking forward to attempting it!

Anyone else have any treadle experiences? I’d love to hear about them!