Sewing Machines: Slantomatic 401

I’ve been trying to rotate some of my favorite machines recently. I love my Necchi machines so much that I could sew on them forever and never feel like I was missing out on anything (is there such a thing as sewing machine monogamy?) but variety is the spice of life, they say. Also I want to use the others enough to keep them well maintained and to break some of the older ones back in to optimal performance. So I’m revisiting some of my Singer machines.

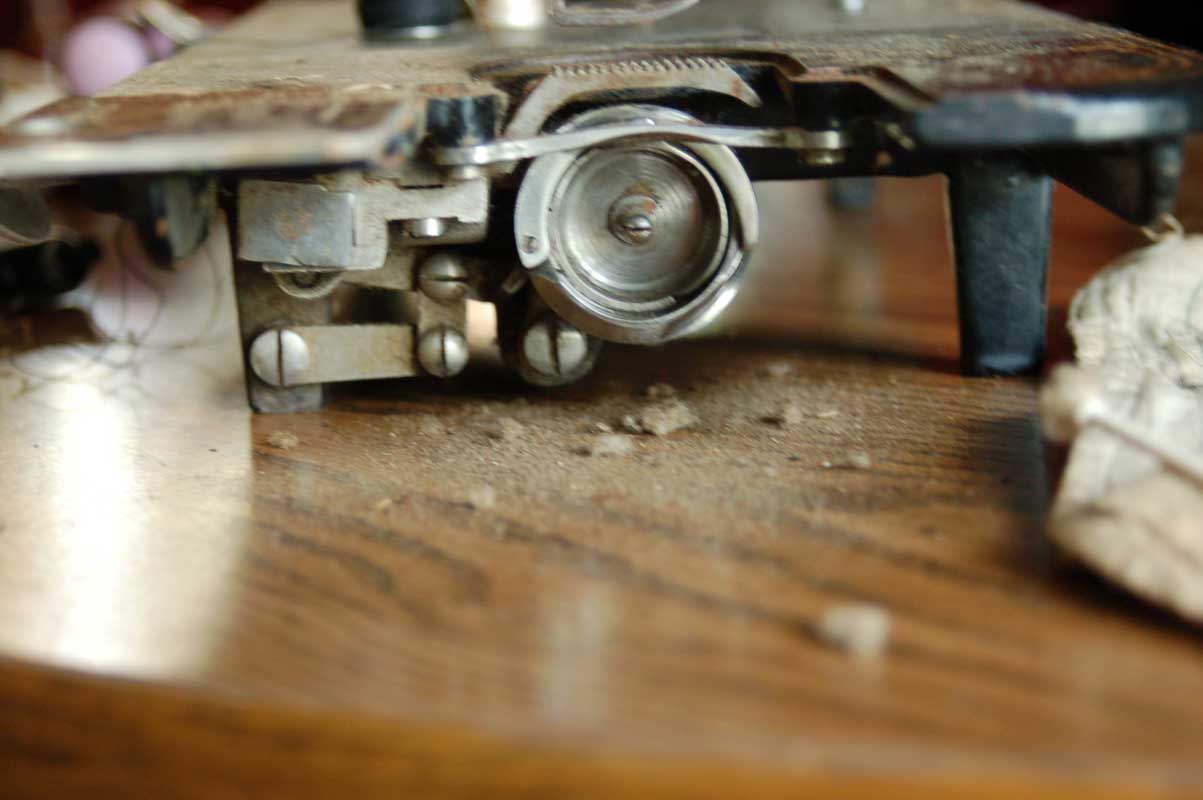
I currently have two Slantomatic 401s. One of them came to me perfectly tuned, oiled, adjusted. It was the first vintage sewing machines I purchased for myself when I began sewing regularly and the Walmart plastic Brother sewing machine just wasn’t working for me anymore. The first time I sewed with it, I was in love. Compared to the rickety, inconsistent stitch quality of the bargain basement Brother, with its dismal white lump design and utter lack of aesthetic appeal, it was heavenly. The stitches are gorgeous and the feed is so consistent that I can turn my work and sew perfectly over the stitches that came before. *swoon*

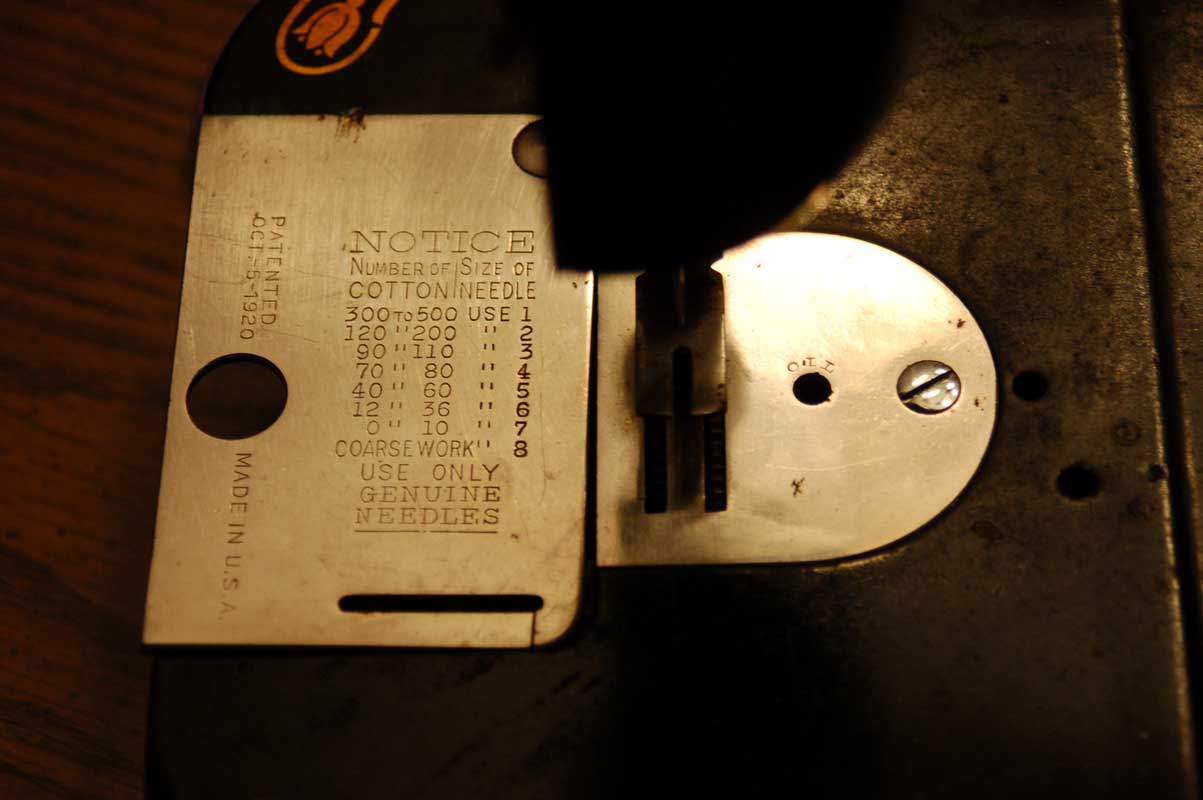
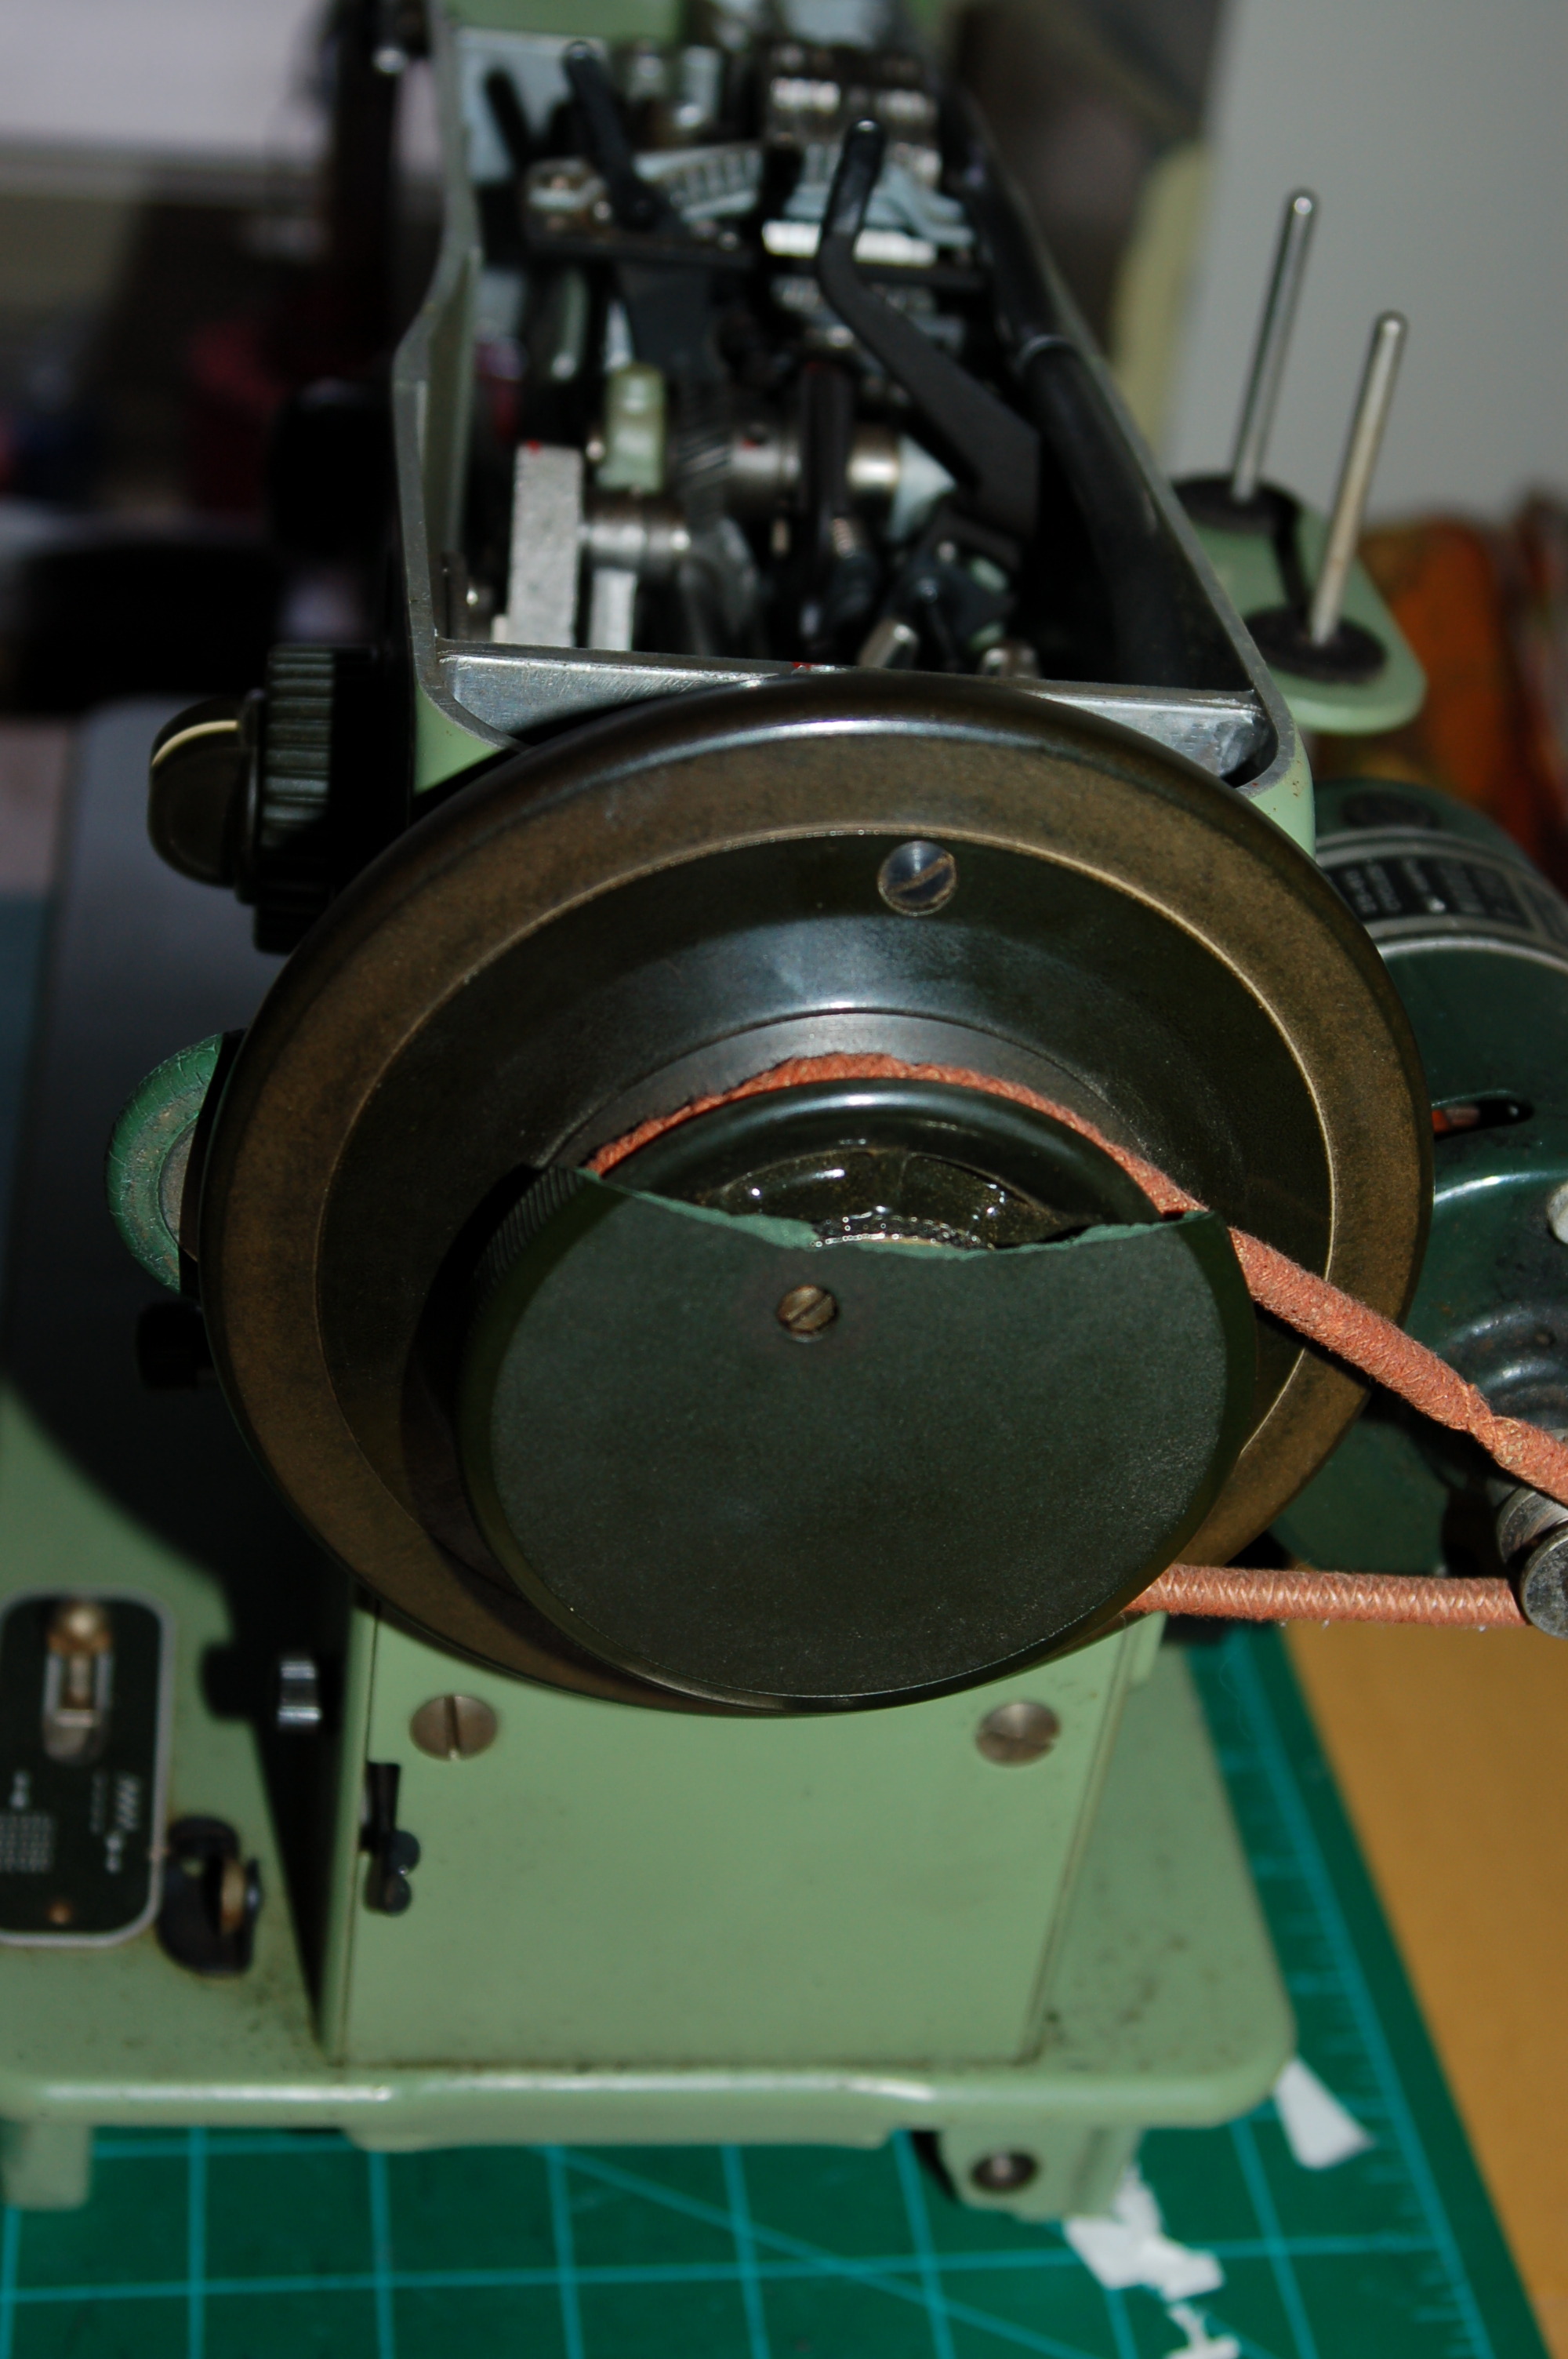
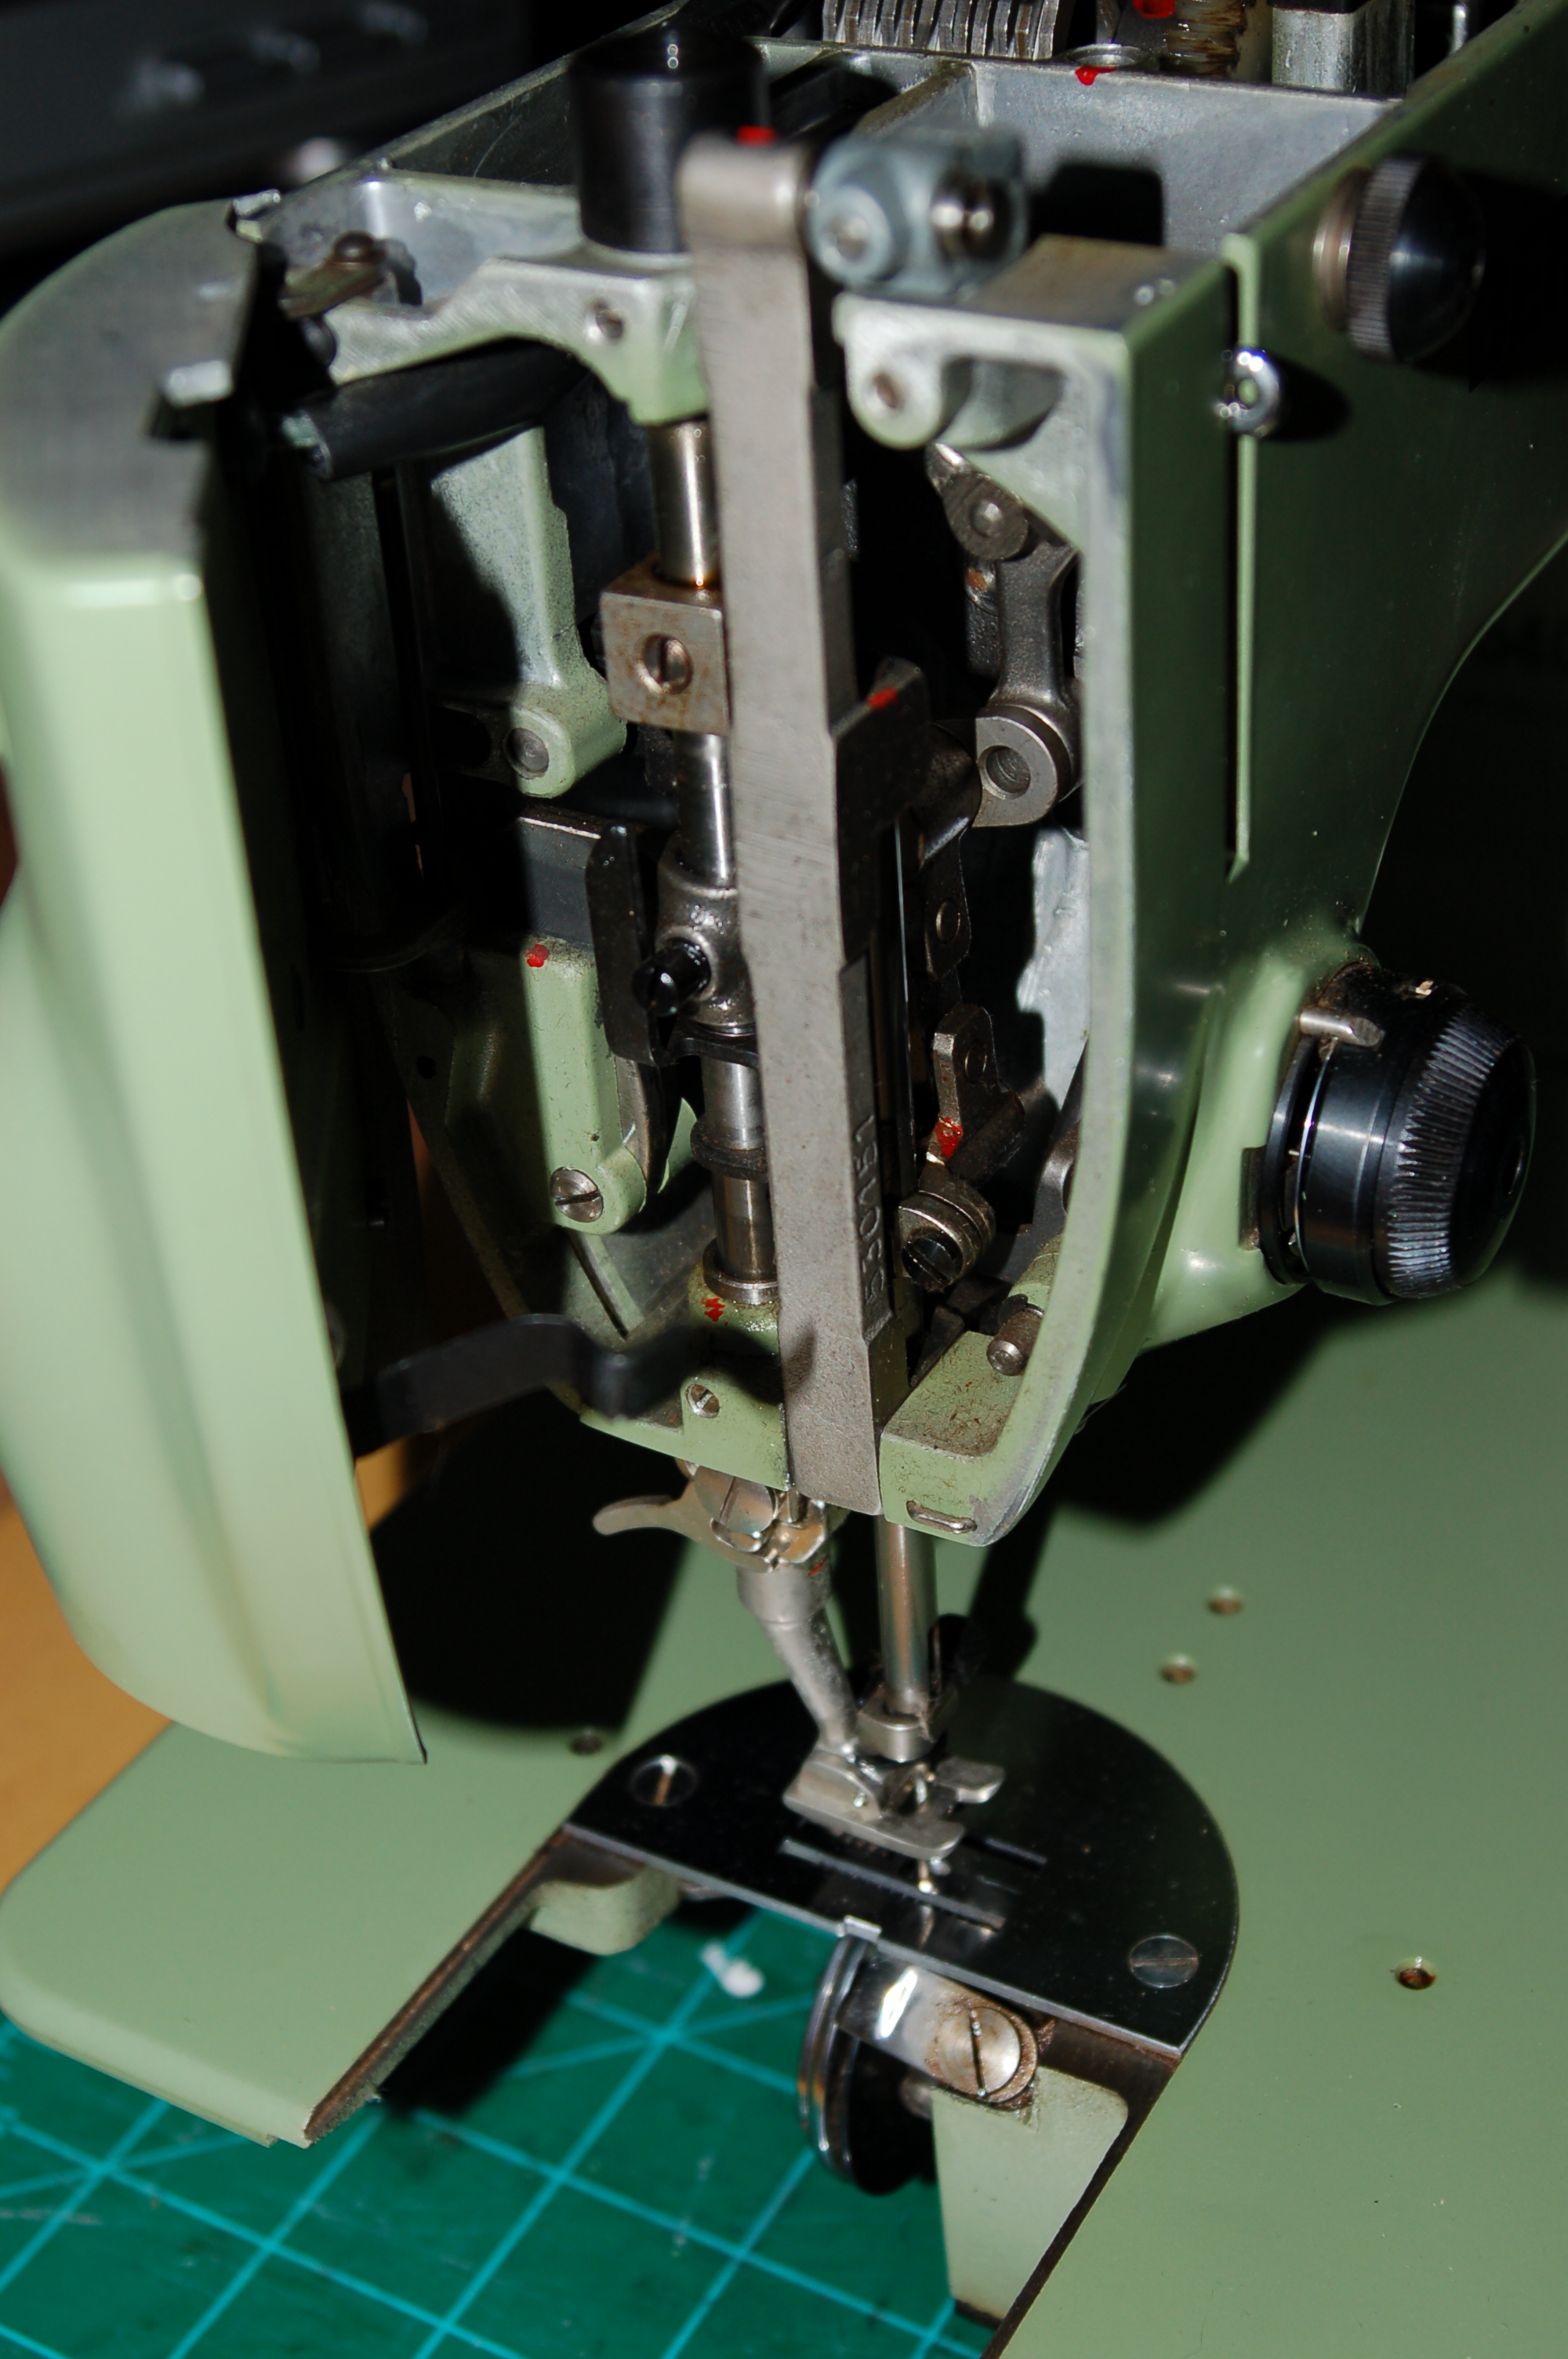
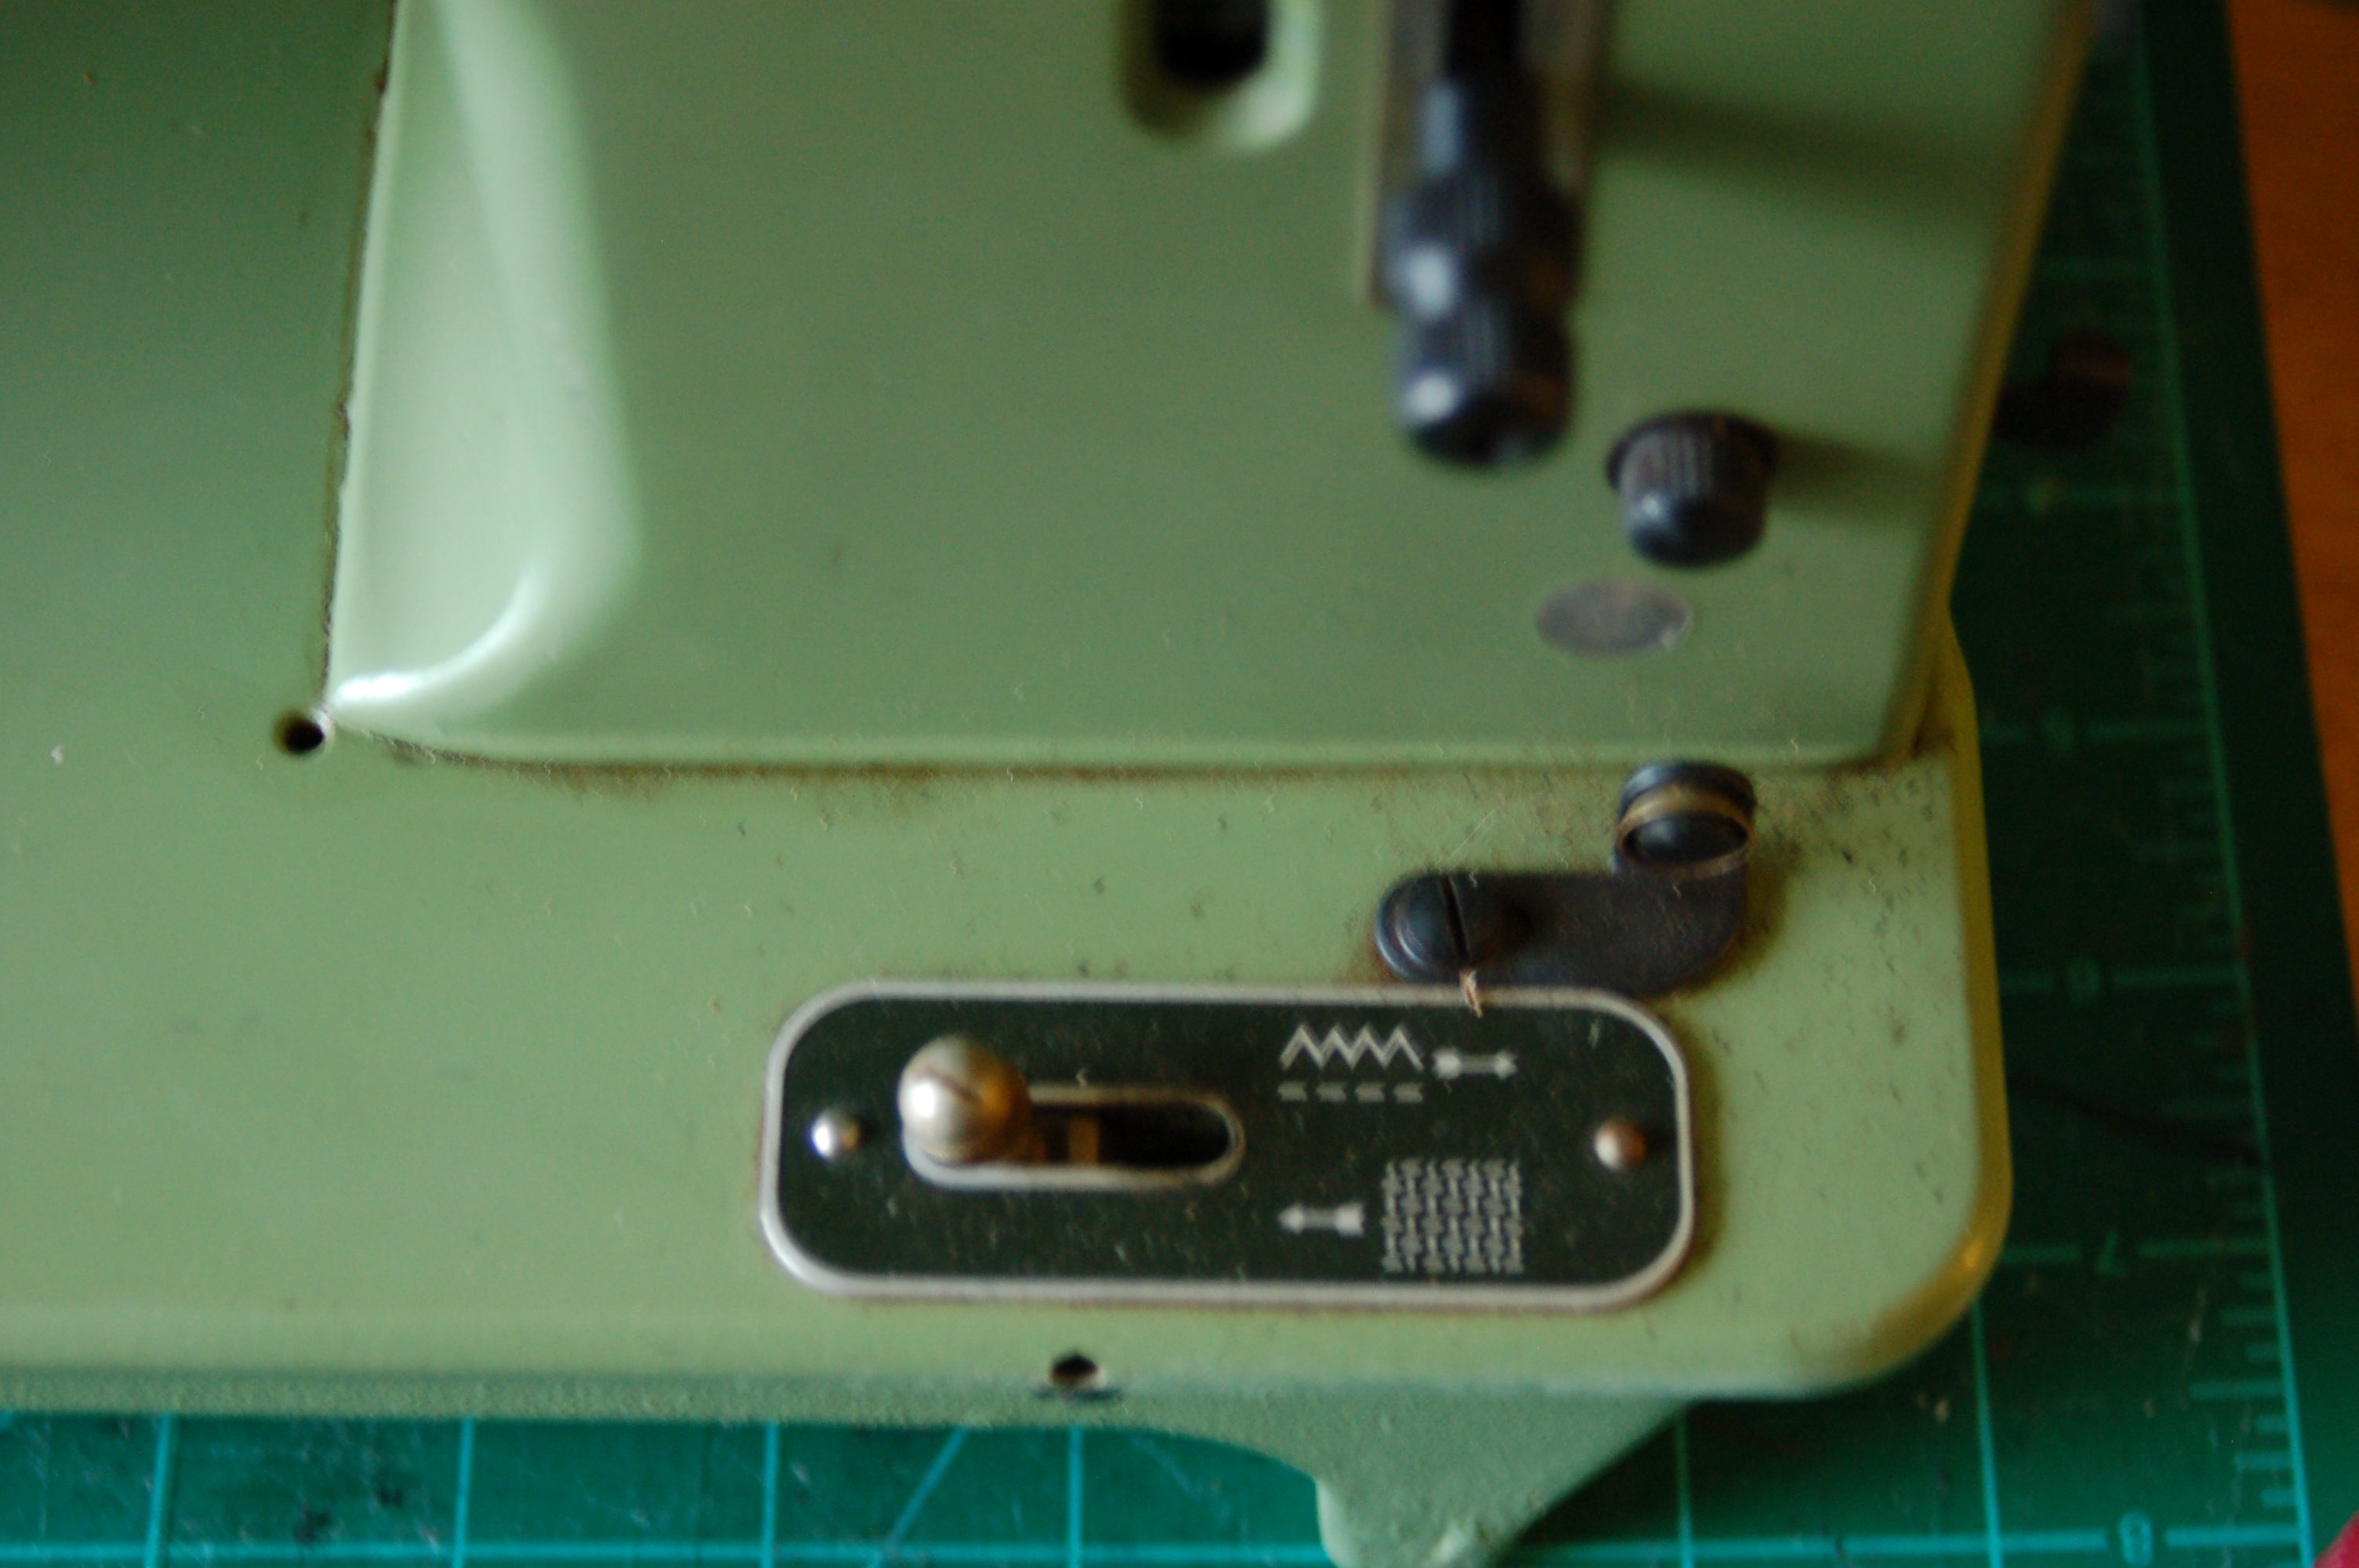
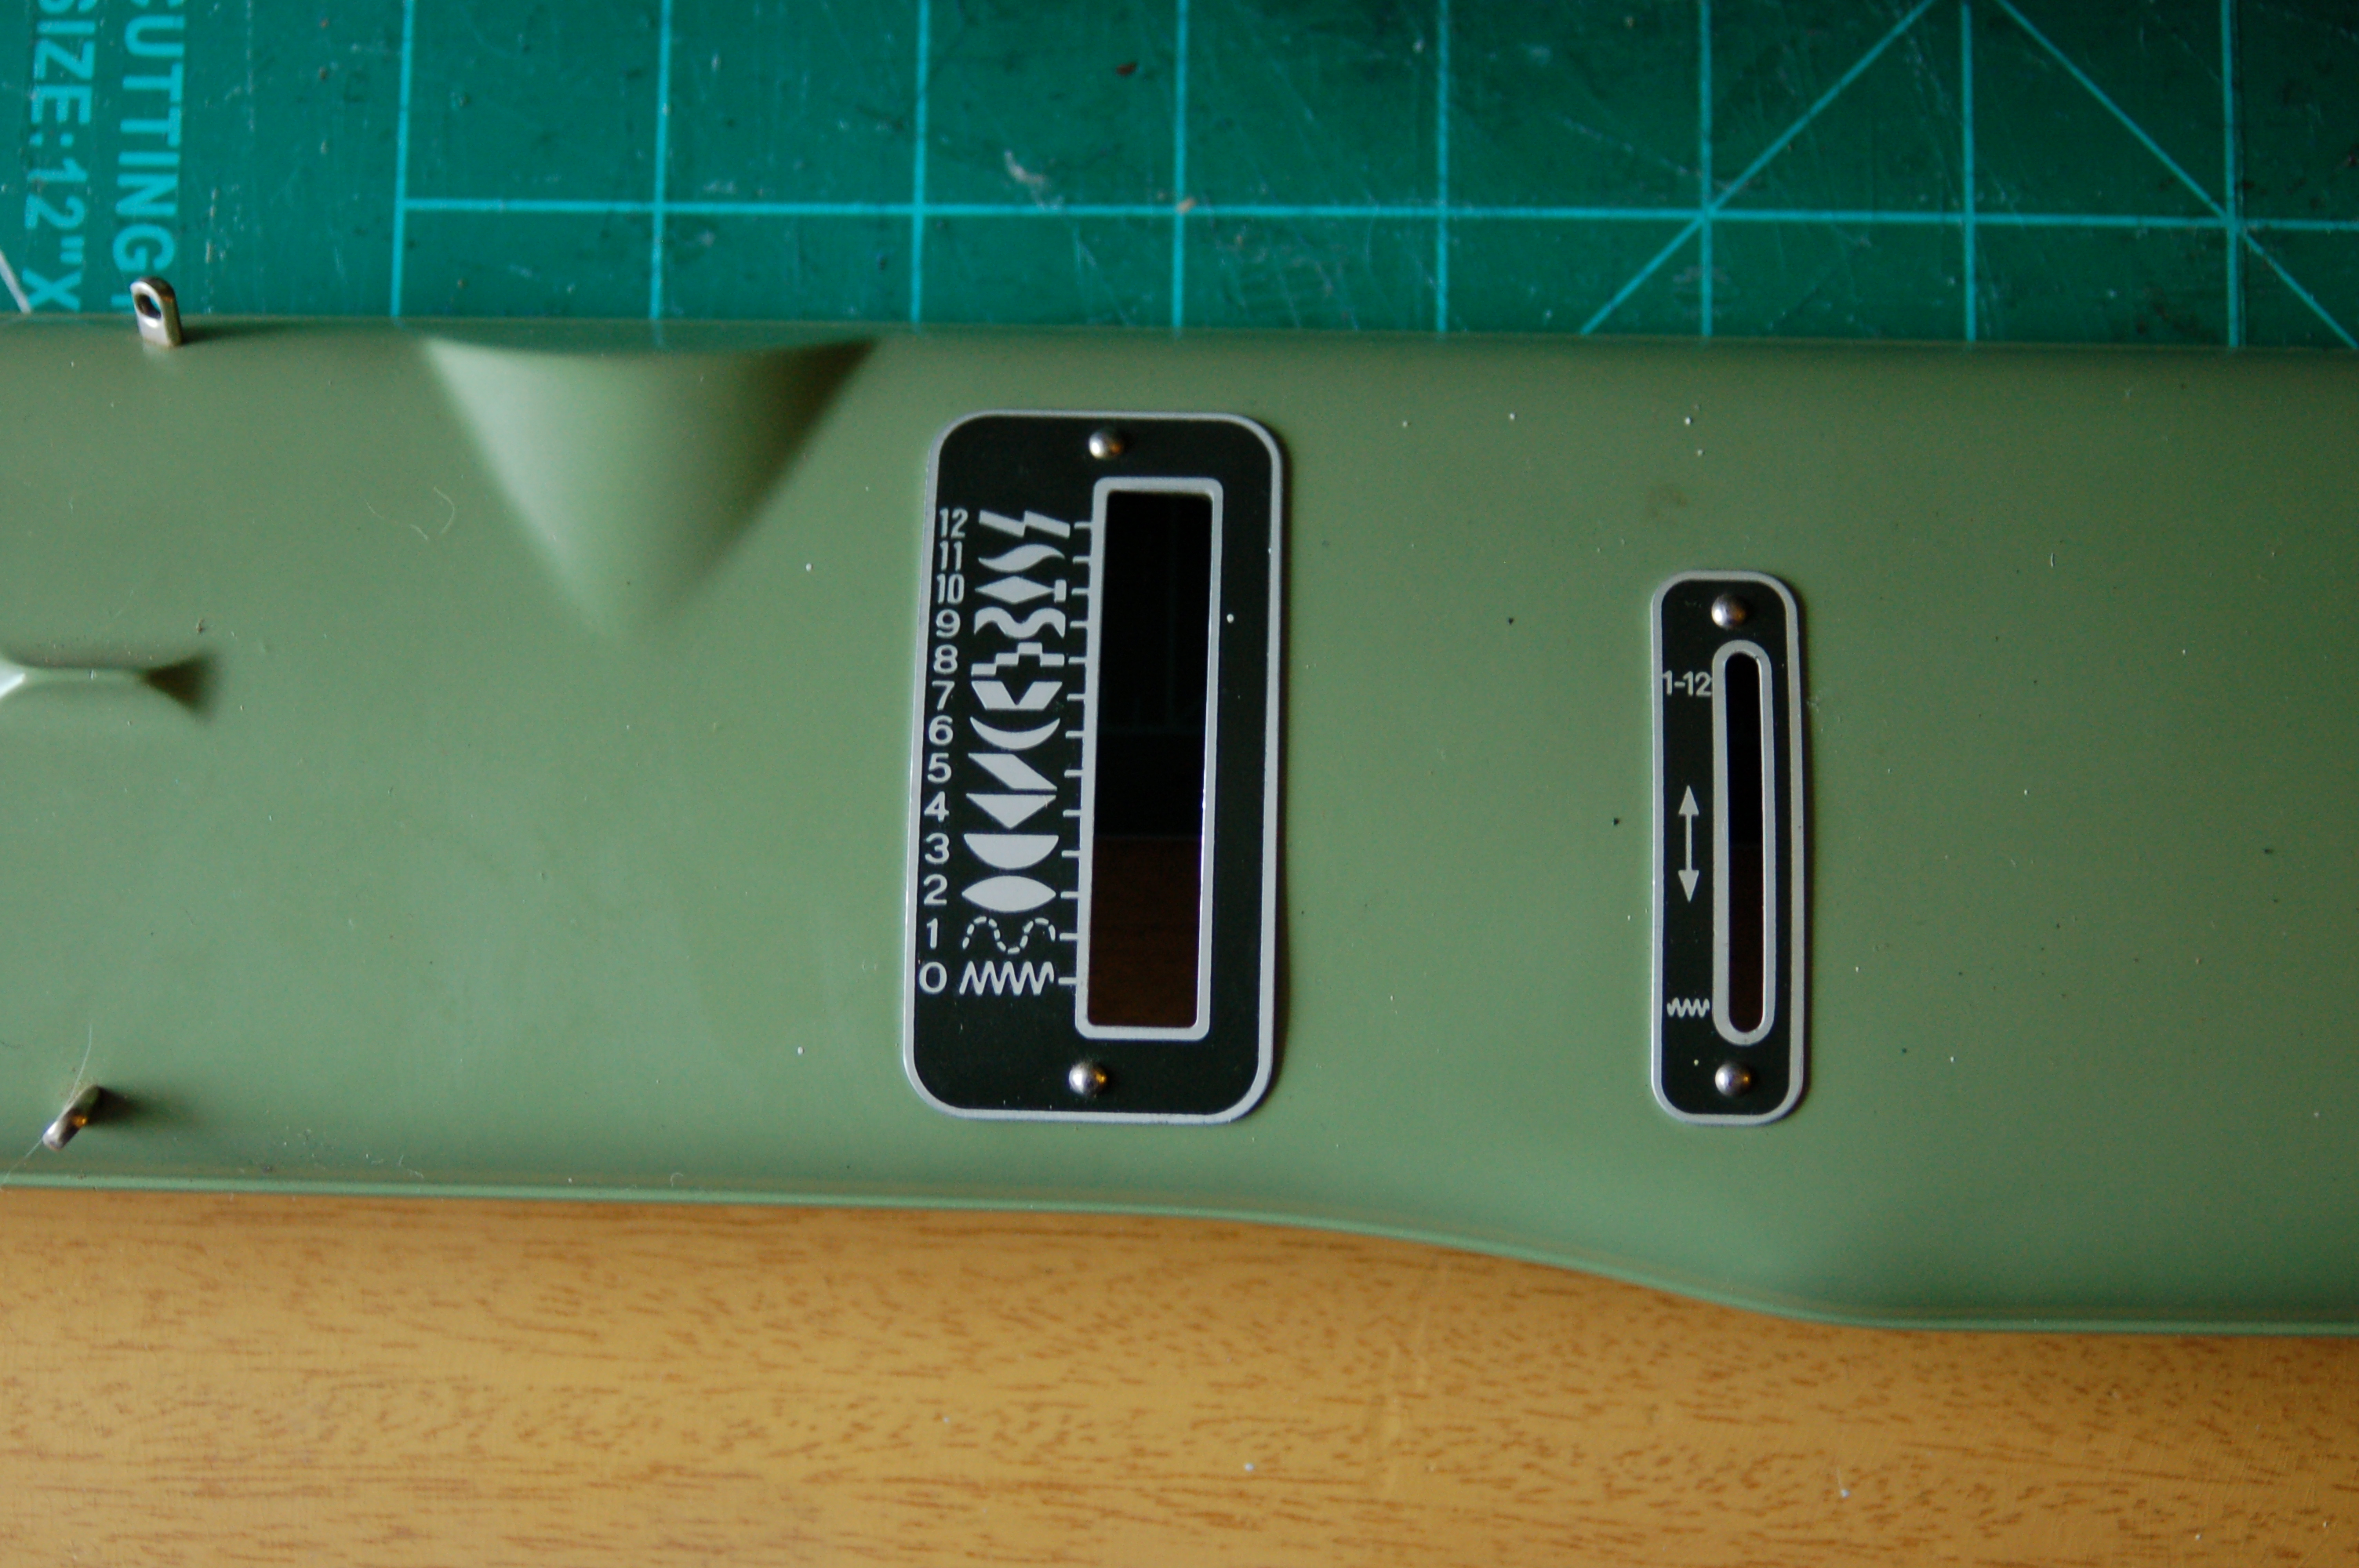
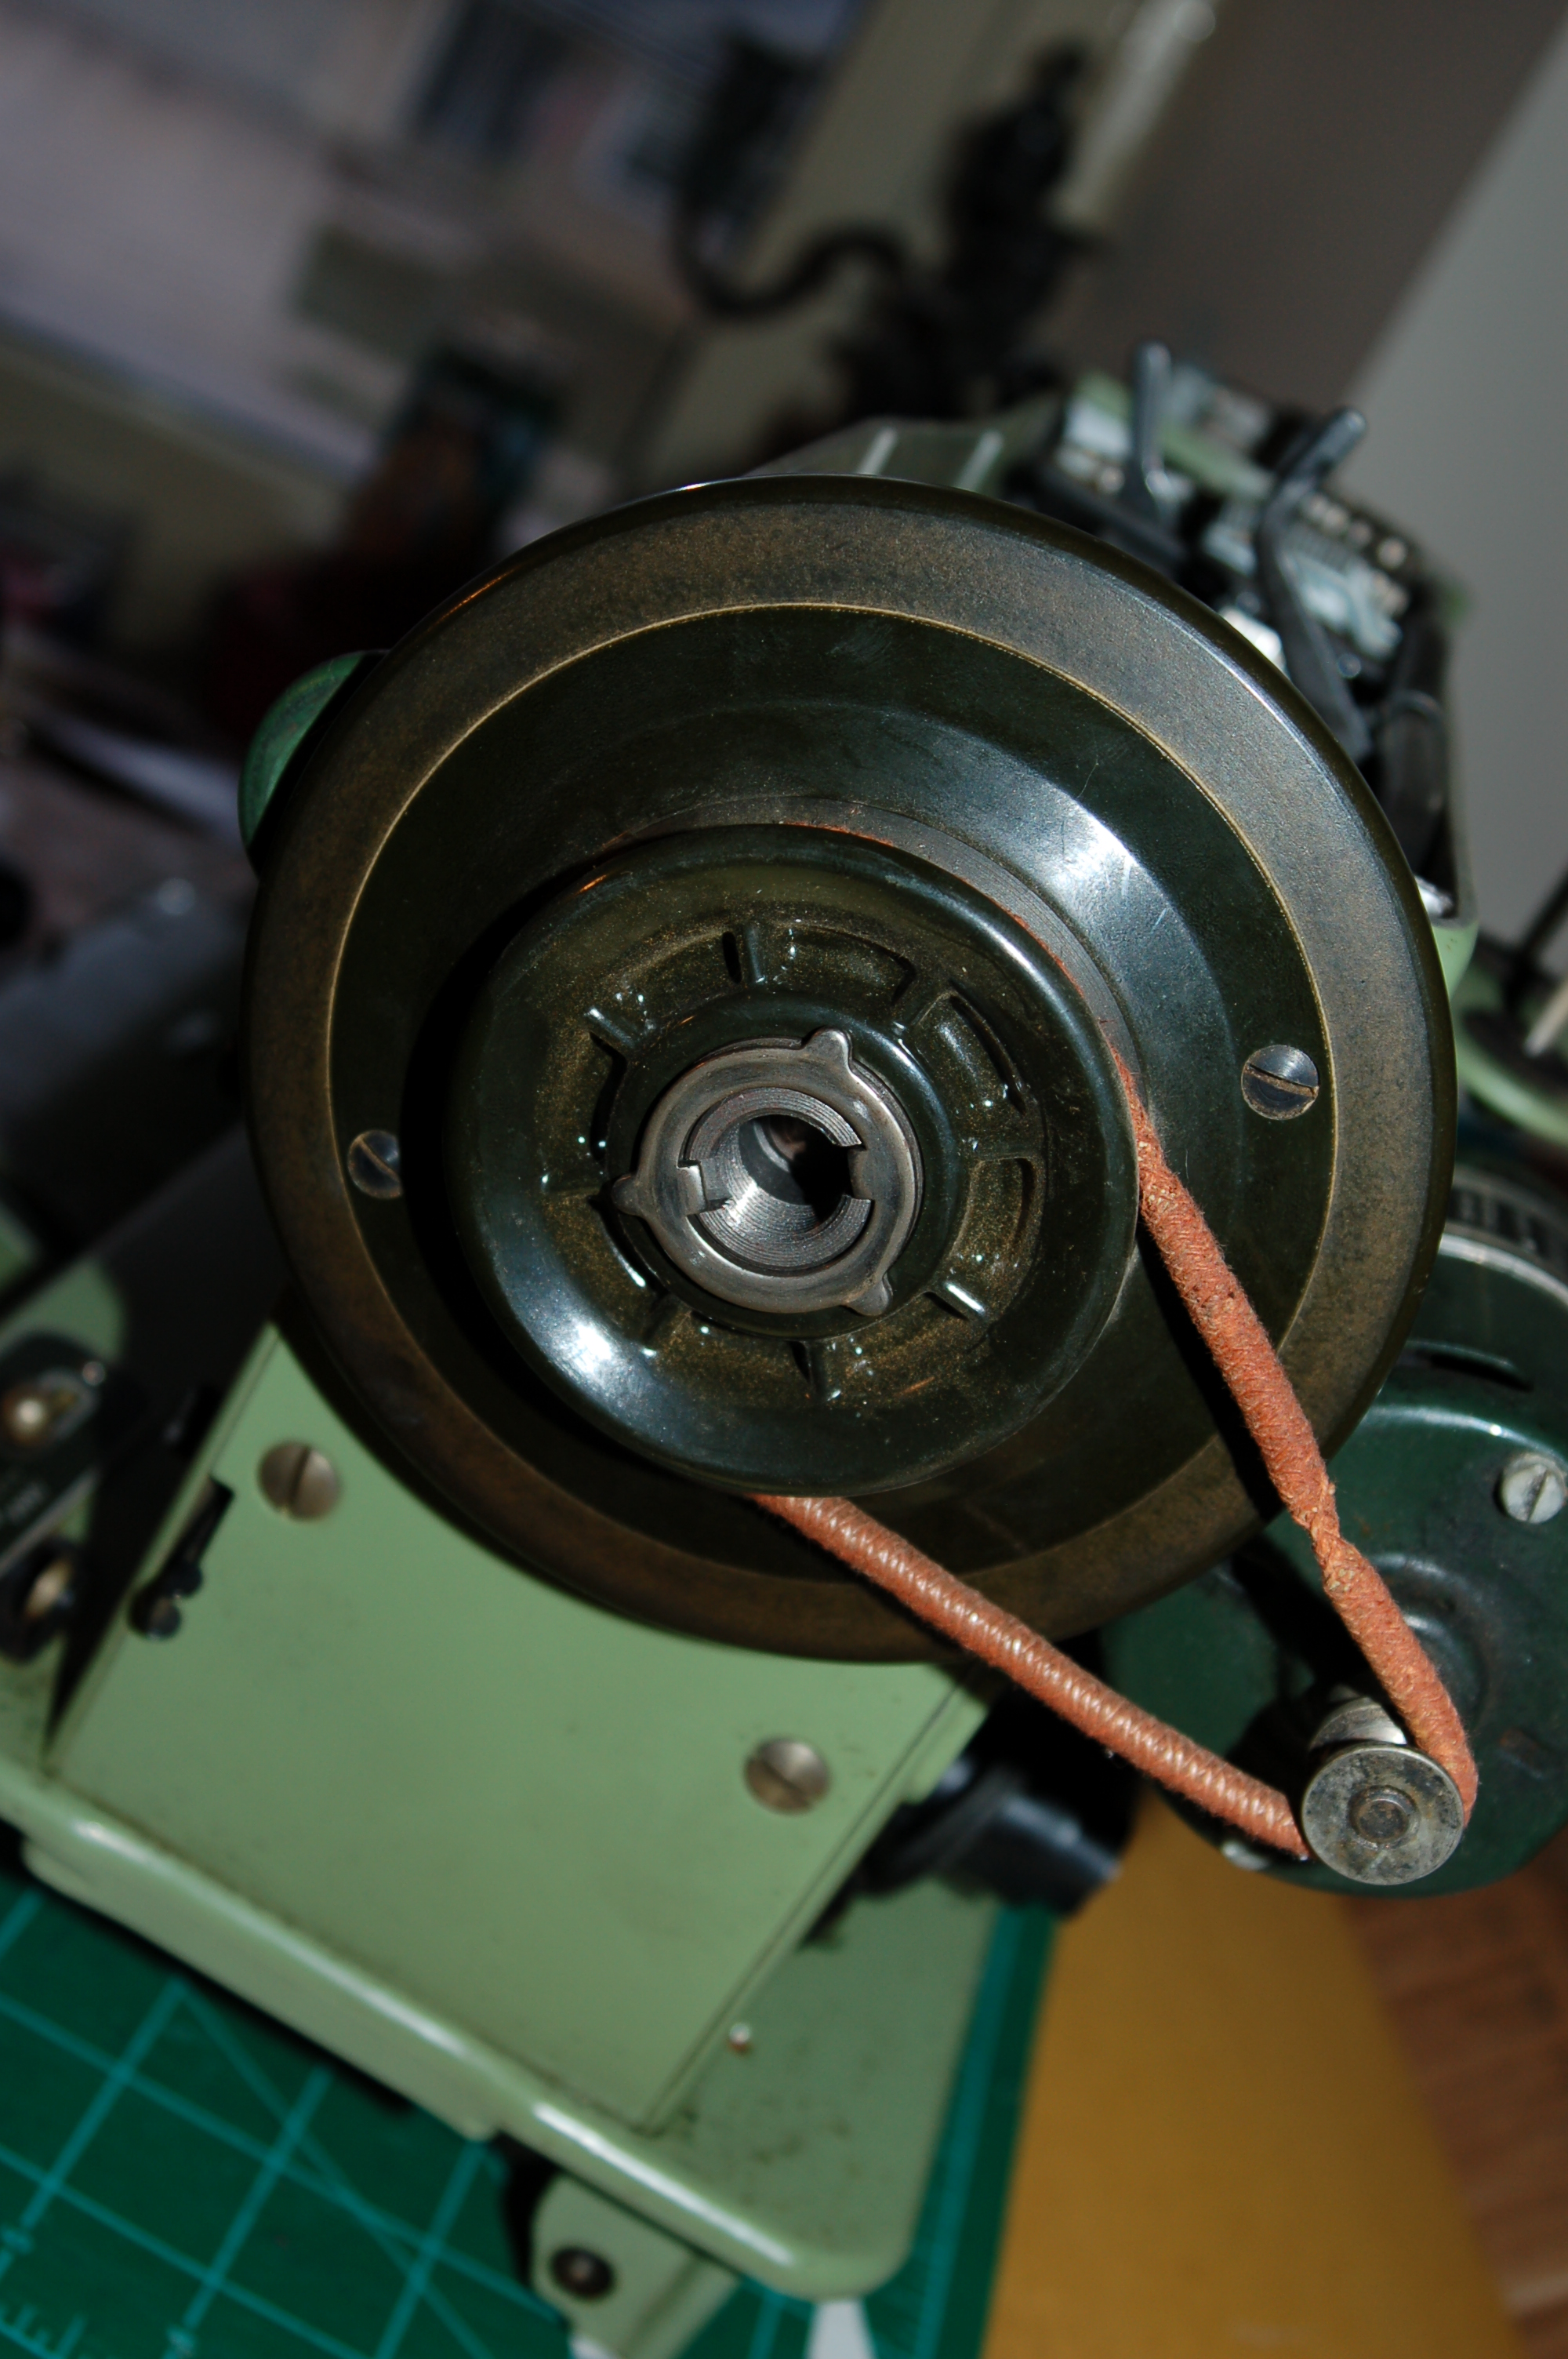
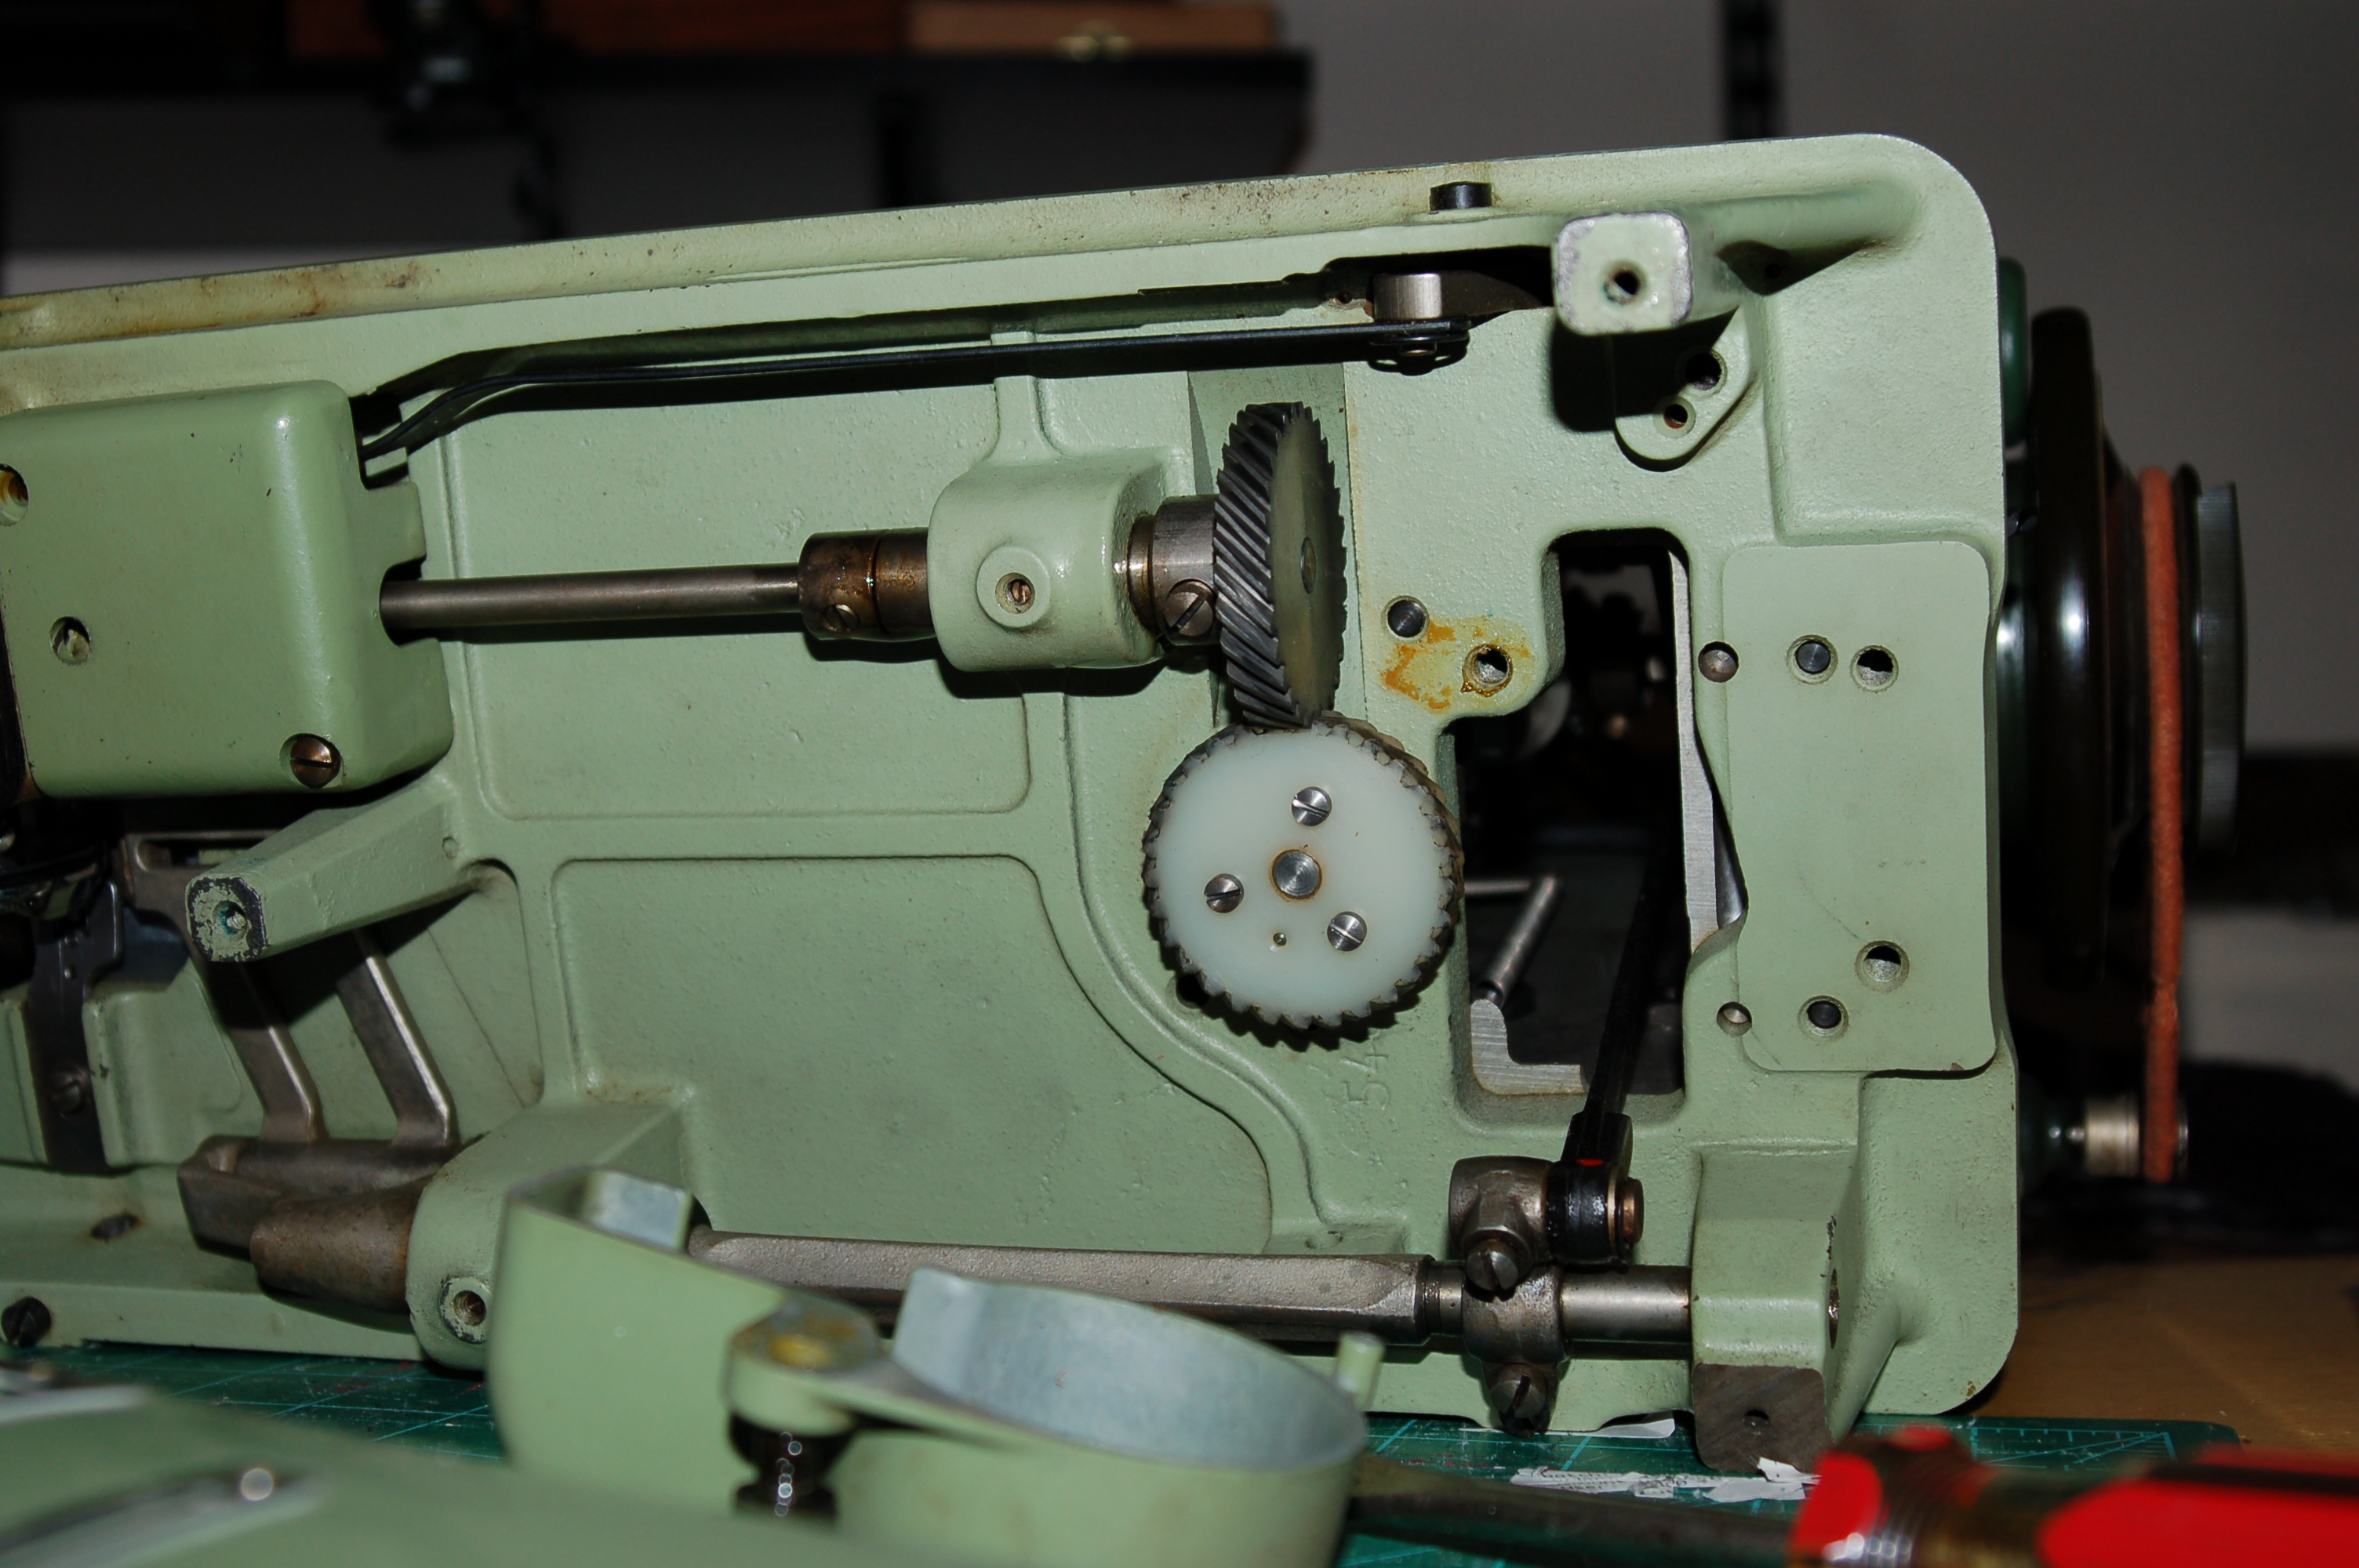
It converted me to a vintage machine enthusiast forever. It’s gear driven, which gives it a feeling of solidity and precision like nothing I’d sewn on before. Internally it’s all metal, save for one part–there is a very large, crucial gear on the handwheel that is actually textolite, a very durable plastic material. Unlike many of the plastic and nylon materials Singer used over the years, it doesn’t seem prone to breaking, thankfully. (For more info, see Old Sewing Gear’s great blog here.) It has zig zag, a blind hem stitch, and three step zig zag stitch built in, as well as a ton of other decorative stitch possibilities. The needle position is adjustable and the needle plate has measurements engraved in it, which is really helpful with seam allowances.

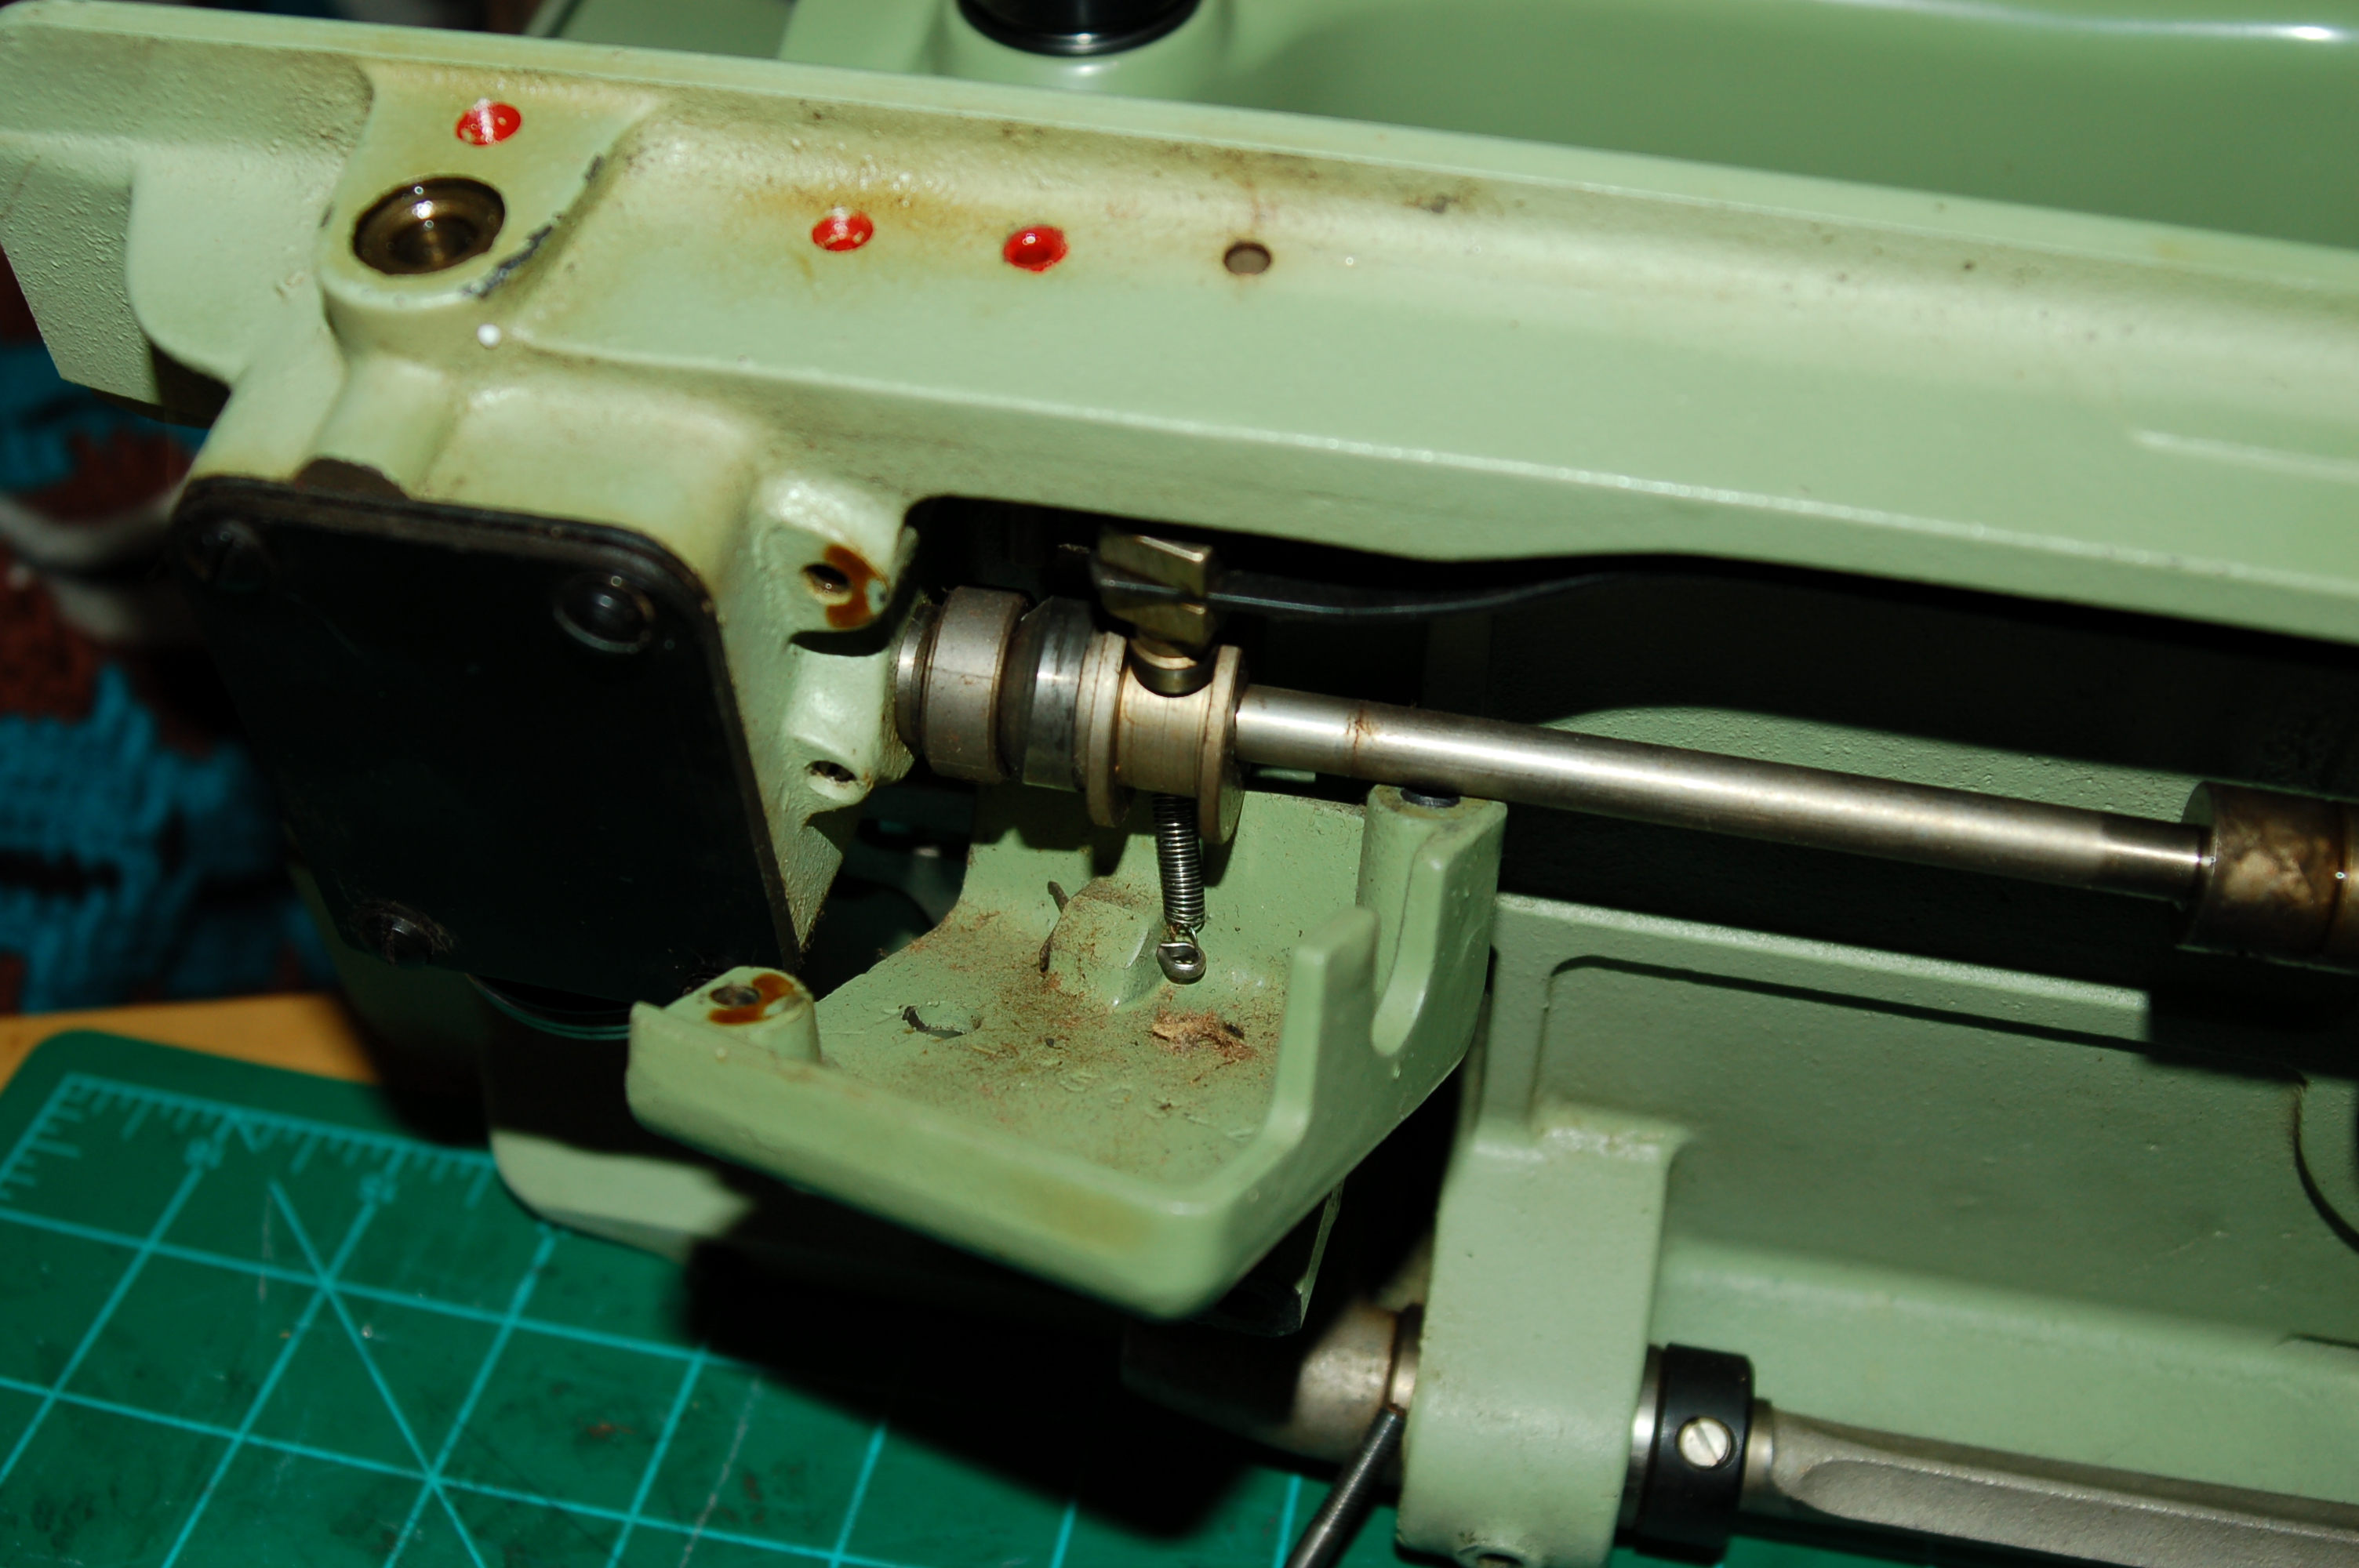
I bought another in awful shape as a clean up project. It was caked in weird greasy gunk externally, which was impossible to get off without alcohol soaked q tips. It was varnished up internally as well, which alcohol works well to clean up–it evaporates quickly enough that it isn’t as much of a problem near wiring as something like WD40 would be (which the jury seems out on using to loosen stuck sewing machines anyway). The camstack and gears that allow for the decorative stitching were bound up as well–I had to use a hair dryer multiple times to allow the warming and cooling of the metal to expand and contract the parts enough to work the oil in and loosen up everything. Now it sticks a bit from time to time, but overall it’s working wonderfully.

So that’s my current go to machine for my foray into sewing with jersey. With a ballpoint needle, it works incredibly well for this purpose. I thought I’d share some photos of mine and some of the technical information I’ve found over the years. (Apologies to the original source of the schematic–although the manual can be found on the Singer website, I’m no longer sure where the schematic is from. And the service manual was made available by Donald of Sewing Dude – his post here. His blog is very informative and very, very funny!)

singer 401a – manual

singer 401a – schematic

singer-401-service-manual from Sewing Dude blog


Weekend Project: Treadle Tune Up!

I have crafter ADD.

I am still working on the perfectly fitted yet moveable bodice/sleeve–I’m on attempt #6 in the last three weeks, I believe, and have used up all of my muslin hoard in various attempts, but will be launching into the next iteration tomorrow. I let myself do one attempt every 2-3 days lest the frustration reach throw-a-sewing-machine point. I think I’ve almost got it, though 🙂

As a respite from said frustration, and because I always visit my grandparents on the weekend, and because my grandparents aid and abet my showing machine addiction by sending me sewing machine porn pictures during their flea market outings AND allowing me to stash my overflow in their basement, I decided to finish rebelting my Singer treadle! Months ago, my grandpa and I went on an hours-long drive to pick up this Craigslist find in a very cantankerous ex-hippy older man’s basement. He became much friendlier when I made it obvious I was not out to haggle and did not want to dismantle the machine and sell it as a foo-foo shabby chic table. Nothing against shabby chic, but seeing whitewashed cast iron hurts my little bitter heart. Apparently his too. He said he had bought it decades ago and an ex girlfriend used to sew on it during the 70s, but he had never gotten around to refinishing it as he’d hoped. It was dusty and had some staining and damage to the wood surface, and the machine is varnished and the decals have some serious wear. But that’s part of its appeal. There’s an aesthetic ideal called wabi sabi in Japan that I think of with old machines and antiques–beauty in imperfection, beauty in the natural cycle of decay with time, wear from use. I’ll spare you that rant, mostly, but it’s a fascinating subject. For example:

tumblr_mkfx5d5hp91ry2m62o1_540

So anyway, my treadle. It needed a belt, and a TON of oil, and some serious scrubbing and loosening of varnished parts. Replacing a treadle belt isn’t hard, exactly–you just buy a precut length of leather belting, or measure it with a string over its path through all the turns of the flywheel and balance wheel, and then you trim it to the point that it’s got enough tension against the wheels to turn the machine, but not too tight. According to the interwebz, a slightly loose belt works better, and some people even recommend violin bow rosin to help with the grip. (This and much more wisdom on treadle tips and tricks here.) It took some fiddling to get the length just right, and my grandpa used a very small drill bit to drill a hole on either end of the belt. The edges need to be trimmed so that the two ends of the belt butt up to one another, and then you crimp the staple that usually comes with the belting shut securely by squishing it just right with a pair of pliers. Grandpa has mad skills in this department. Tricky but nothing compared to the storm of swear words that I unleash on a vintage Husqvarna. I love the simplicity of these old machines so much. There is a very Zen pleasure that comes from playing around with them–and in the treadling action itself. It takes some getting used to, since the wheel will move in either direction when you initially start to pedal and it will break your thread if it moves away from you (for a Singer treadle–White and some other models move the opposite direction, though). But using a slight turn of the handwheel with my right hand to convince it to move the right direction really helps. So does using my hand to bring the wheel to a complete stop. I’m sure it gets easier with time and practice.

ad482788-770d-4fe6-8e1a-6d042b83e3f4

All cleaned up, cast iron cleaned with a rag and sewing machine oil, etc.

76ecbd99-d0d3-464c-aaa9-8db6eb328f84 (1)

Sphinx decals. So cool! Evidently the discovery of King Tut’s tomb led to Egyptomania in fashion during the 20s.

ac604c70-1548-4a0d-b45d-244b23c237ee

My grandpa shared a big chunk of the mancave for my machinery. I think he enjoys it, too.  The treadle to the right is table only, and was a gift from some friends who wanted it to go to a nice new obsessive’s home. It was missing the front drawer and the wooden pitman rod connecting the flywheel on the base to the treadle pedal part had been broken. So after months of scouring online, I found replacements for both. Evidently the pitman rods were made in metal as well as wood–I wish there were a contemporary source for these, although I suspect someone with woodworking skills would have no problem making a new wooden one. Alas, I do not.  My grandpa repainted the legs as he remembers them from his childhood. He did a wonderful job on them!

abb54768-8a04-468c-b618-896ae99a0611

The woman who it originally belonged to apparently loved that distinctive 70s green that the drawers are painted in. I don’t, and I hope to use some Citristrip one day to remove it. My partner jokes that one day I’m going to get us haunted by messing with the wrong antique. Let’s hope it’s not by refurbishing this one.

And also…I’ve been working on the pattern for this!

1887-young-ladys-tailor-jacket

It’s from a fashion magazine during the 1880s that came with a huge pattern insert. The pattern pieces are all printed on top of one another, so I have my work cut out for me. It’s quite a tangle. But–once I get my sloper perfected; fingers crossed for try #6–I’m looking forward to attempting it!

Anyone else have any treadle experiences? I’d love to hear about them!

Sewing Machine Addiction: Improved Eldredge Rotary B

Amid the frustrations of work today, I decided to do a little sewing machine tinkering to get my zen mindfulness on. There’s something about brushing out the dust, oiling and waxing these old things that mellows me out. Industrial chemical fumes perhaps? I really should buy myself a facemask one of these days.

My project for the day was this ebay find, which of course came with a beautiful wood base that was utterly demolished in transit because people seem to forget that antique wood is fragile and sewing machines are heavy and the postal service is not big on delicate handling of the bajillions of packages it throws around each day. However, it’s still an awesome machine.

The Improved Eldredge Rotary B. (This is before I cleaned it.)

eldredgerotarybbefore It takes unusual 20×1 needles, of course, being of the era (30s?) when every sewing machine company sold needles for their machines. The needle is similar to the modern 15×1 system, though, in that it’s flattened on one side. (If I *really* wanted to, I could probably put a standard needle in but not push it all the way up into place and make it work, though it wouldn’t be as stable as it should.)

chicagopostplug

It has a friction drive motor, which isn’t all that unusual (some other machines like Whites and mid-century Elnas have these too) but it’s actually built or snugly wedged into the body rather than mounted on it. So far I can’t see any way to remove it. It also has the unusual Chicago post electrical set up. The foot pedal and sketchy cord that go with it were also demolished during shipping, not that I’d have trusted them anyway. But that will be a scary rewiring job, if I try it at all, because I’m very newb at electrical systems and the Chicago ones aren’t polarized and I don’t yet know what that means for rewiring a machine. (And this machine wasn’t intended as a workhorse so I don’t have to have it running to enjoy it, exactly; I bought it because of the art deco styling and its idiosyncracies.)

It was so, so, so dirty.

bobbincasebobbin holymessbatman
spoolpindirty

But it cleans up nicely!

spoolpin needlethreadguide decal afterstitches

The threading is unique. I have another older Eldredge and both have more steps than most to thread them, but once threaded correctly the stitch was very nice and even, especially since I was turning the machine by hand. The stitches have an interesting antiqued look because of the dirty, probably 60+ year old thread in the bobbin and the tarnish on the presser foot. There’s something about that patina of age I like–I’m not as intrigued by machines that look new as I am by machines that have a history to them. (Same thing with faces, oddly enough–the older I get the more bored I become with straightforward beauty. It seems so blank, so simplistic; I enjoy looking at faces with more of a story told in them. Interesting how one’s ideals about beauty and aesthetic appeal change over time.)

This blog post (here) links to a complete manual (bless you, Anne Graham, for posting it because I’d have never threaded it otherwise.) And it also links to a source for needles, bobbins and bobbin cases (here), which is incredibly helpful for machines this old and scarce.

So for a clean and oil job, I’m pretty happy, but there is still some tightness I’d like to work out, and this plug/wiring system is a problem to puzzle over too…

Sewing Machine Problems: Bernina Favorit Edition

Despair, today thy name is Bernina. *sob*

My 740 has a cracked vertical gear. It was fine just days ago. Totally fine. I have no idea how it broke since I’ve hardly used this machine, but I noticed it today turning over the balance wheel by hand. It’s a slight catch, like when thread is beginning to jam or there’s some issue with a bobbin. It took me a few minutes to realize that the vertical gear in the Bernina was cracked completely through. There’s a gap in the teeth, and when the teeth of the other gear get misaligned because of it, that’s when there feels like there’s a catch in the machine.

On the plus side, I might be able to fix it. Eventually. I’m signed up for Ray White’s super legendary awesomeness SEWING MACHINE REPAIR CLASS next month. I had no idea the White Sewing Center is but a two hour drive from my humble abode so I will be revisiting my former life as a commuting student and driving back and forth for the three glorious 8 hour days with fellow obsessives. I am beyond excited about it. I only signed up for the basic class, which likely will not cover the mad drama and heartbreak of taking apart a machine to replace a gear, but it will definitely teach me enough about the interconnected systems of the machine to be able to adjust the timing and any other things I might mess up in the process. I don’t want to undertake this repair till after the class, but when I do, I will be documenting it extensively (because abandon all hope, ye who attempt to dismantle any part of a sewing machine without photographic help retracing your steps) and will share my progress.

I was considering selling the 740 in order to make room in the collection for a machine I *thought* was too good to be true–a Bernina 540 in exquisite shape complete with table and a dazzling array of vintage accessories. “Sews great.” they said. “Should be in a sewing machine museum,” they said. Should be in the ever growing museum of stupid mistakes I’ve made re: sewing machine purchases. When I received it, it was frozen. A few hours and some TriFlow and some BlueCreeper and some Singer lubricant and a whole lot of f-bombs later and it sort of turns, but something is still so bound that the entire machine sort of heaves forward at a certain point in the rotation of the handwheel. The motor turns but only while emitting a banshee-like screech and of course it doesn’t actually engage the machine because the belt is completely disintegrated and I don’t have a replacement that fits it. The seller was super nice and most likely shipped it at a loss, so I feel almost bad for him–I don’t think I was deliberately misled but think the seller doesn’t sew and doesn’t know the first thing about it. Like that the machine actually needs to turn. *sob*

Since there’s jack crap on the internet as far as in depth information on the favorit, I took some photos of the 540 as I tried to nurse the ol’ girl back to functionality:

A view from above. The silver toothed gears are the decorative stitch cams; my lever is frozen at the moment so even if the machine ran, not usable. Visible close to them is the dirty looking white-ish gear–it’s one of three or so that is nylon/silicon/some kind of mystery crap sixties plastic prone to breaking. I do love that the oil points are clearly marked in red.

DSC_5032

Another top view. Under the main shaft is the vertical gear (I think), another plastic gear. This is what cracked in my 740. It’s interesting that the needle position selector in this one is a wider pin and moves very freely; this is bound up on some of my other Berninas and not TriFlow nor BlueCreeper nor sailor names has pried it loose yet.

DSC_5033

Oh, look, my cracked hand wheel. No one knows how to pack sewing machines except sewing machine obsessives. It’s sad. I’m not even mad about it, because luckily there is a metal core like a common metal stop motion knob which will keep it functional even if all the plastic crumbles away. Behold the disintegrating belt. It feels like a cloth covered elastic hair tie, which is interesting and a bit different than the other belts I’ve seen on machines of the era..

DSC_5035

DSC_5036

Front view. Cosmetically, she ain’t bad. I like the avocado green, though, because I’m stylistically perverse like that.

DSC_5037

DSC_5038

Interesting details that differ significantly from the Records and other Berninas I’ve seen. No buttonholer lever, but a toothed setup instead.

DSC_5040

DSC_5041

The decorative stitches it can do. Theoretically.

DSC_5042

The back view, where the dust is a bit more obvious. It has a three pin connector power cord/speed control pedal. I have a flatbed Husqvarna and a Pfaff 130 that use this same somewhat uncommon setup. It took me forever to find a cord that would fit this shape.

DSC_5044

DSC_5045

Underside. The machine looked pretty clean so I was surprised to find it so bound up, but it was dry as a bone and so dusty. The Favorit models I’ve seen all have these covers on the underside obscuring the gears. I’m not sure if it’s because the Favorit hook system is supposed to be faster and more heavy duty than other Berninas and they felt a need to have an extra protective layer over them, or if these are more like oil pans, or what exactly. But the black cover houses the hook gears which are metal on metal and need lubricant.

DSC_5046

I removed the stop motion knob and the balance wheel and oiled the main shaft here. The clutch washer and stop motion knob work just like a typical Singer’s.

DSC_5048

DSC_5050

DSC_5051

DSC_5052

Here’s the hook gear.

DSC_5055

Here’s the third nylon/plastic gear with its cover removed.

DSC_5056

The middle cover removed. Not a gear, but grooved metal parts that move against each other. Not sure why this cover is held on with a spring, either.

DSC_5057

DSC_5058

So ends the tour. We’ll see what the BlueCreeper does overnight. The Necchi facebook folks turned me on to the wonders of this penetrating lubricant. I wouldn’t use it for oiling a sewing machine but it’s great at breaking loose stuck parts–apparently it’s used heavily in the logging industry to loosen rusted screws and a billion other things. I have been very impressed by its ability to un-stick what TriFlow couldn’t on another machine. It seems to need a few hours to really get in to all the cracks, so we’ll see how it works tomorrow.

Today was not a good day for hoarding.